


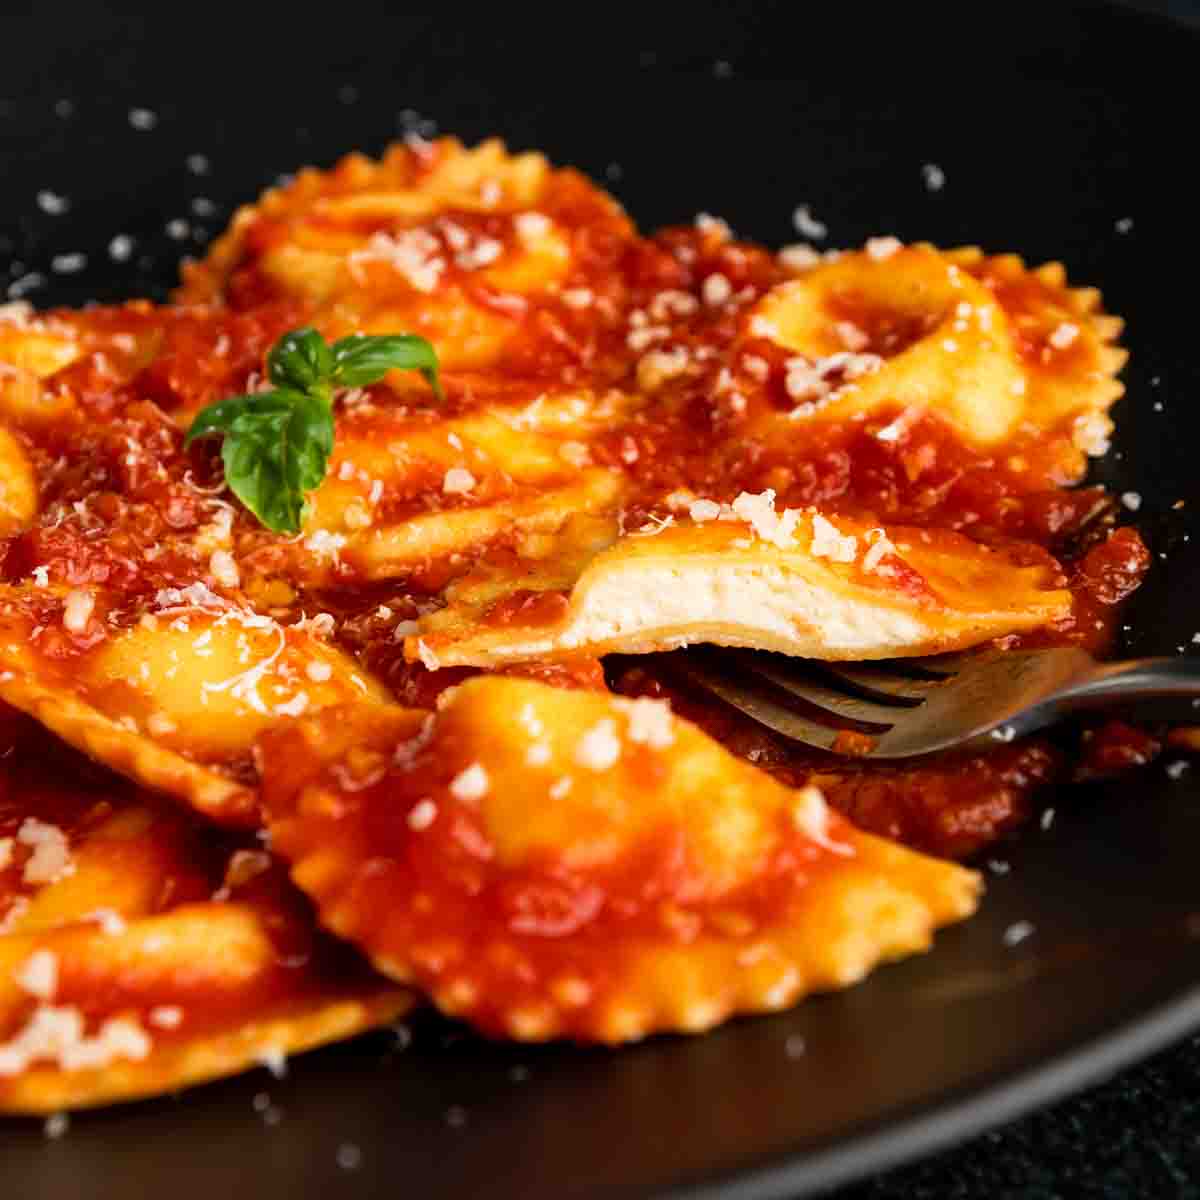
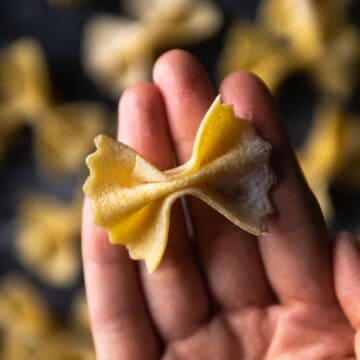
There is nothing better than homemade Italian ravioli! Silky sheets of fresh pasta enveloping all the cheesy, meaty, or pureed vegetable deliciousness? I mean, come on!
This tutorial will include our favorite homemade pasta recipe and demonstrate five easy ways to make fresh ravioli at home!
Jump to:
- Perfect Parcels of Pasta
- Homemade Pasta Dough
- Equipment Needed
- How To Make Ravioli By Hand (5 Ways!)
- Method #1: Ravioli Maker (Ravioli Mold)
- Method #2: Ravioli Stamps
- Method #3: Hand-Cut Ravioli
- Method #4: The Fold and Seal Method (Wonton Wrapper Method)
- Method #5: The Dowel Method
- Tips for Making Filled Pastas
- Drying Fresh Filled Pasta
- Can This Recipe Be Stored For Later?
- How To Cook Fresh Ravioli
- Serving Suggestions
- More Homemade Pasta Making Tutorials
- Recipe
- Comments
Perfect Parcels of Pasta
Making Italian ravioli at home can seem a bit intimidating but, fear not! With this recipe, a few tips and a little practice, you'll be cranking out fresh ravioli in no time at all!
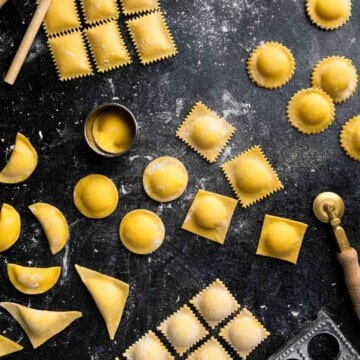
This guide demonstrates five methods for making ravioli at home. So, no matter what your skill level is - you'll be able to have freshly filled pasta on your dinner table TONIGHT!
Homemade Pasta Dough
The key to making ravioli that won't tear, break or burst is a phenomenal tried-and-true pasta dough recipe. Our homemade semolina pasta recipe is included in the recipe card below. It's a multi-purpose pasta dough that is perfect for making pasta of all shapes and sizes.
Our pasta recipe makes a silky egg and semolina dough that is richly flavored, easy to work with and resilient to shaping, cooking and saucing. If you have never made homemade pasta before, I recommend checking out my full Homemade Semolina Pasta Dough blog post for all my tips, tricks and detailed guidance.
Do I Need Fresh Pasta To Make Ravioli?
No! While I highly recommend making fresh pasta (it's easier than you think!), you don't have to. If you would like to make ravioli from pre-made wonton wrappers that's totally okay! Go ahead and skip to the Fold and Seal Method. 🙂
Equipment Needed
Some simple hand tools and equipment is needed to make homemade Italian ravioli.
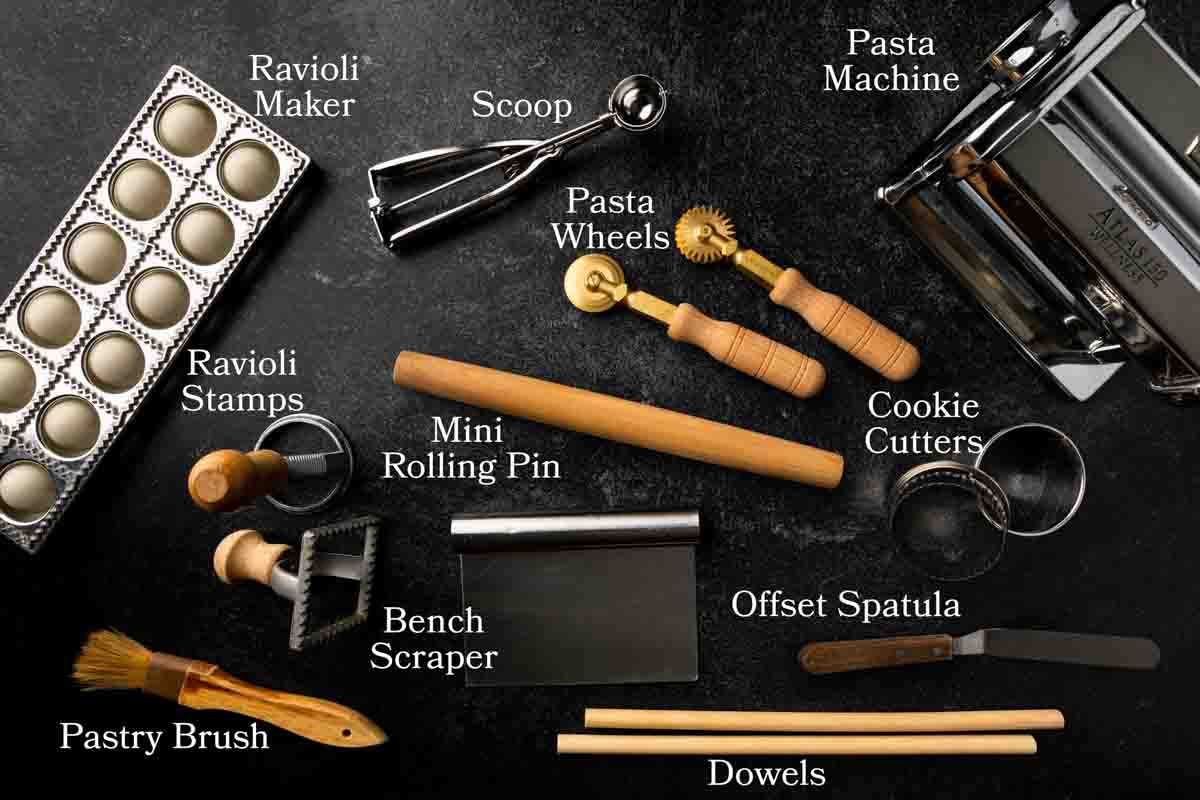
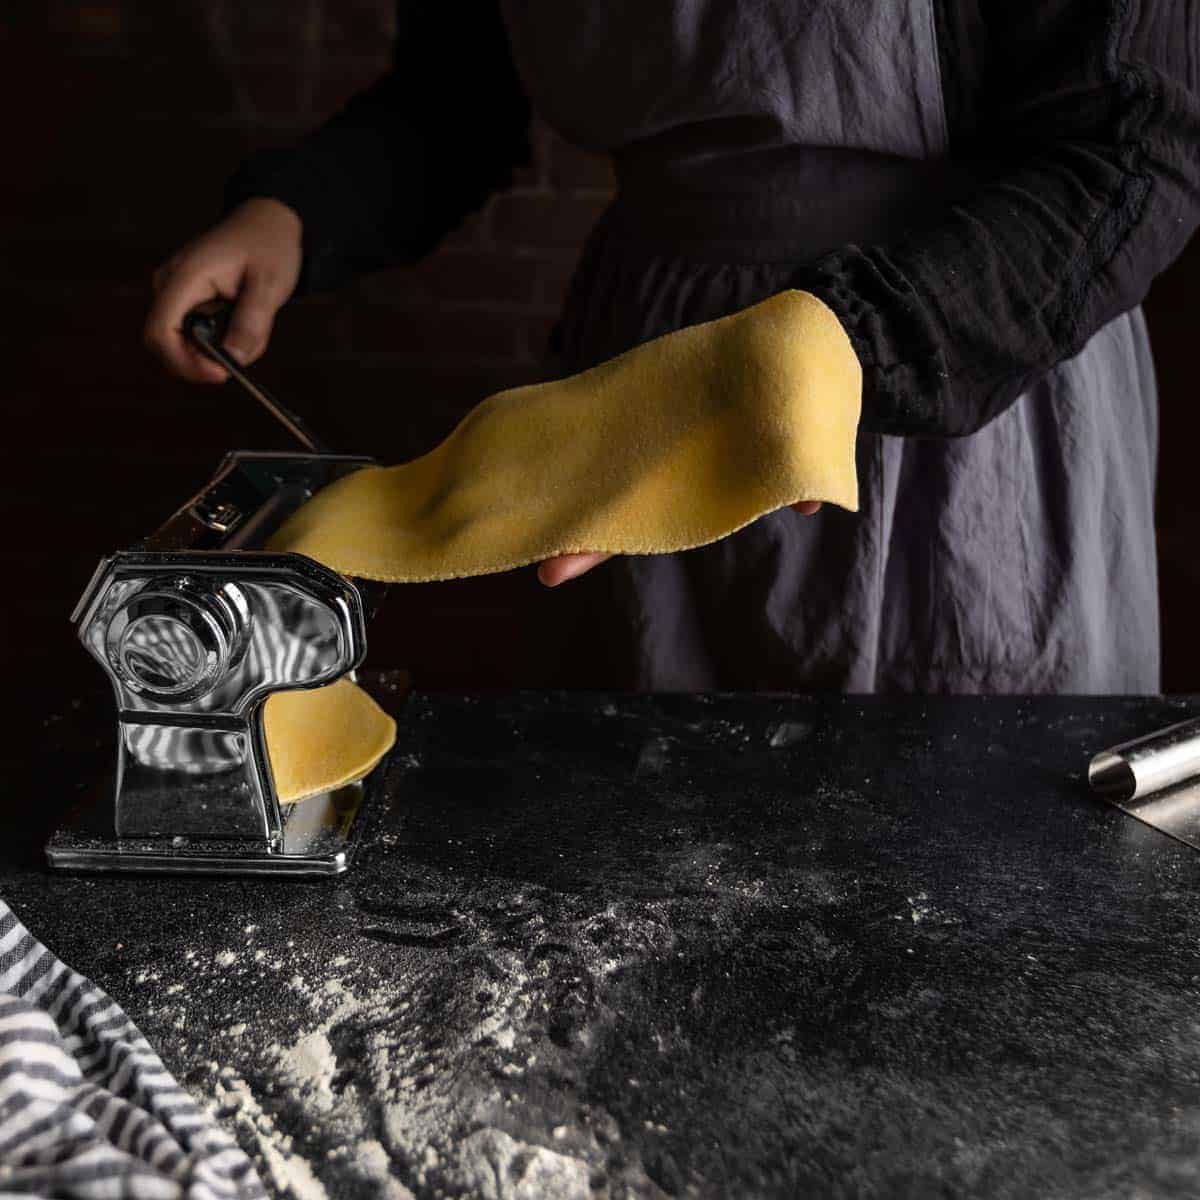
First, you need to sheet the pasta dough into lasagne sheets. Unlike some pasta shapes that benefit from a thicker chewier noodle, ravioli cooks best when you sheet the dough quite thin. It can be done with a rolling pin (or sideways wine bottle!) but I do recommend using a pasta machine for ease and consistency. We use a small hand-crank pasta machine called an Atlas Marcato 150, but any manual or mechanic pasta machine will work well.
To fill the ravioli you can either use a small (1 Tablespoon) ice cream scoop or a pastry bag (not pictured). To seal the pasta together, I like to use a barely dampened pastry brush, but a moist fingertip will work in a pinch.
As for shaping the ravioli, the equipment needed really depends on which method you will use. What you have available to you will likely determine which method is best suited for your kitchen.
Special Equipment for Each Method
Method | Special Equipment |
|---|---|
| #1: Ravioli Mold | Ravioli mold, rolling pin, small scoop or pastry bag |
| #2: Ravioli Stamps | Ravioli stamp (any shape) or cookie cutter; small scoop or pastry bag |
| #3: Hand-Cut Ravioli | Sharp knife, bench scraper, pizza cutter, or pasta wheel; small scoop or pastry bag |
| #4: Fold and Seal* | Sharp knife, pasta wheel or circle cookie cutter; small scoop or pastry bag |
| #5: The Dowel Method | ¼ inch wooden dowels, offset spatula, sharp knife or pasta wheel |
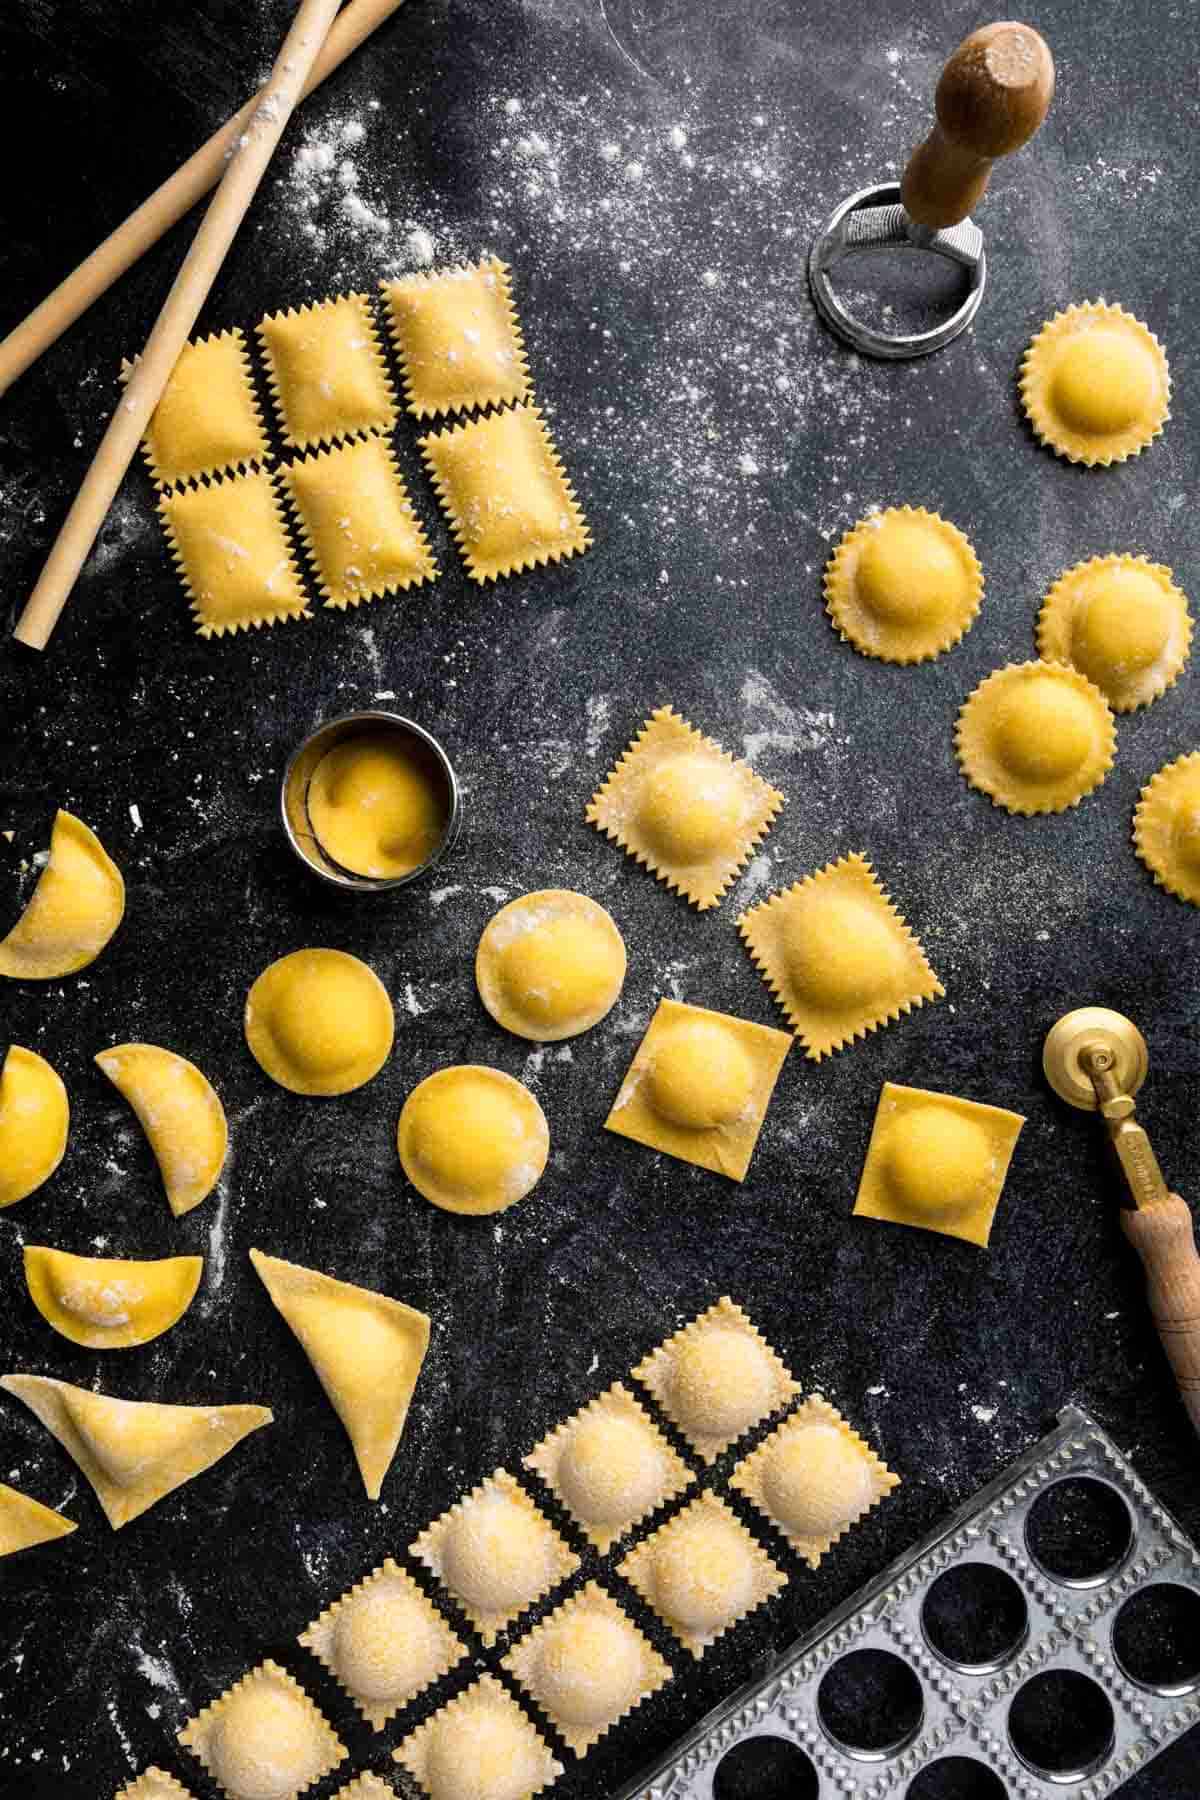
How To Make Ravioli By Hand (5 Ways!)
There are MANY ways in which you can make ravioli at home. Depending on your available equipment, farce (ravioli filling) and time restraints - one or all of these methods may work best for you.
Personally, Method #2 (The Ravioli Stamp Method) is my favorite. However, I occasionally still use The Fold and Seal Method (#4) or, if I'm in a hurry - I use the fifth technique that I call The Dowel Method.
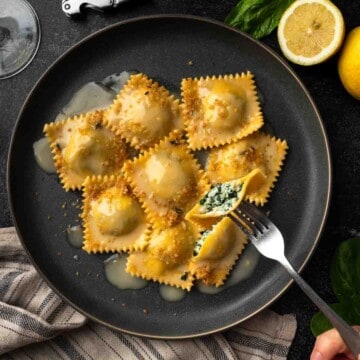
This tutorail is being demonstrated with our classic Four Cheese Ravioli recipe.
Sheeting The Pasta: How Thick Should Ravioli Dough Be?
Since the ravioli dough will be two layers around the edges, it is important to sheet the dough thinly. Depending on the heartiness of your filling, I recommend sheeting the dough between 1 -1.2 millimeters thick (thinner than 1/16 of an inch, yet slightly thicker than a credit card).
On the machine that I use (an Atlas Marcato 150), this thickness is achieved on settings 6 or 7. On a Kitchen Aid roller attachment, try settings 5 or 6. For more delicate fillings you can sheet the pasta dough to the thinnest settings.
Method #1: Ravioli Maker (Ravioli Mold)
The Ravioli Maker method is probably the most popular way to make ravioli at home - at least in the US. A ravioli mold (sometimes called a ravioli maker, tray or tablet), is an inexpensive kitchen tool that can help you to make ravioli quickly and efficiently.
For this method to be successful, you need to have a perfectly made pasta dough that has great gluten structure and isn't too wet or too dry. It's a great time-saver for experienced pasta makers but I have found it can be a bit finicky for beginners.
It is KEY that the bottom sheet of pasta (the piece that will go over the metal frame) is heavily dusted in flour. Without enough flour, your ravioli are sure to stick and may not be salvageable.
I also like to spritz the indented dome mold with a bit of non-stick cooking spray. This way you can avoid having the dough stick to the mold without introducing excess flour to your ravioli filling.
How To Use a Ravioli Mold
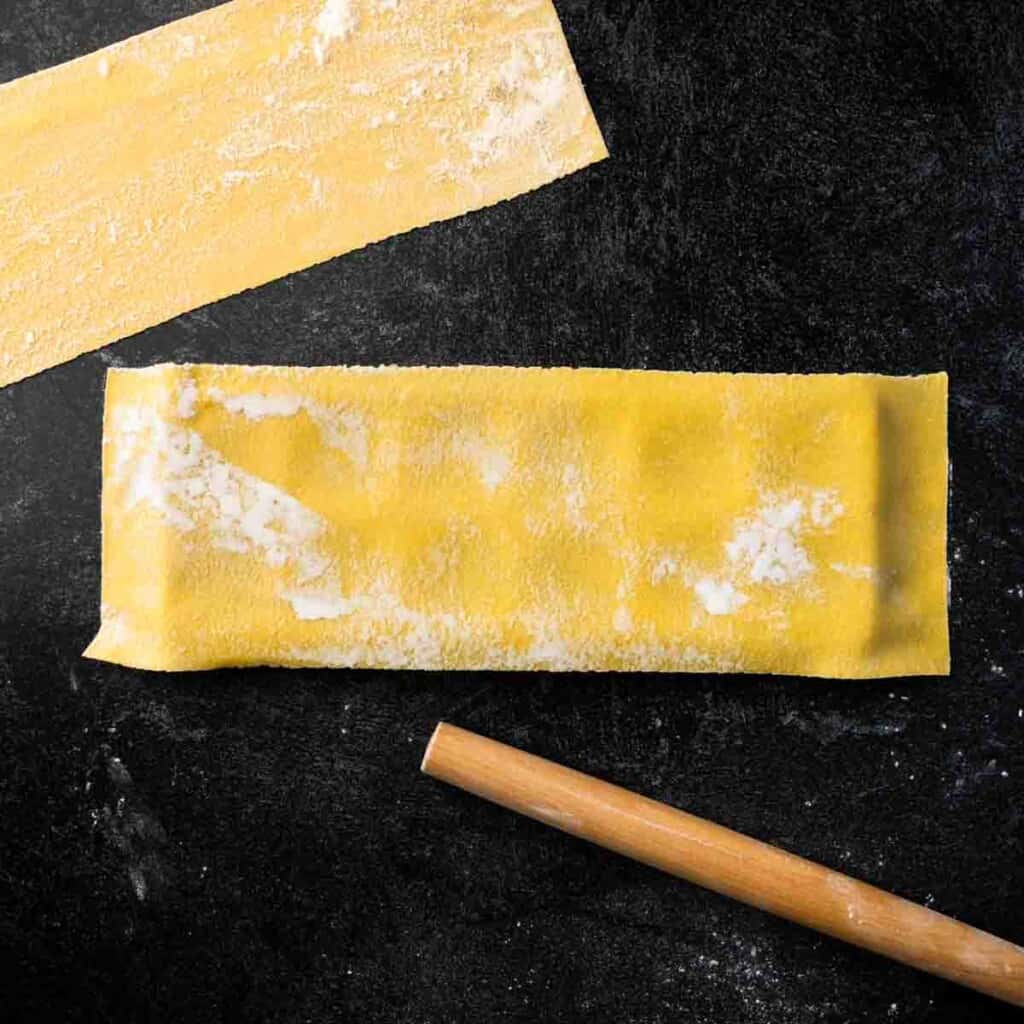
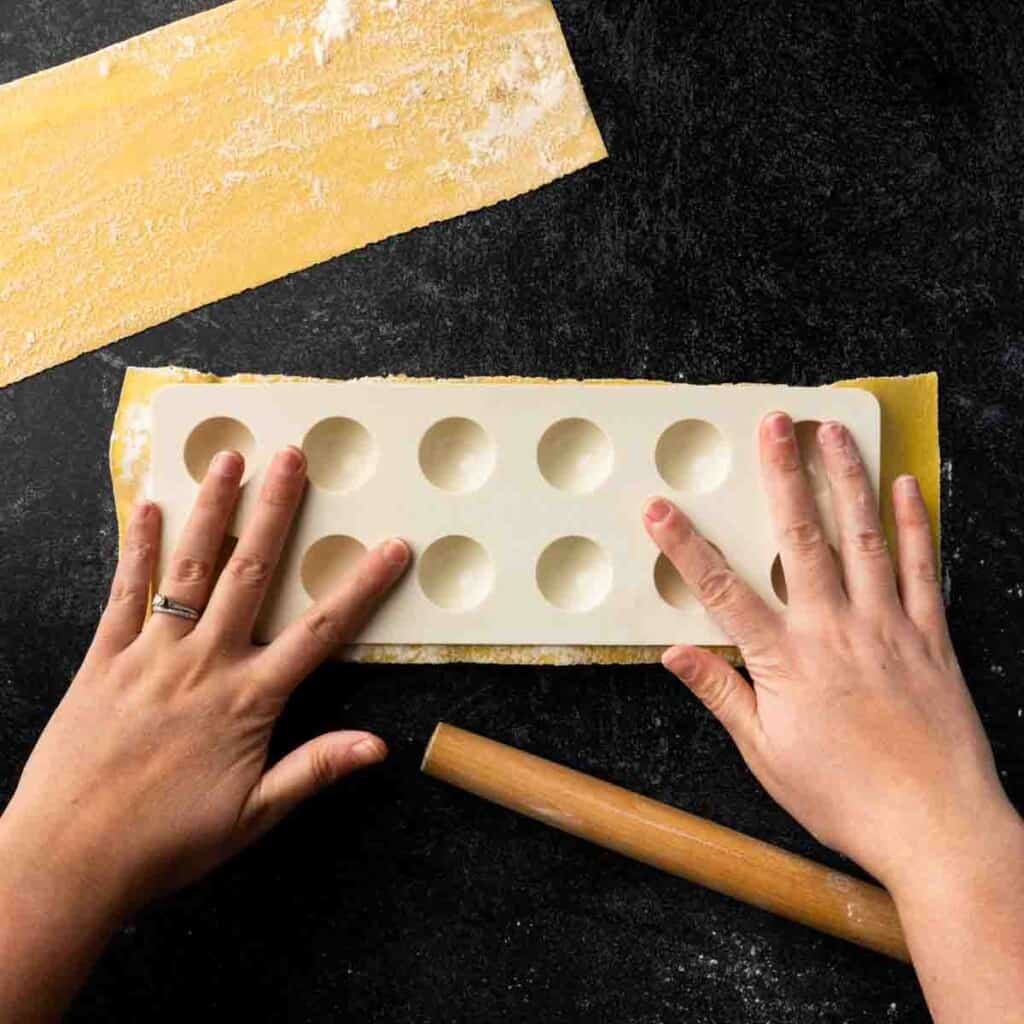
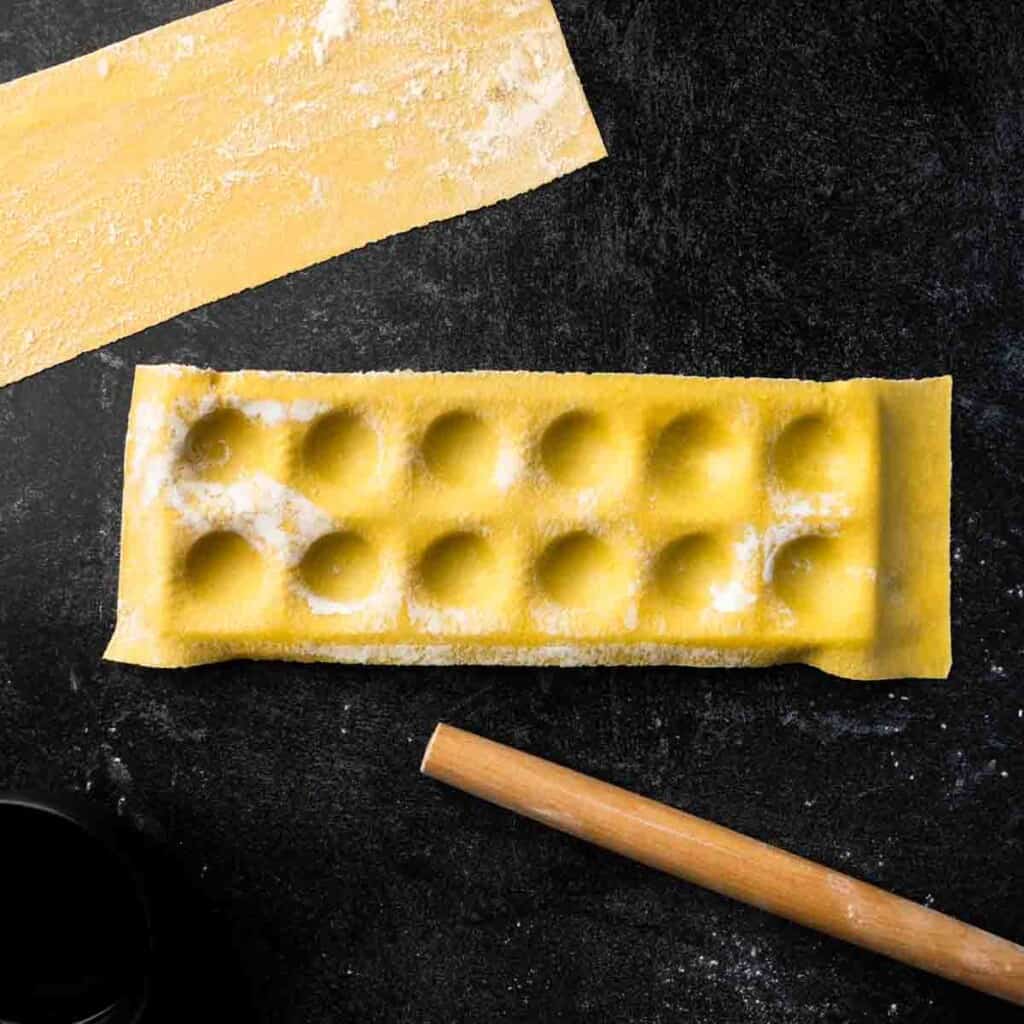
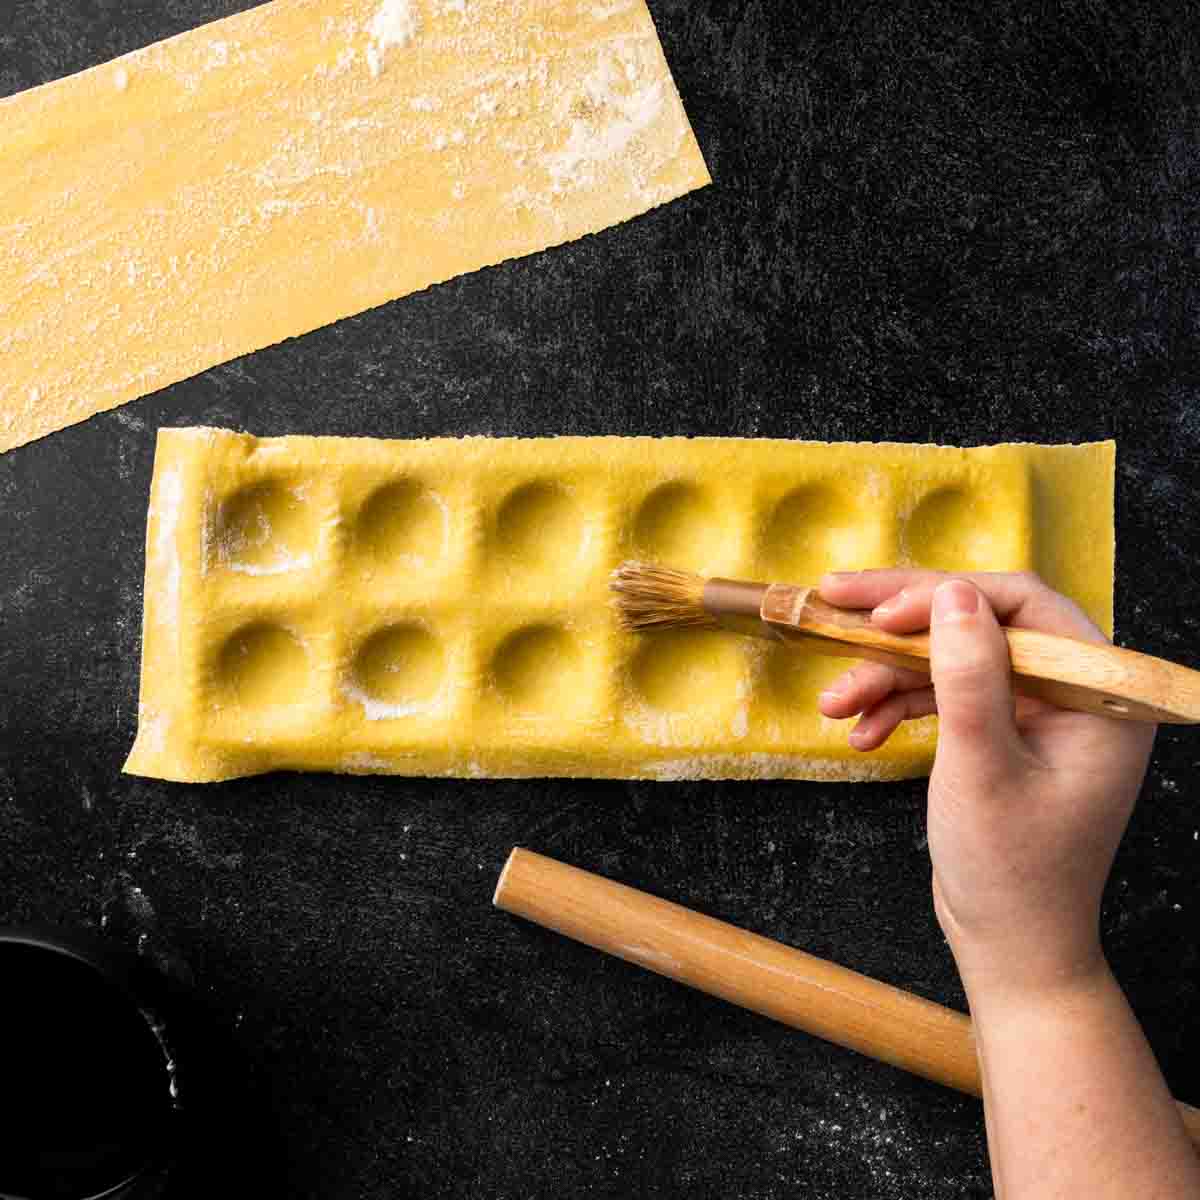
1. Lay one sheet of heavily floured pasta dough over the grid frame of the mold. Spritz the dome mold with a bit of nonstick cooking spray. Push the indented dome mold over the dough to create wells. Remove the dome mold and set aside.

2. Use a lightly moistened pastry brush to dampen the dough along the edges of the frame. (If your dough is at all moist or sticky, the excess water will not be necessary).
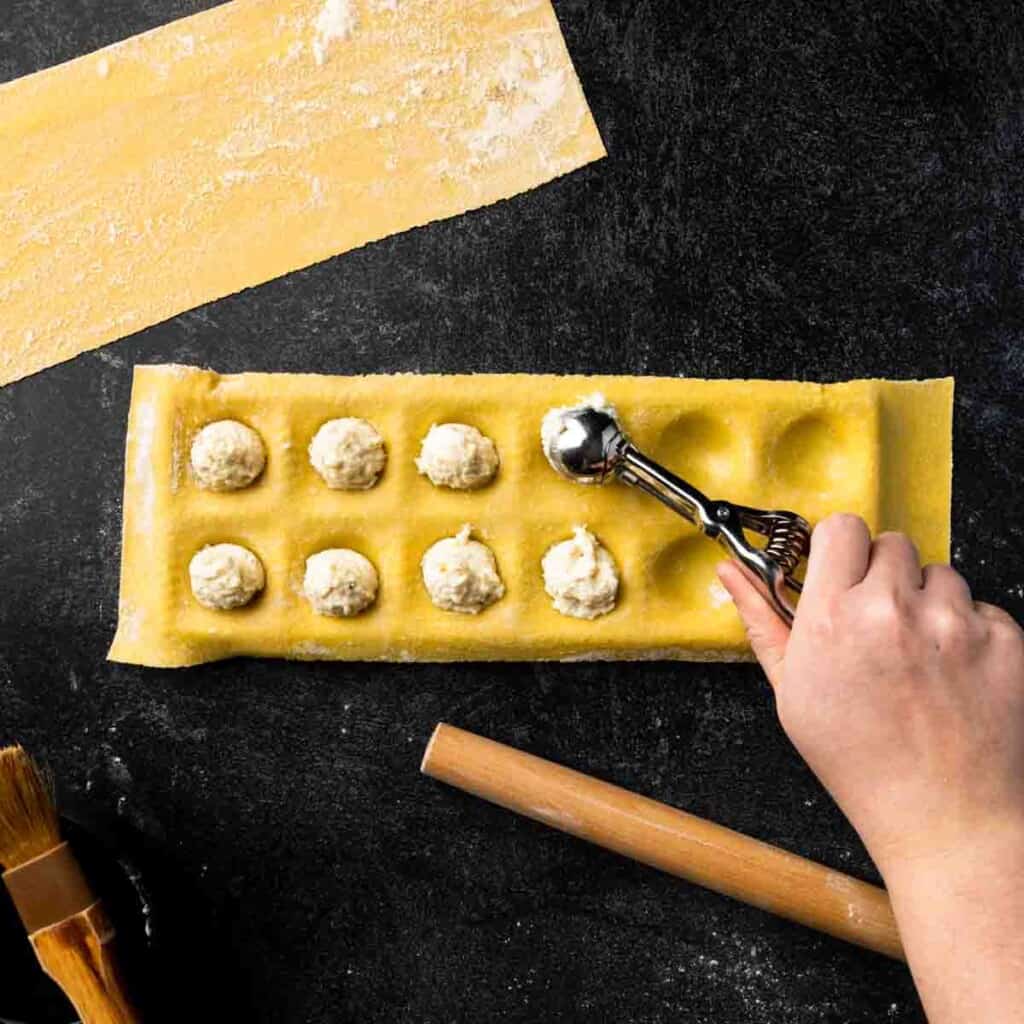
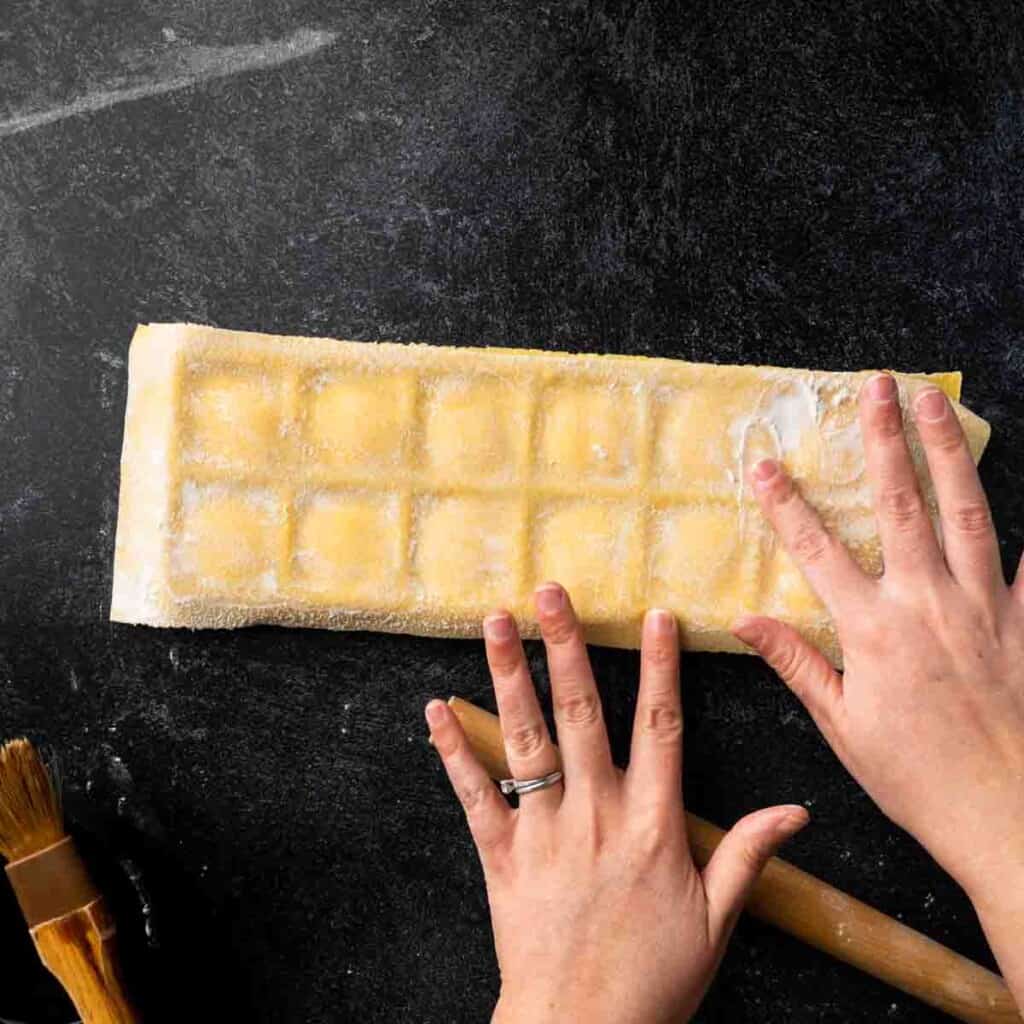
3. With a small scoop or pastry bag, fill the pasta wells with ravioli filling completely. Be careful not to leave any empty space where air will be trapped. Place a fresh sheet of dough over the filled ravioli frame. Use your fingertips to seal the dough around the frame while pushing out any potential air bubbles.
4. Roll a rolling pin along the length of the ravioli mold to seal and cut. Press along any areas that are not cut through. Save any scraps (brushing away excess flour) to be re-rolled.
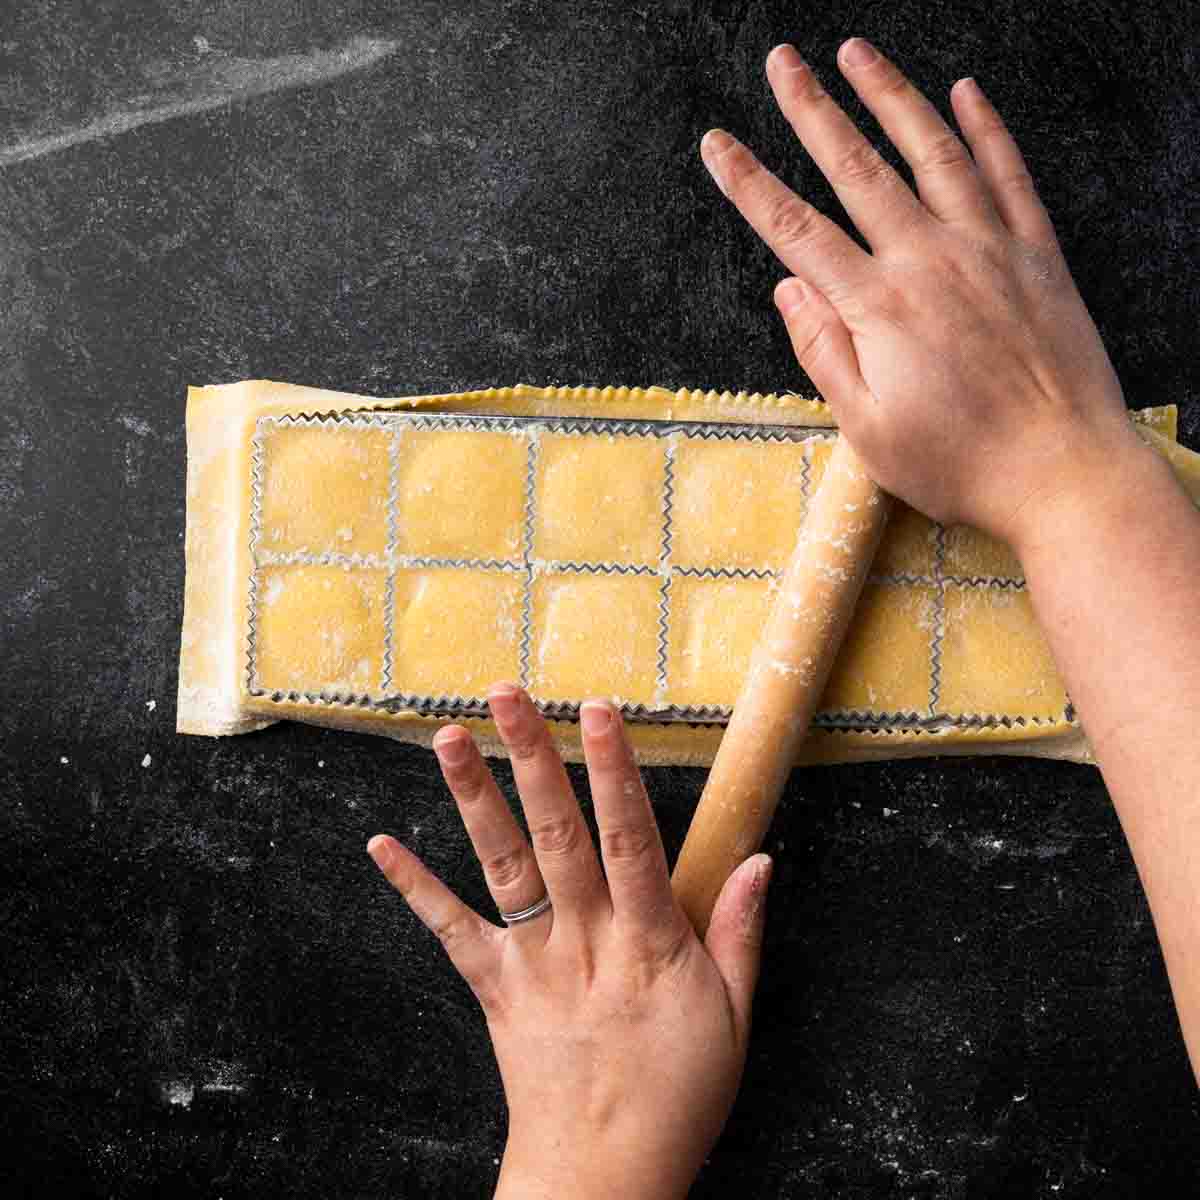
5. Flip the frame over and tap on the countertop to release the ravioli from the mold. If the ravioli are still attached and cannot be easily pulled apart, use a sharp knife or brass pasta wheel to separate completely.
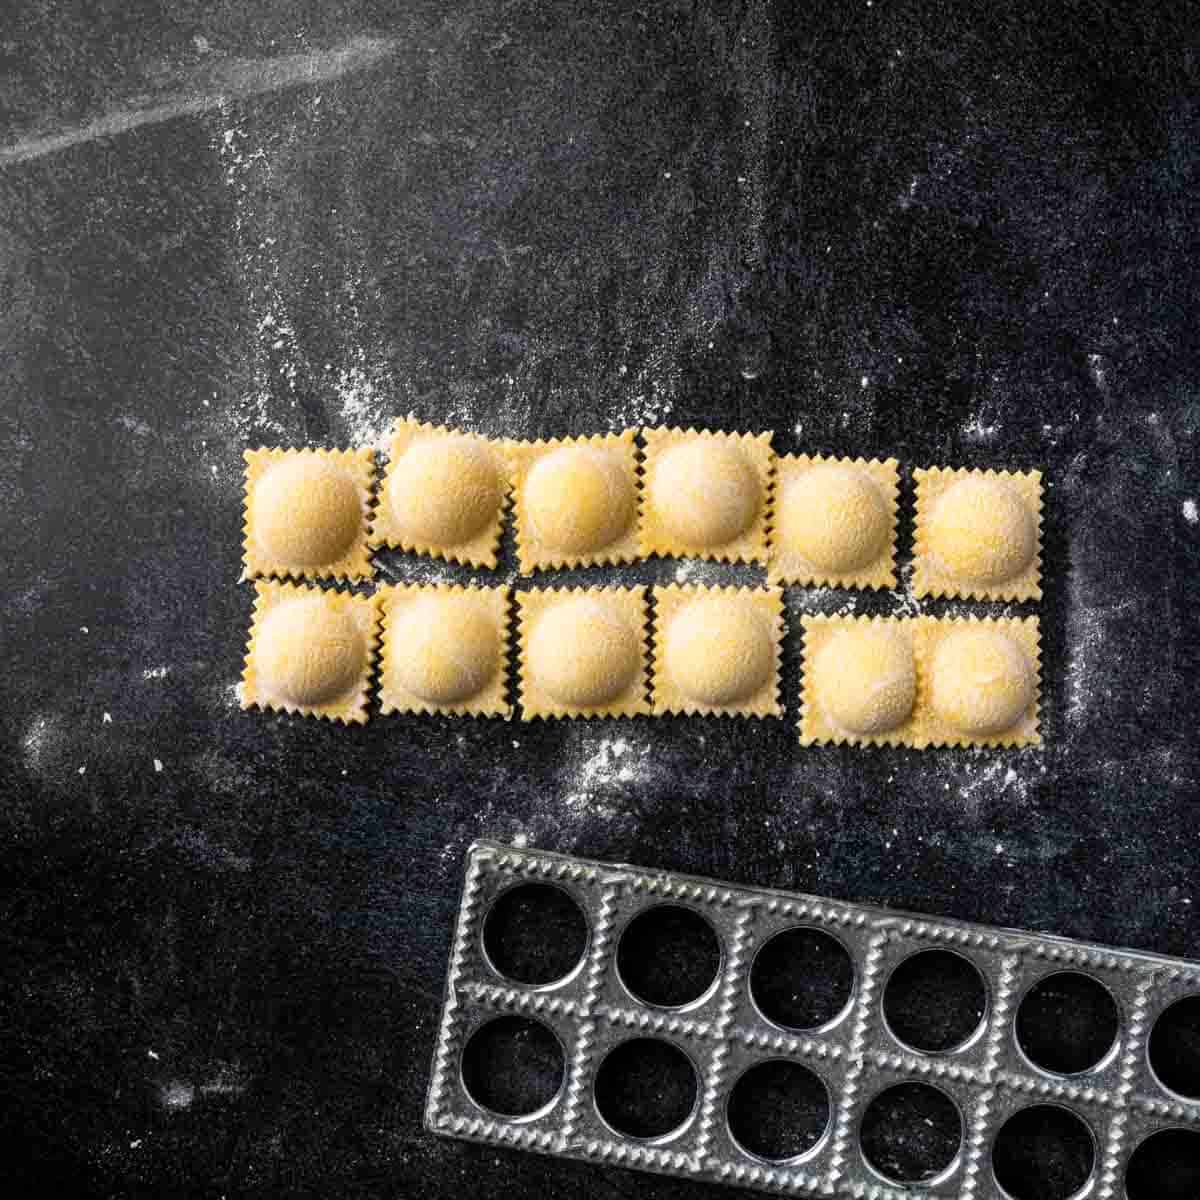
Method #2: Ravioli Stamps
This is my go-to method for making ravioli. It's simple, forgiving and gives restaurant-quality results. A ravioli stamp is an inexpensive tool that can come in various shapes and sizes. It seals and cuts ravioli in one easy motion.
I love my ravioli stamps and definitely recommend the purchase if you plan on making lots of homemade pasta. (I even use them to seal tiny pies like in our Mini Mushroom and Thyme Pie recipe!) You don't need a fancy brass one (though they are incredible). An inexpensive stamp, like the one I use, costs less than $10.
This method can also be done with a cookie cutter, just make sure the edges are well seared afterwards.
How To Use Ravioli Stamps
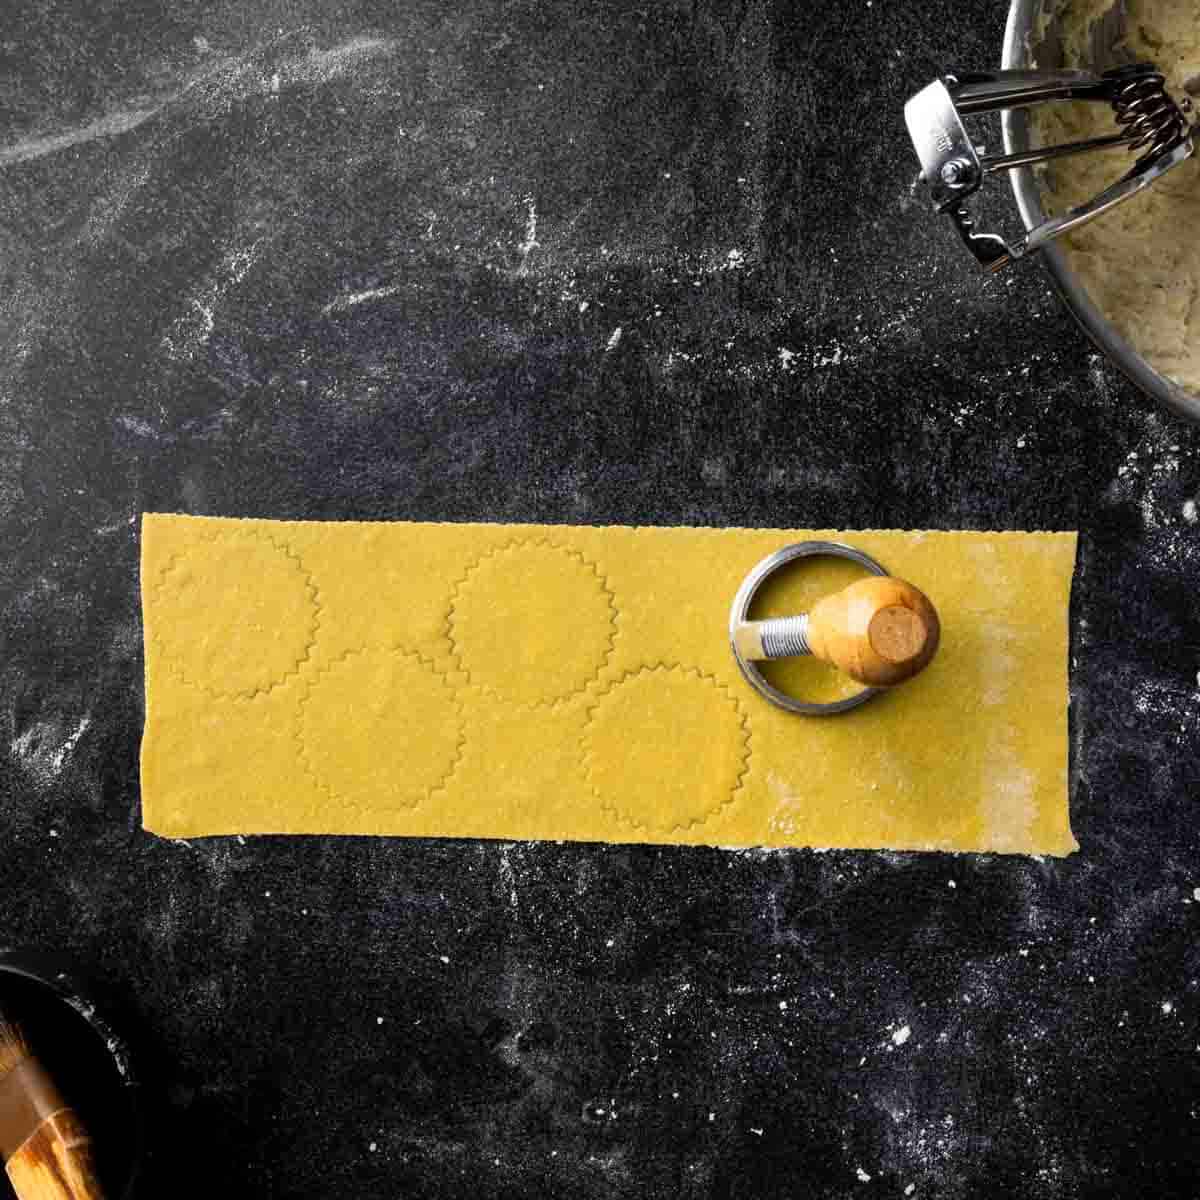
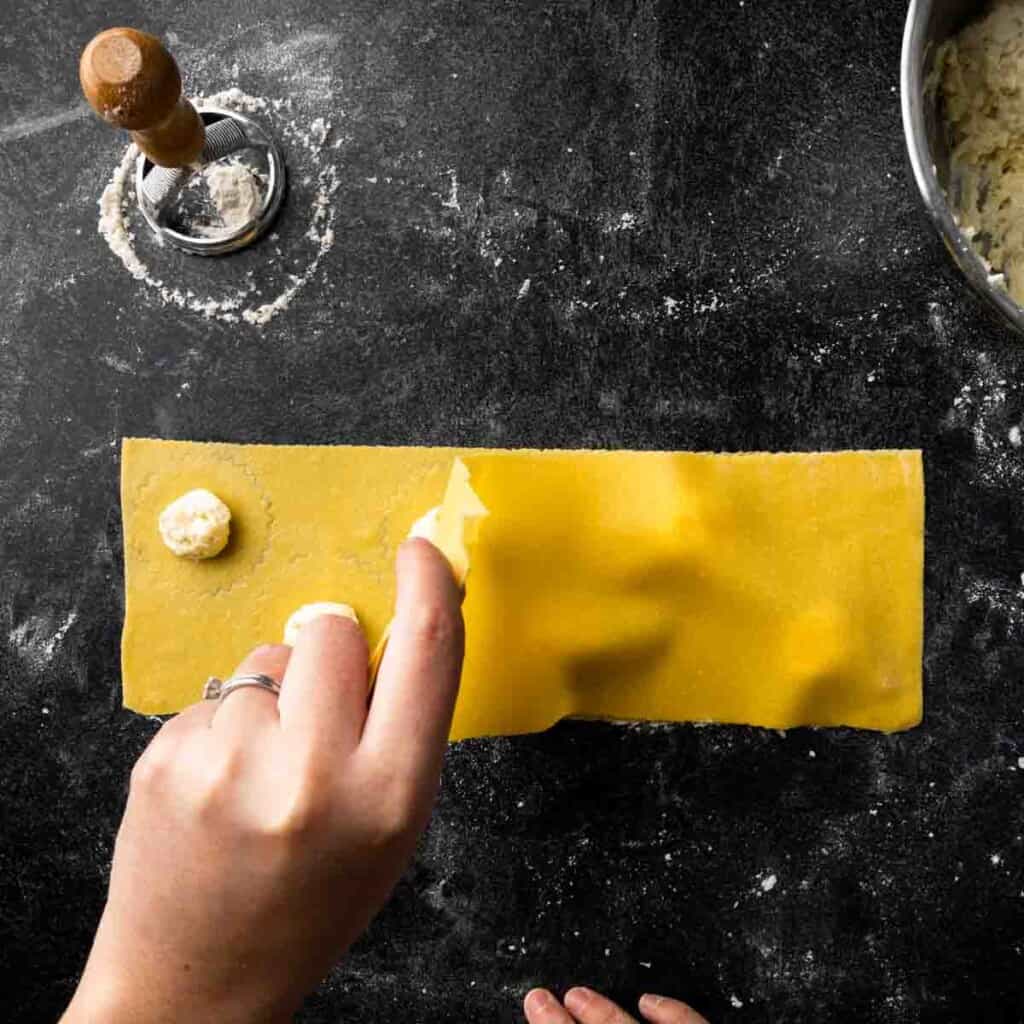
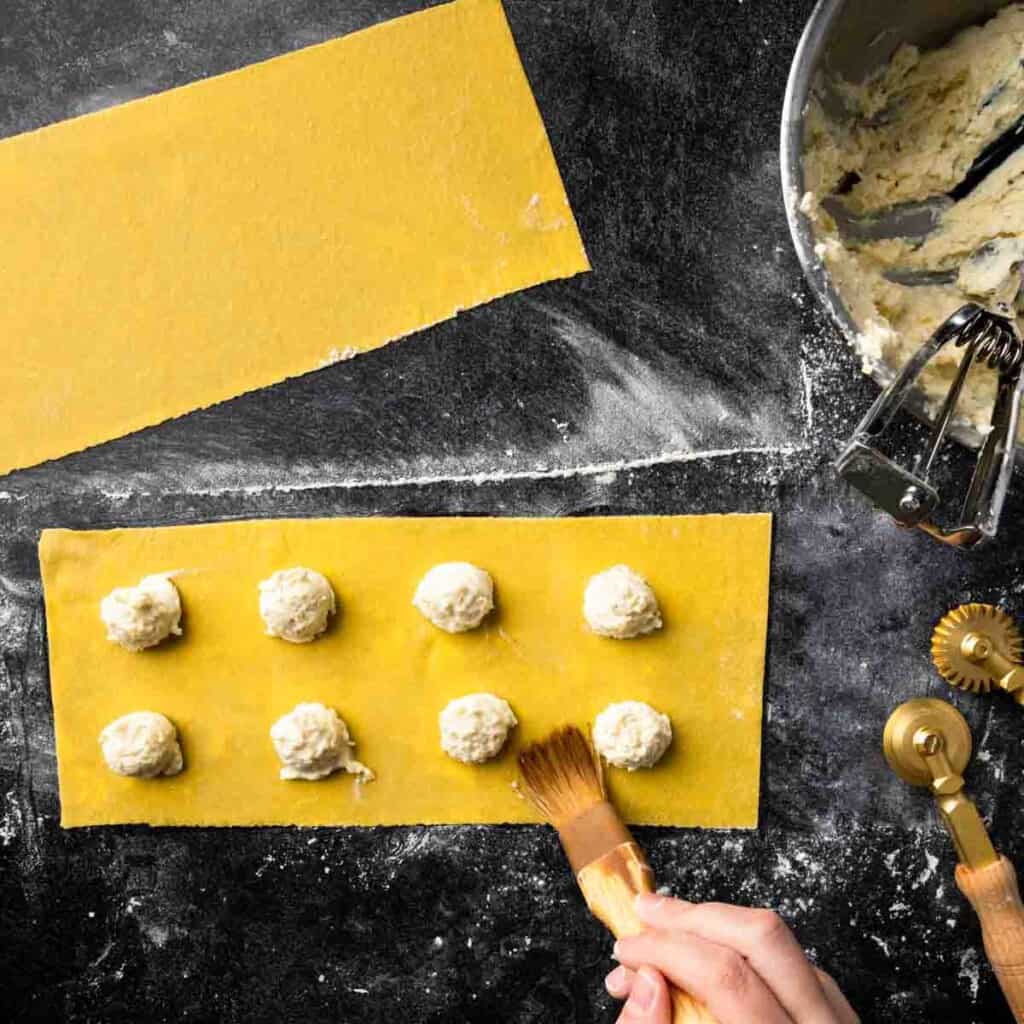
1. Lay one sheet of pasta dough down on a clean floured work surface. Use the ravioli stamp to lightly mark the dough. Be careful not to cut into the dough at all, just leave light indentations to help you visualize the spacing/ how much filling you will need.
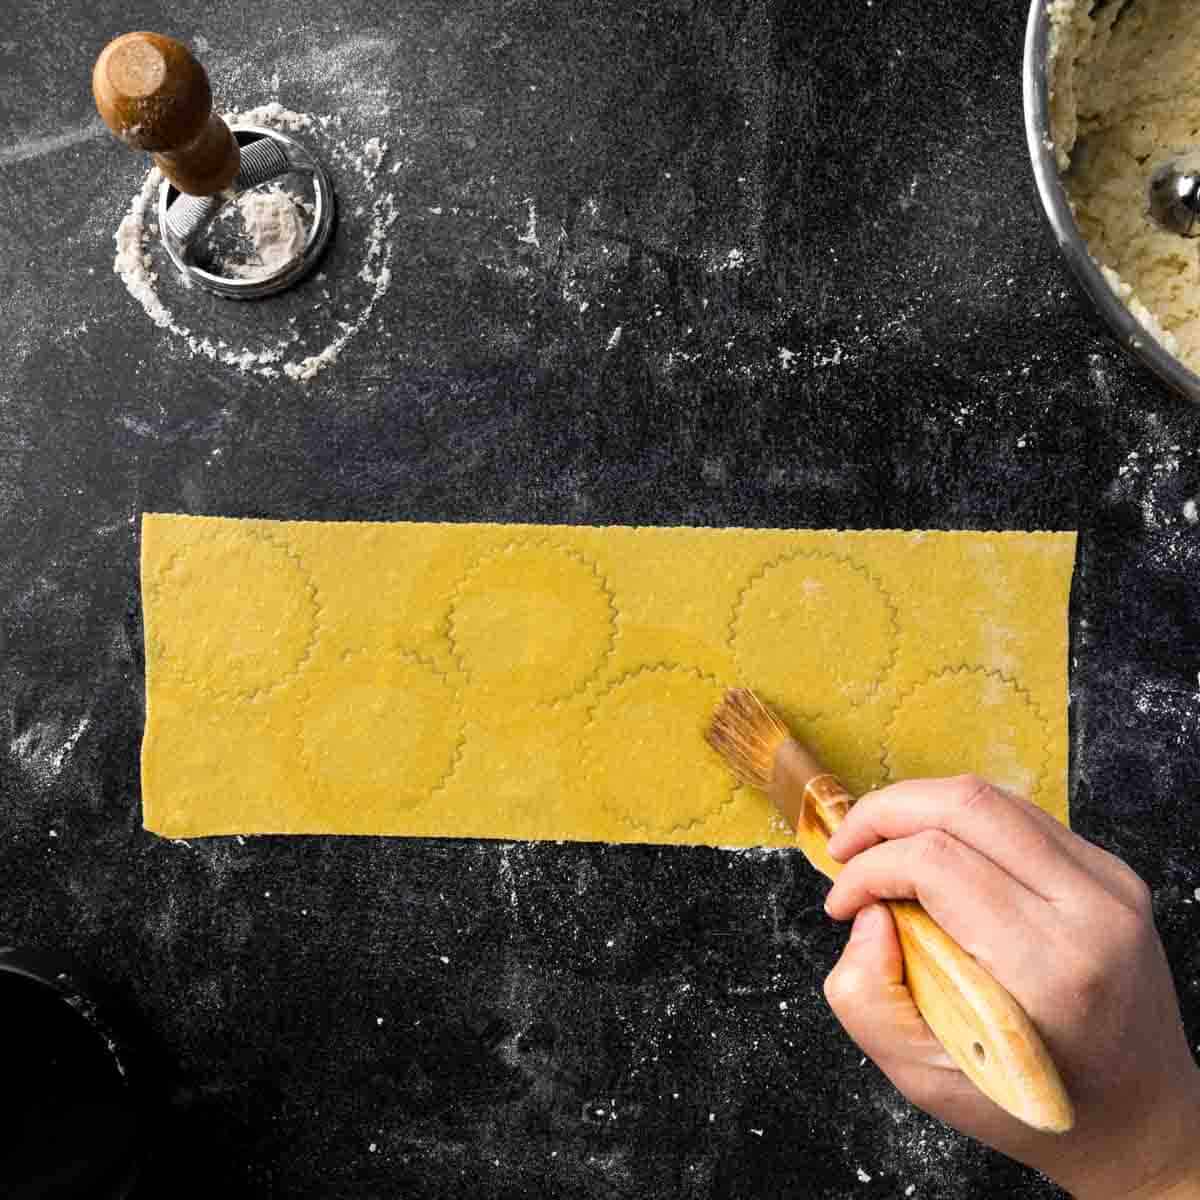
2. With a lightly dampened pastry brush, moisten the dough around the indentations. Be cautious not to add too much additional moisture. Just a small amount is needed to help seal the edges.
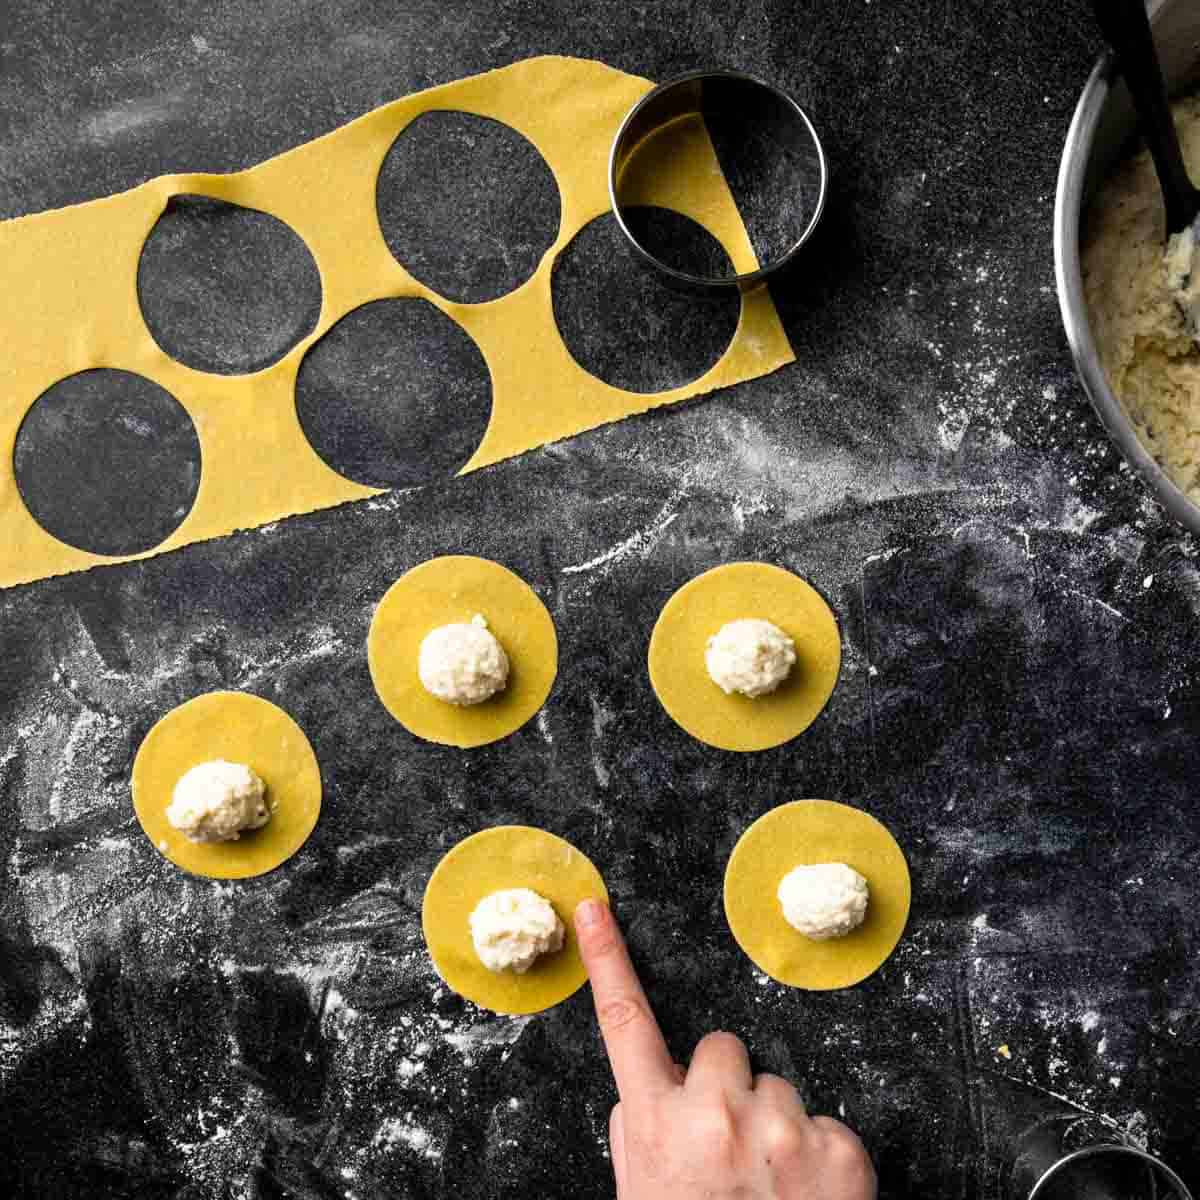
3. Scoop or pipe 1 Tablespoon mounds of filling into the center of each indentation.
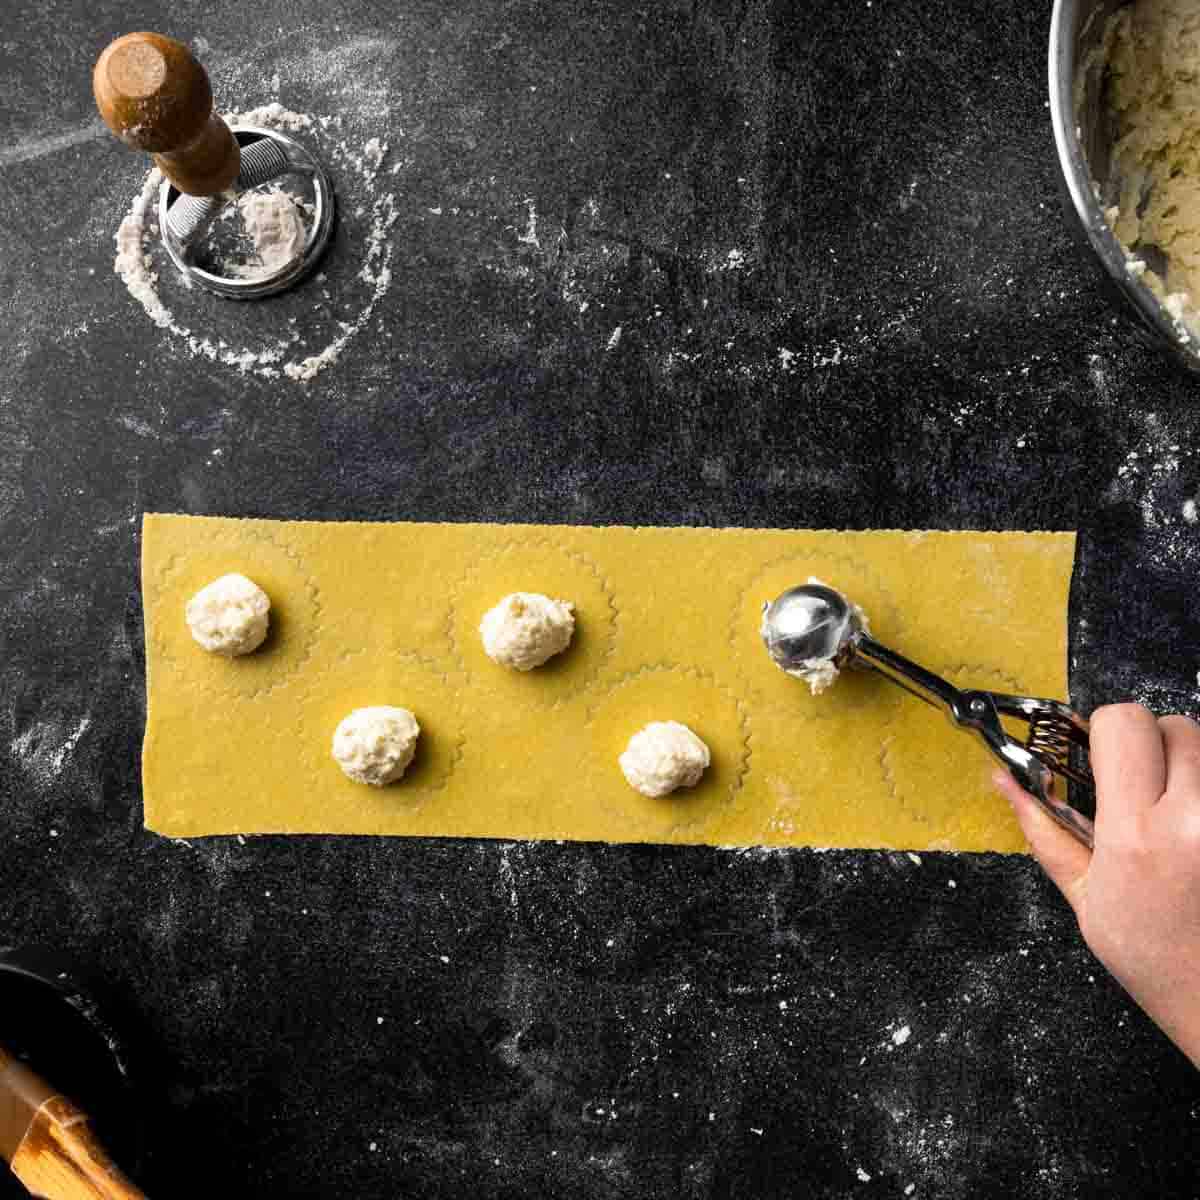
Pro Tip: Filling the Ravioli - For speed and portioning purposes, it is easiest to use a 1 Tablespoon cookie scoop and a circular ravioli stamp. If using a square, triangular or other ravioli stamp shape, I recommend using a piping bag and trying to mimic the shape of the ravioli with the filling. Either way, be careful to leave the edges clear of filling so create a good seal.
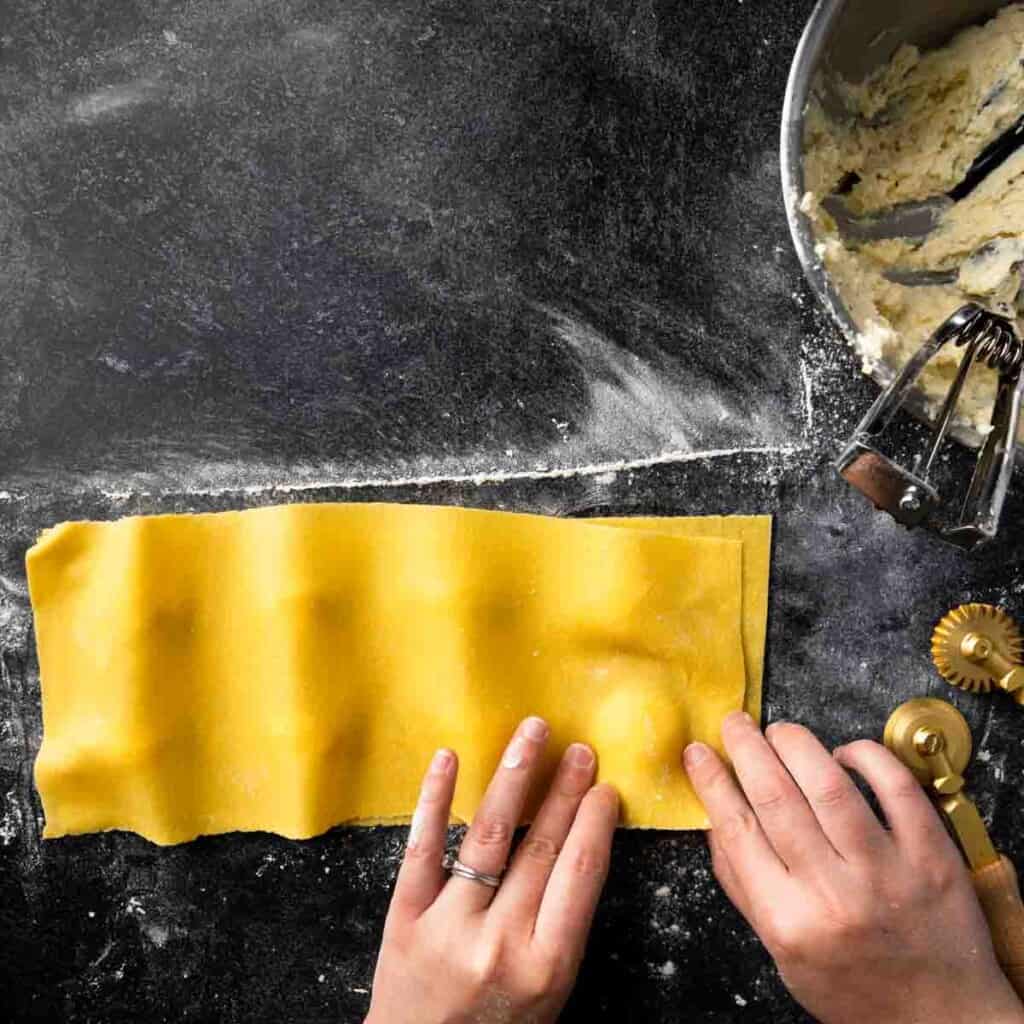
4. Lay a second sheet of pasta dough over the ravioli. Use dry, floured fingertips to seal the dough around the lumps of filling. Be careful to avoid air pockets.
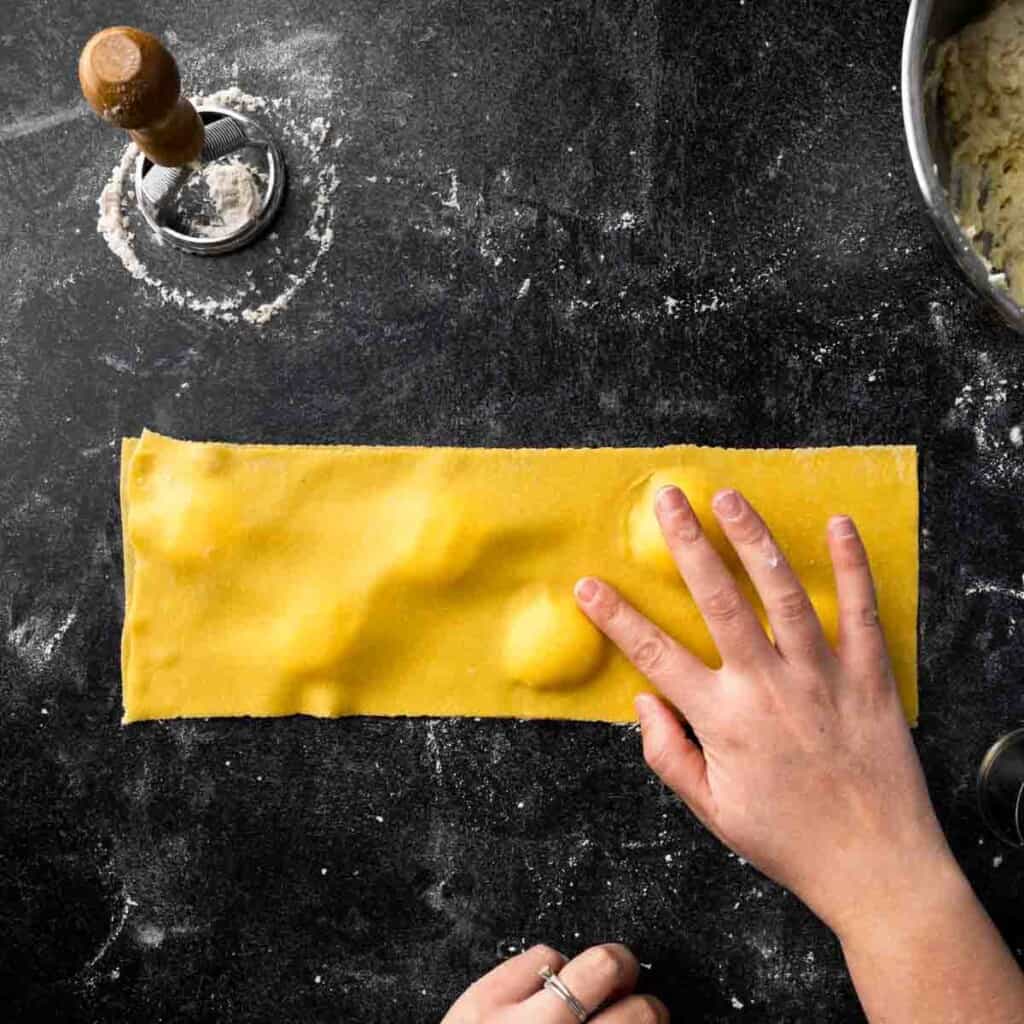
Optional: To shape the ravioli filling into perfect circles, you can use the dull side of a circular cookie cutter (or a small glass) to gently circle around the filling over the top sheet of pasta.
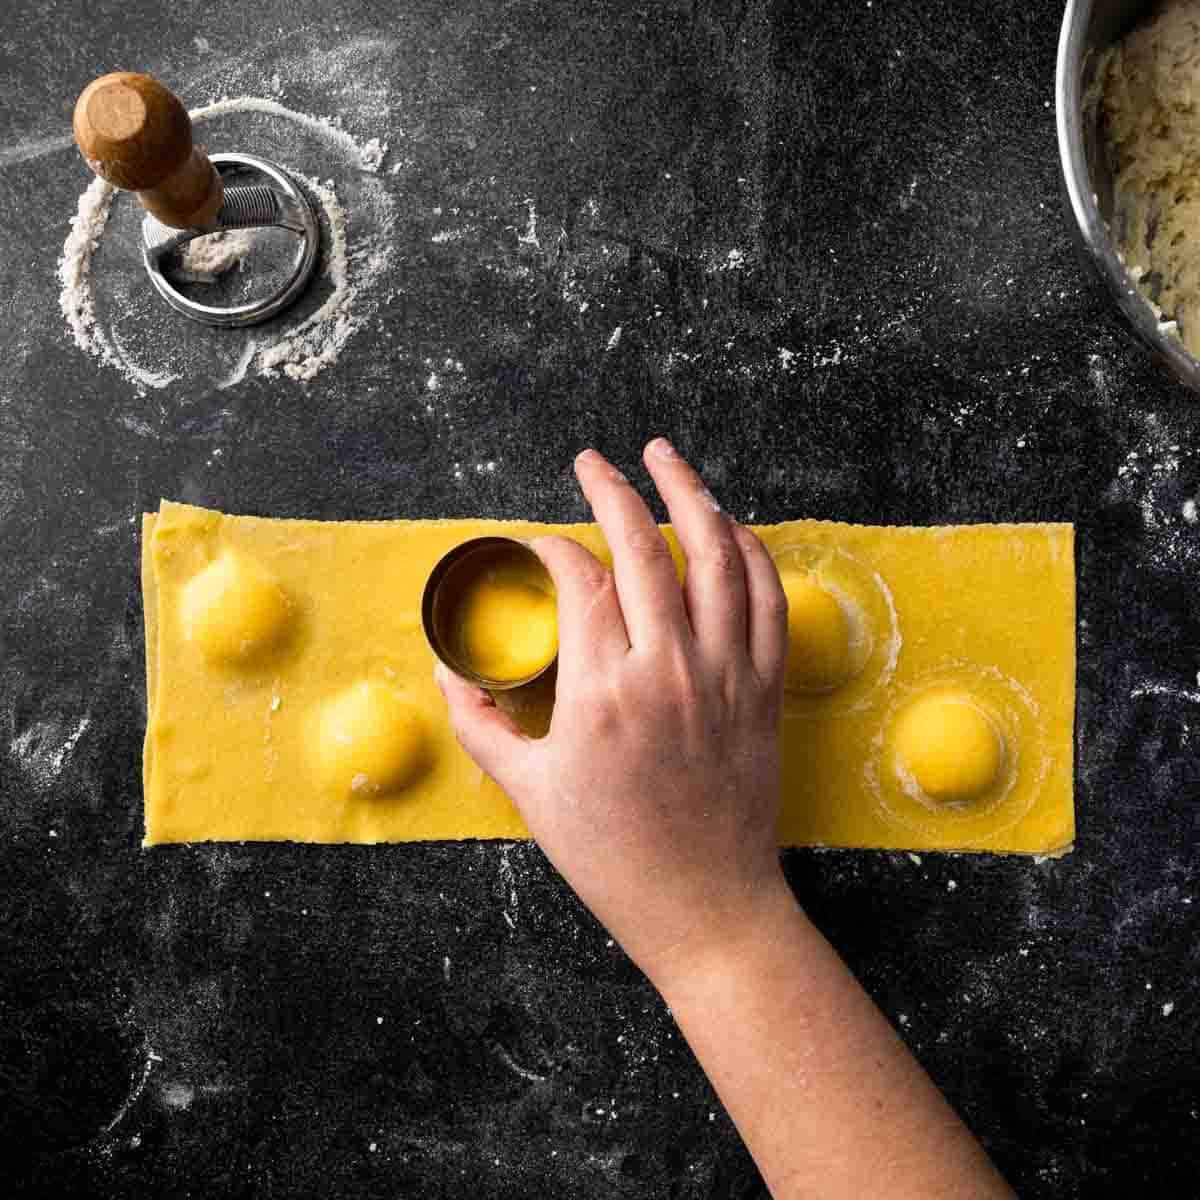
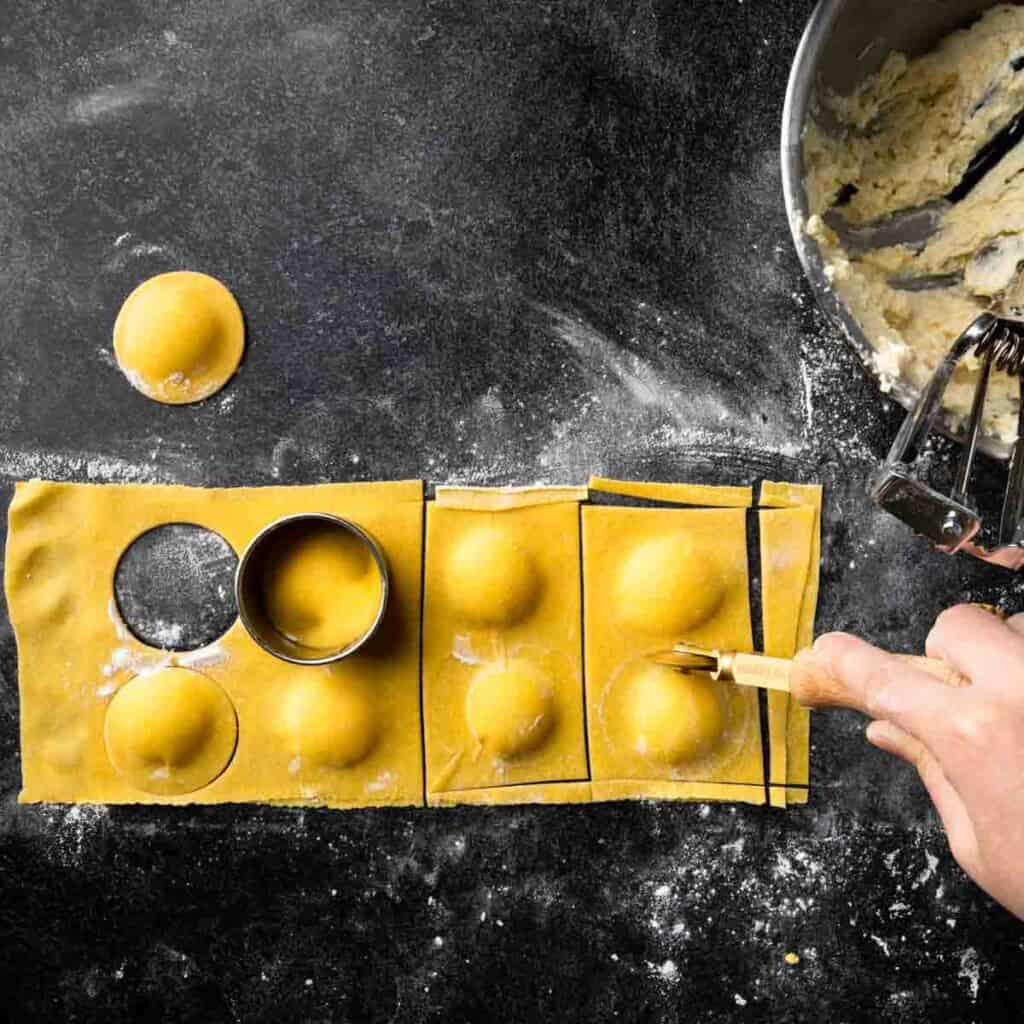
5. Dip the ravioli stamp in a bit of flour and punch out ravioli one by one. It helps to wiggle the stamp as you press, to help make sure it is cutting through the pasta at all edges. Flour the stamp (or cookie cutter), as necessary. Be sure to save all of the excess pasta scraps to re-roll into more sheets of pasta. Use your fingertips to ensure each ravioli is properly sealed.

Method #3: Hand-Cut Ravioli
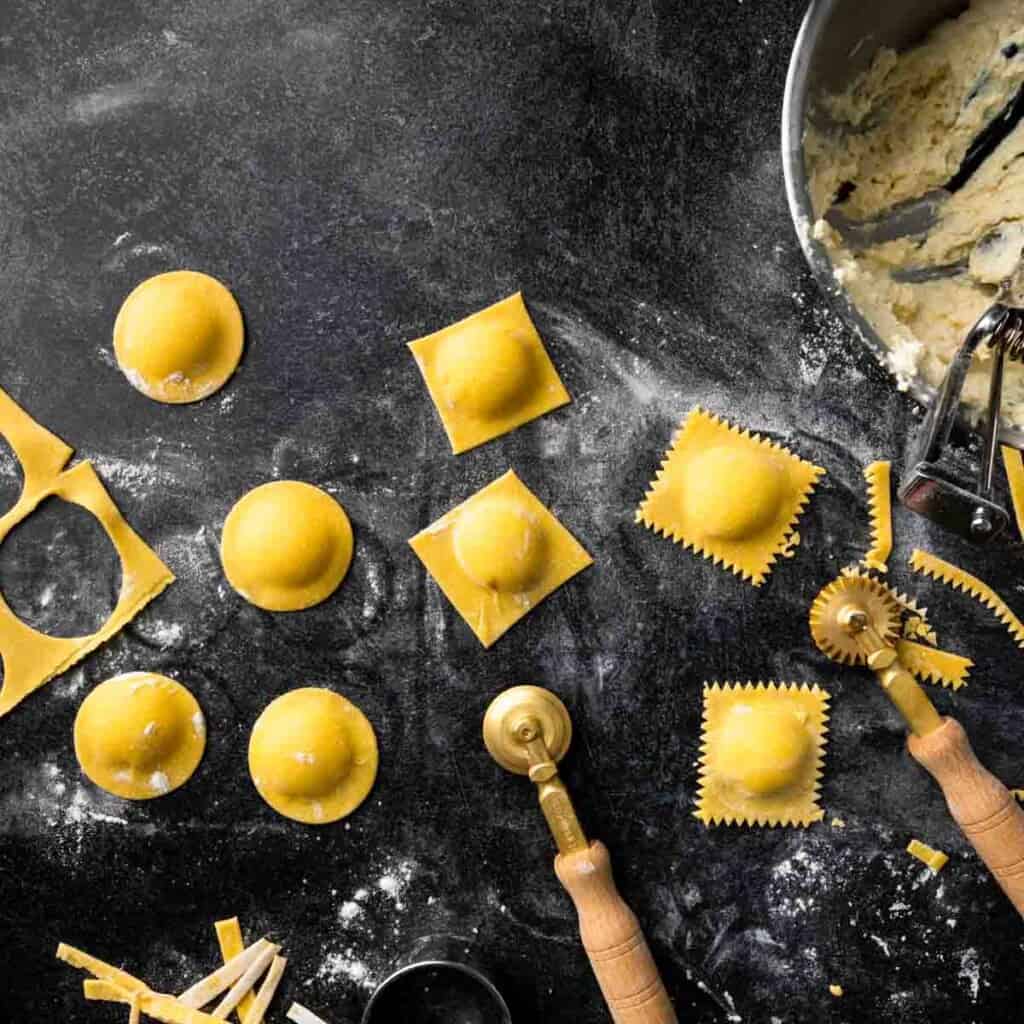
The Hand-Cut Ravioli Method is very similar to using a stamp tool but doesn't require a ravioli stamp or cookie cutter. Instead, you can just cut the ravioli with a sharp knife, bench scraper, pizza cutter, or a straight edge or fluted pasta wheel.
1. Lay one sheet of pasta dough down on a clean floured work surface. Scoop or pipe 1 Tablespoon mounds of filling into the dough while being sure to leave enough room to seal and cut.
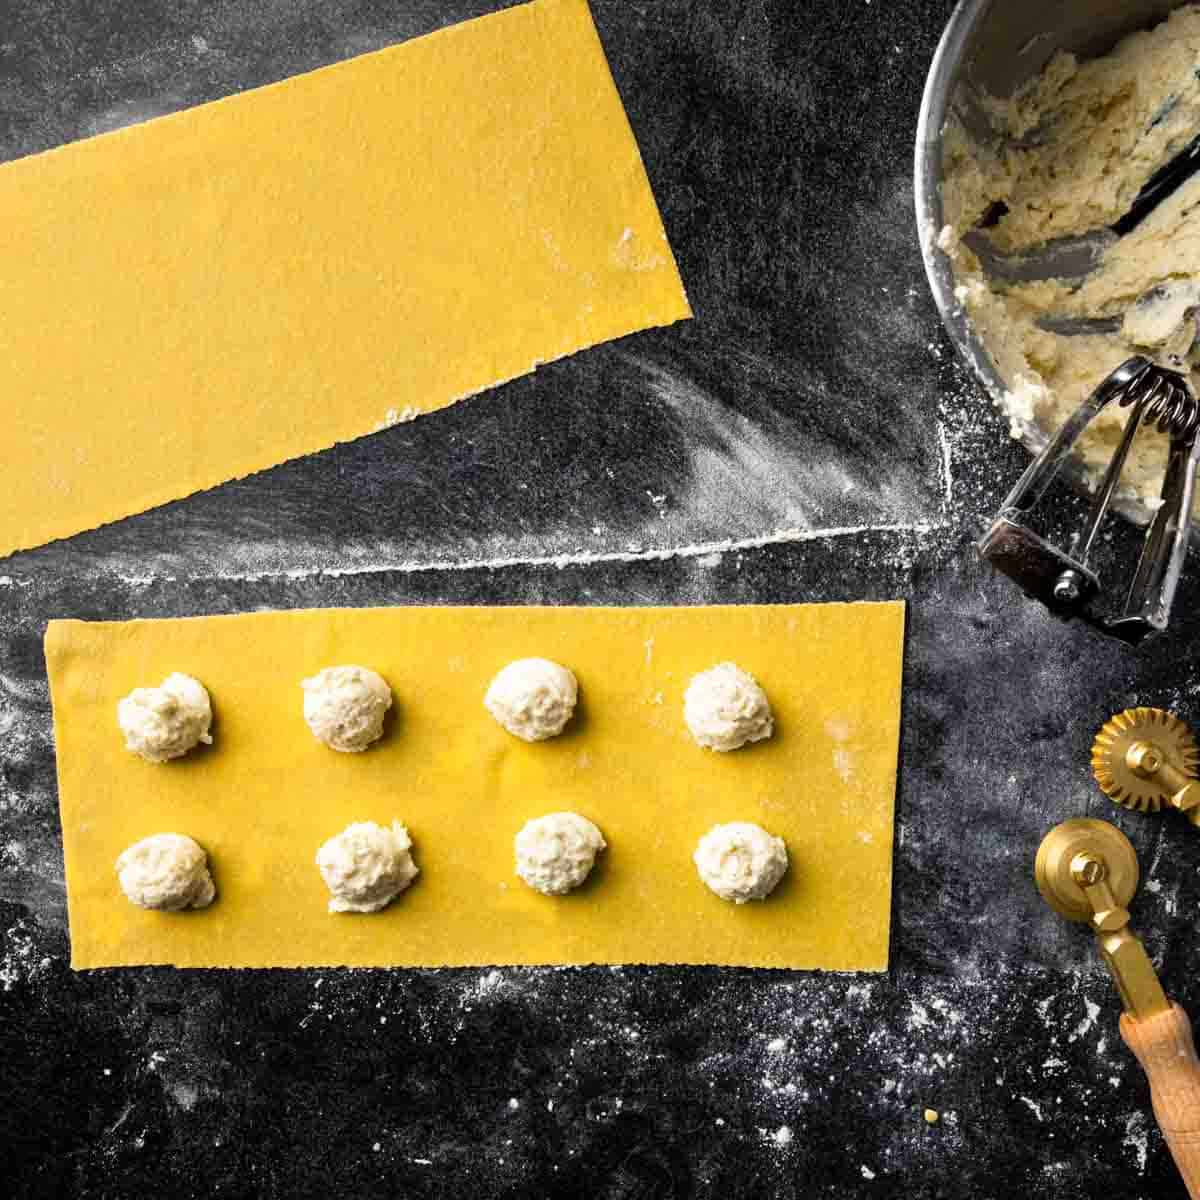
2. With a lightly dampened pastry brush, moisten the dough around each lump of filling. Lay a second sheet of pasta dough over the ravioli. Use dry, floured fingertips to seal the dough around each piece of ravioli. Be careful to avoid air pockets.
3. Cut ravioli into desired shapes using your tool of choice. Use your fingertips to ensure each pocket of pasta is properly sealed along the edges.
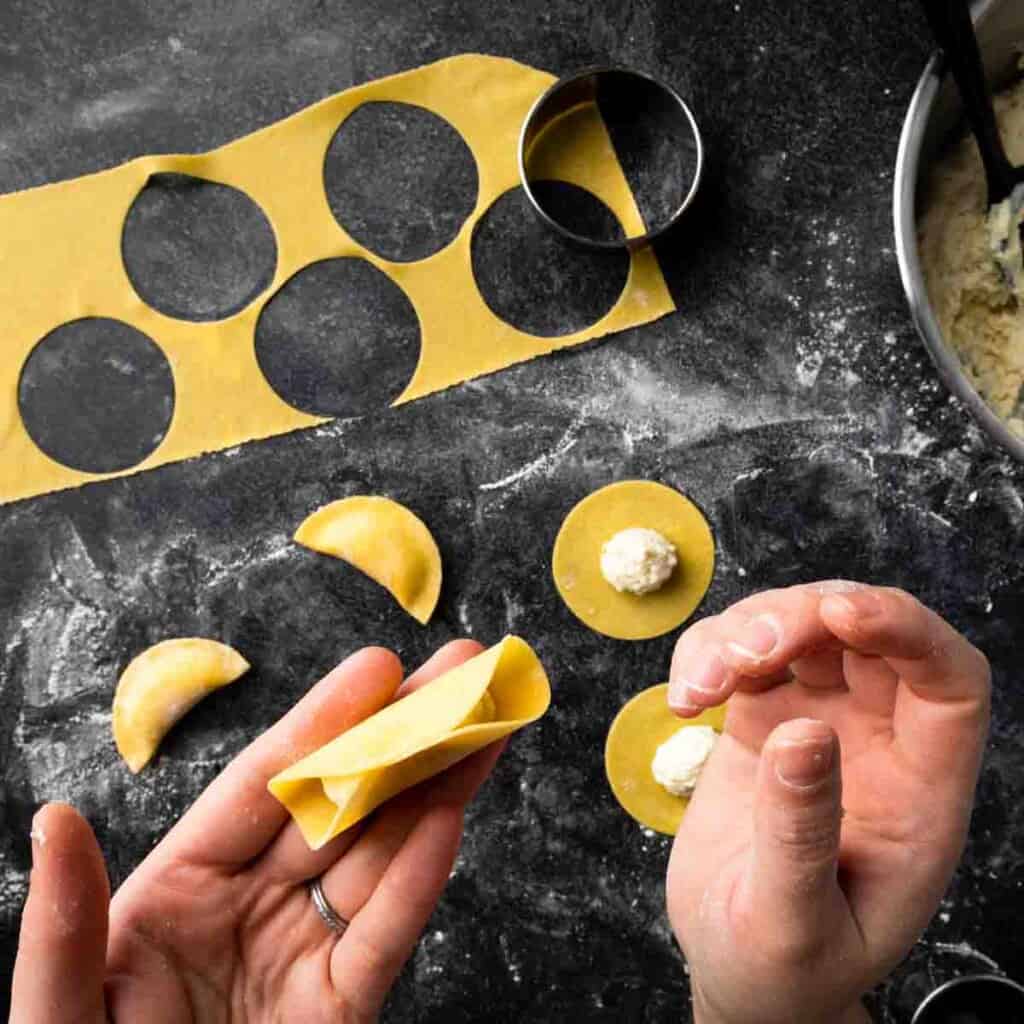
Method #4: The Fold and Seal Method (Wonton Wrapper Method)
The Fold and Seal Method is a fun, hands-on way to make Italian ravioli. This method is also the beginning of making various other pasta shapes such as mezzaluna, tortellini, cappelletti and others.
Folding and Sealing ravioli by hand can be the most fun and is my go-to when I have a little extra time. I find it rather theraputic. This method also works well if you will be making ravioli from wonton wrappers. (Skip to Step 2!)
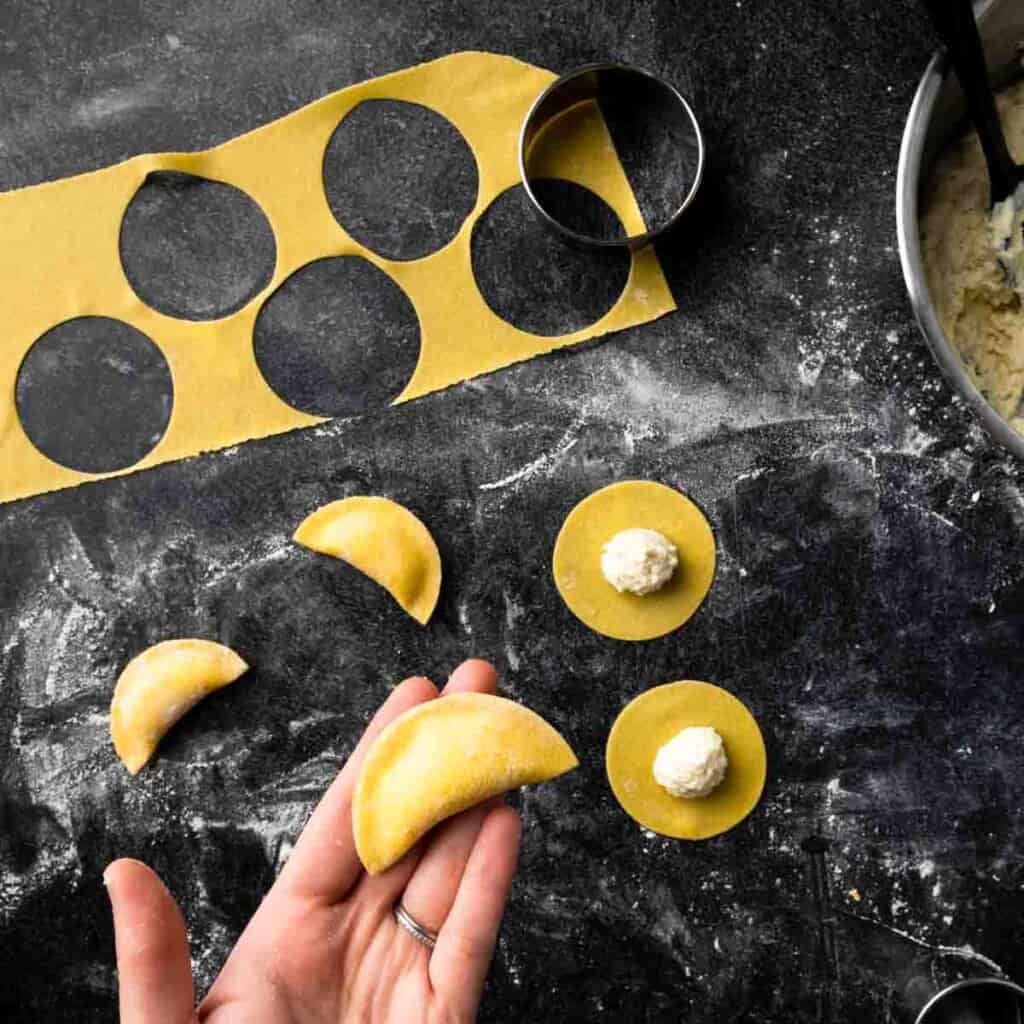
How To Make Ravioli with Pasta Squares, Circles or Wonton Wrappers
1. If using fresh rolled pasta, start by cutting the dough into squares or circles. You can make them any size you like, but I recommend using 2 - 3 inch squares, or 2 - 3 inch diameter circles.
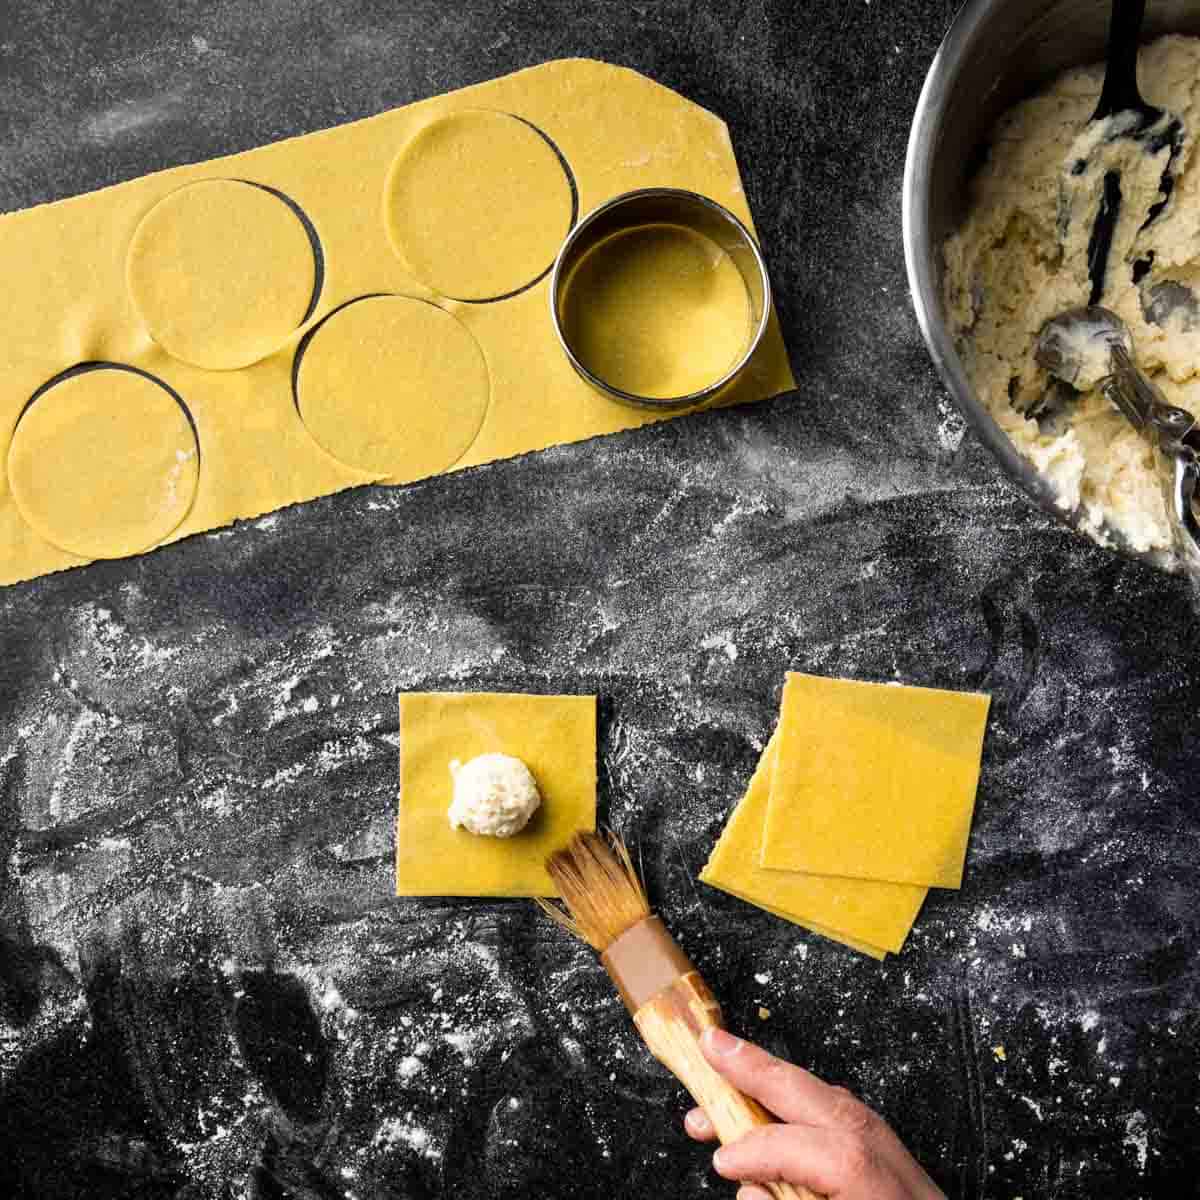
2. Scoop or pipe a Tablespoon of ravioli filling onto the center of each piece of pasta circle or square. Use a lightly dampened pastry brush (or fingertip) to moisten the edges of the dough surrounding the filling.
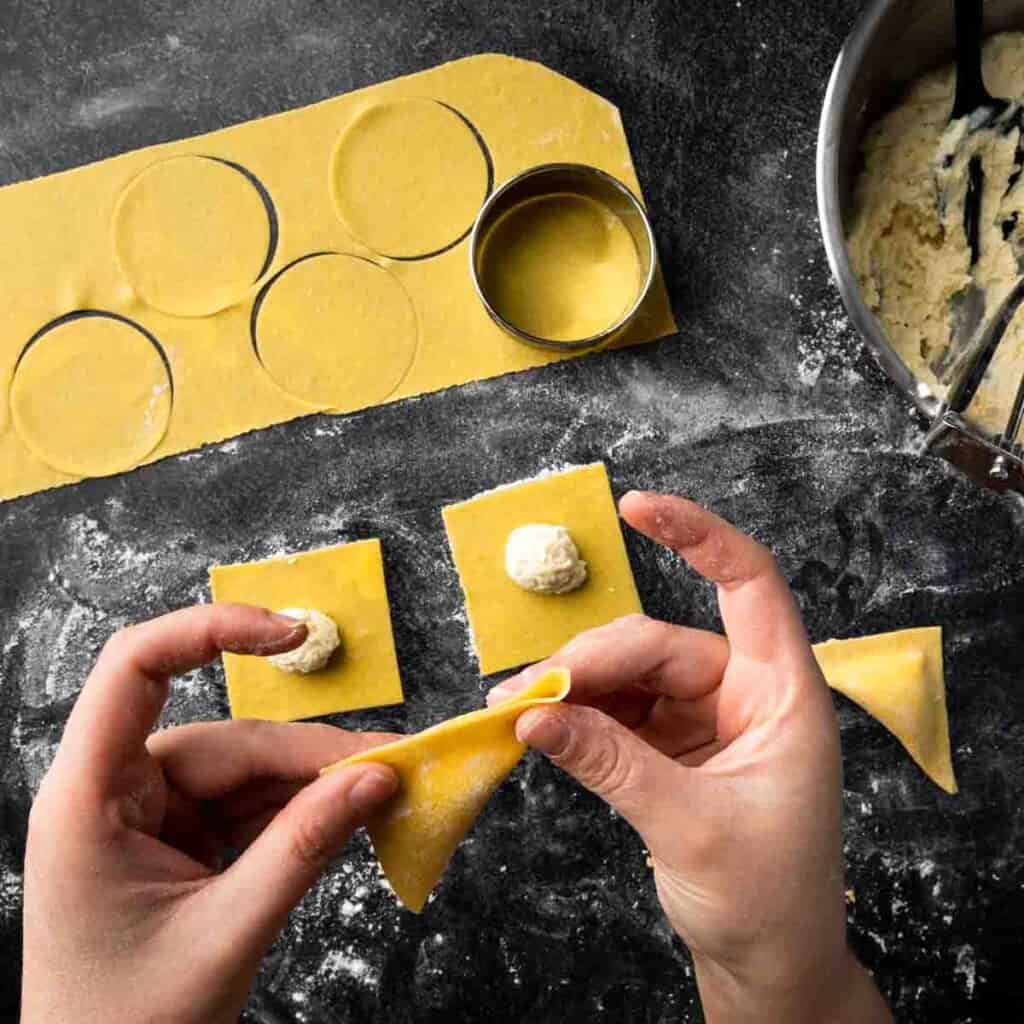
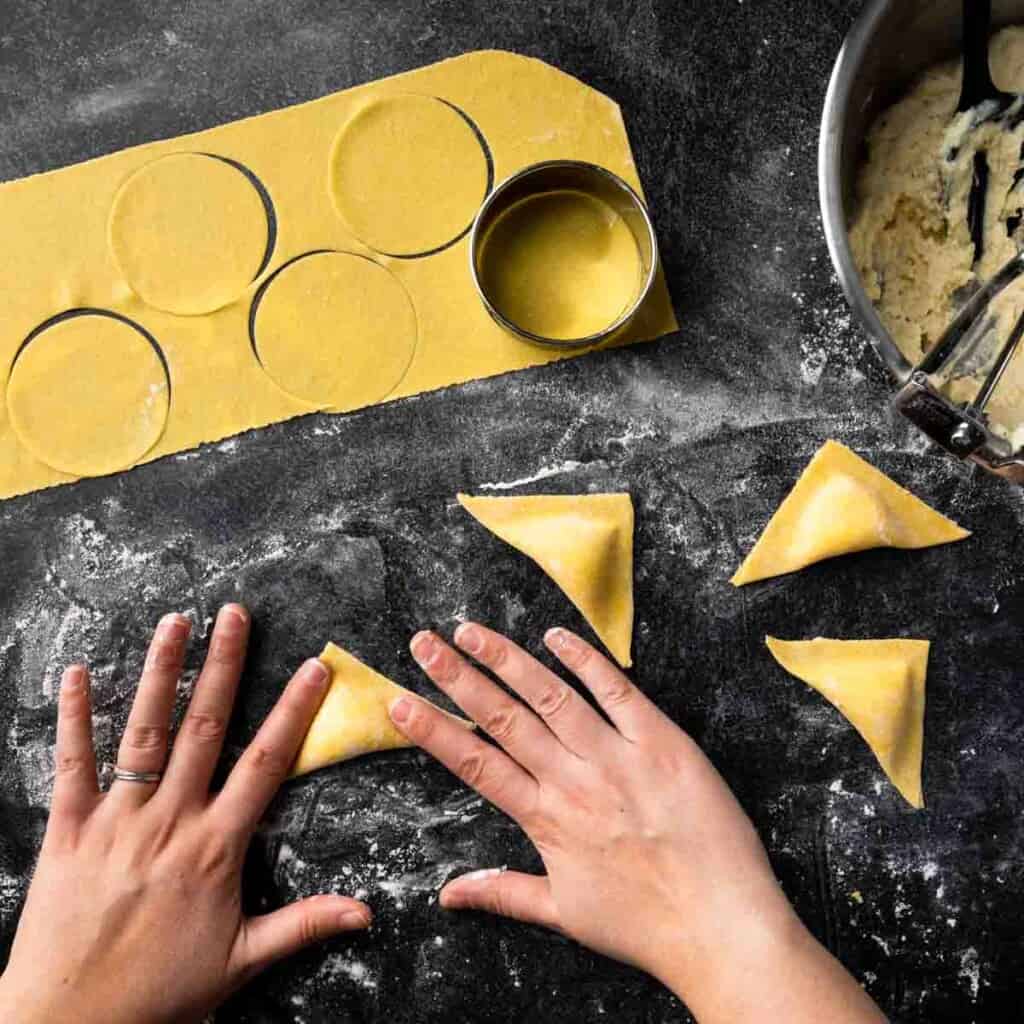
3. Fold the dough over itself OR place a second sheet of dough over the ravioli. (If using square wonton wrappers, I recommend folding them diagonally to create triangle shaped ravioli.) Use your fingertips to seal the edges and be sure to avoid trapping any air pockets. If you would like, you can trim the edges with a fluted pasta wheel.
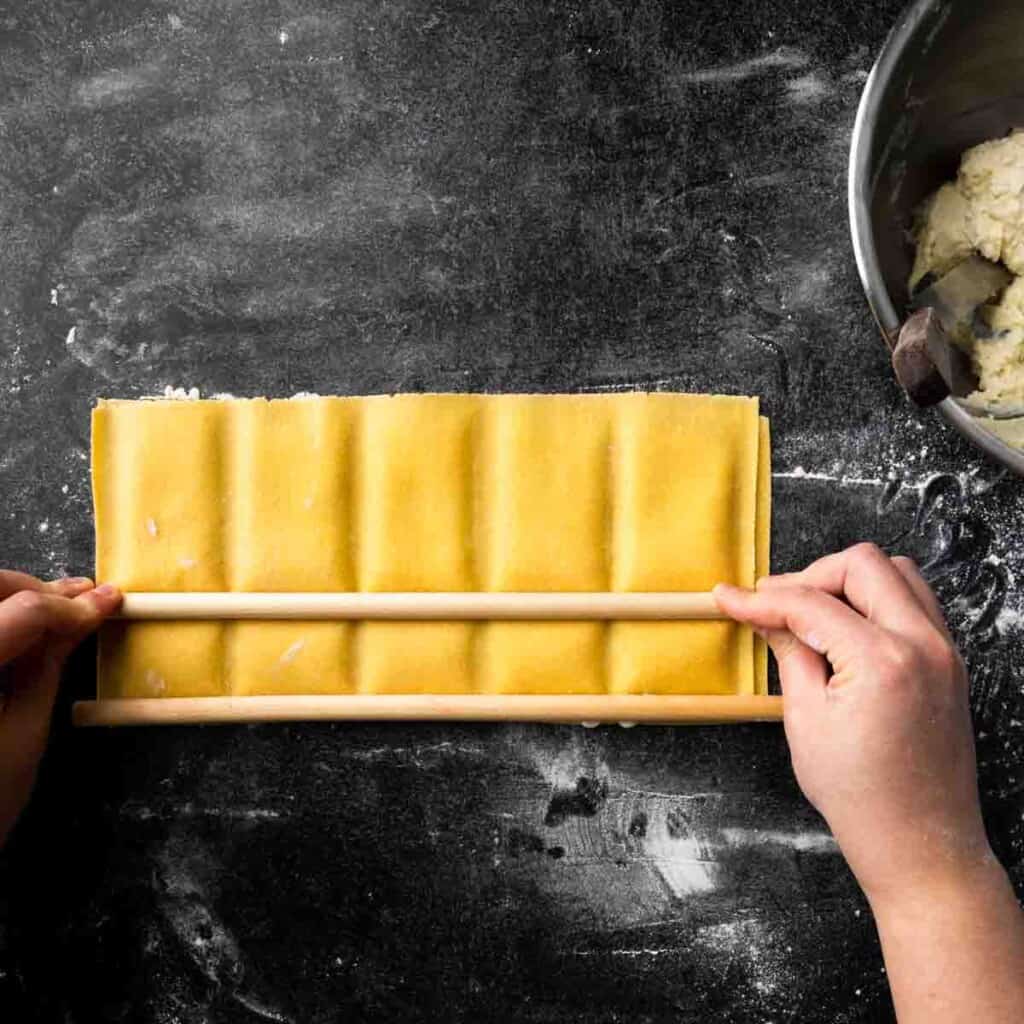
Method #5: The Dowel Method
The Dowel Ravioli Method was built for speed! I learned this method on Instagram from the incredible creator behind Salty Seattle. This method should also work with a wooden ravioli rolling pin - but I can't say I've tried it yet!
This method is great for making ravioli quick. However, the dowel method only works for ravioli with perfectly smooth fillings. Do not use this method for any pasta fillings that have texture - you won't be able to create a proper seal.
Also, it's worth noting that this method creates a ravioli with less filling than the others. So don't be afraid to go with bold flavors and extra sauciness!
How To Make Ravioli with Wooden Dowels
1. Lay one sheet of pasta dough down on a clean floured work surface. Using an offset spatula, spread a thin layer of smooth pasta filling over the surface of the dough.
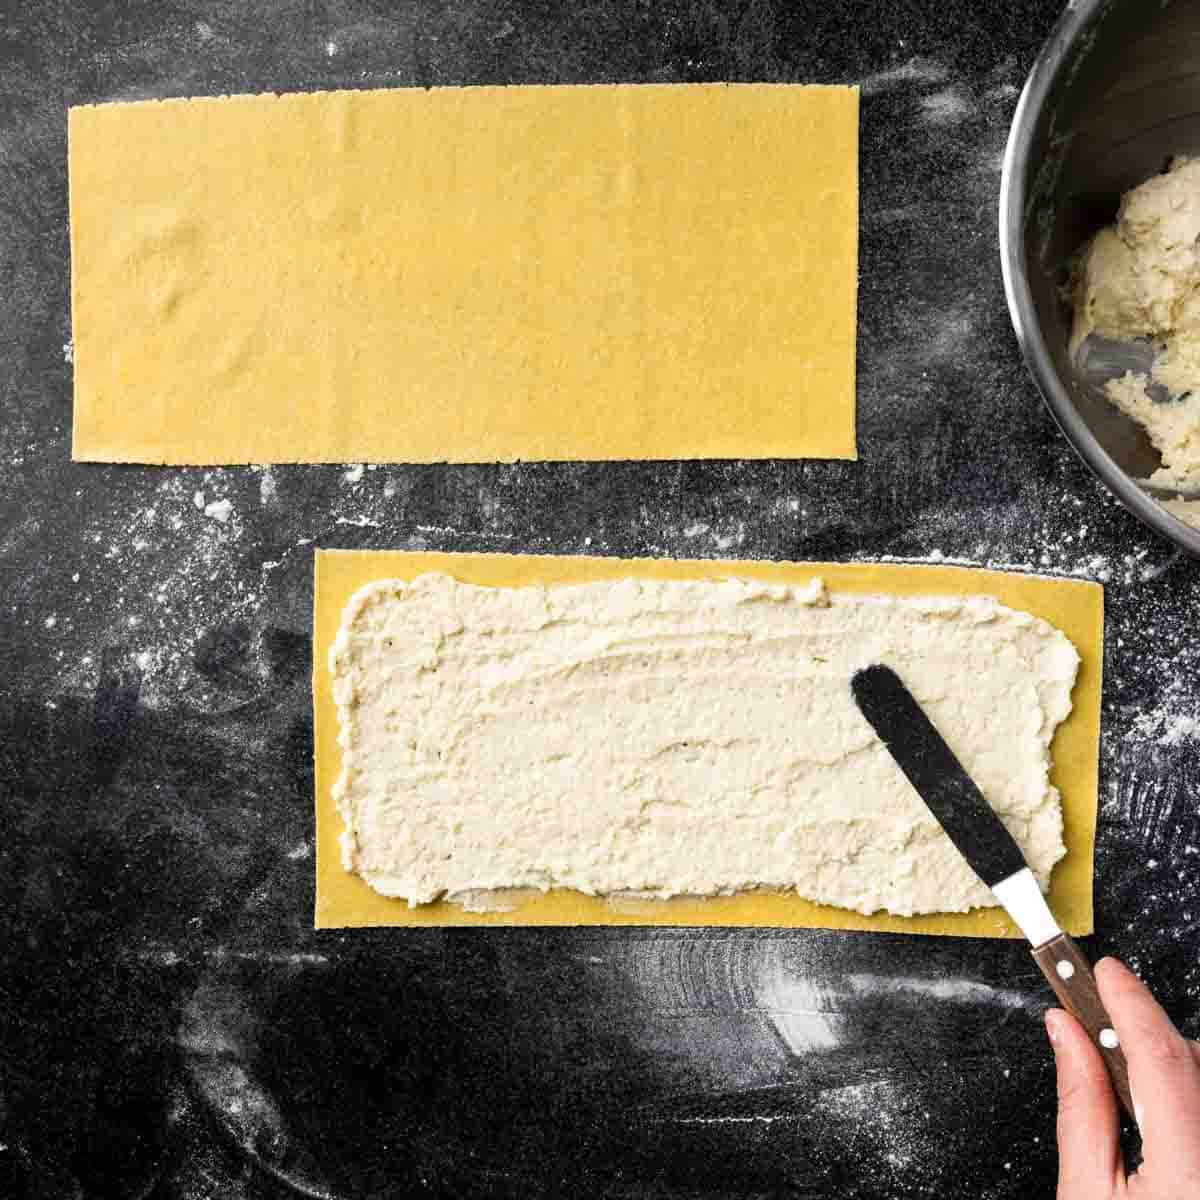
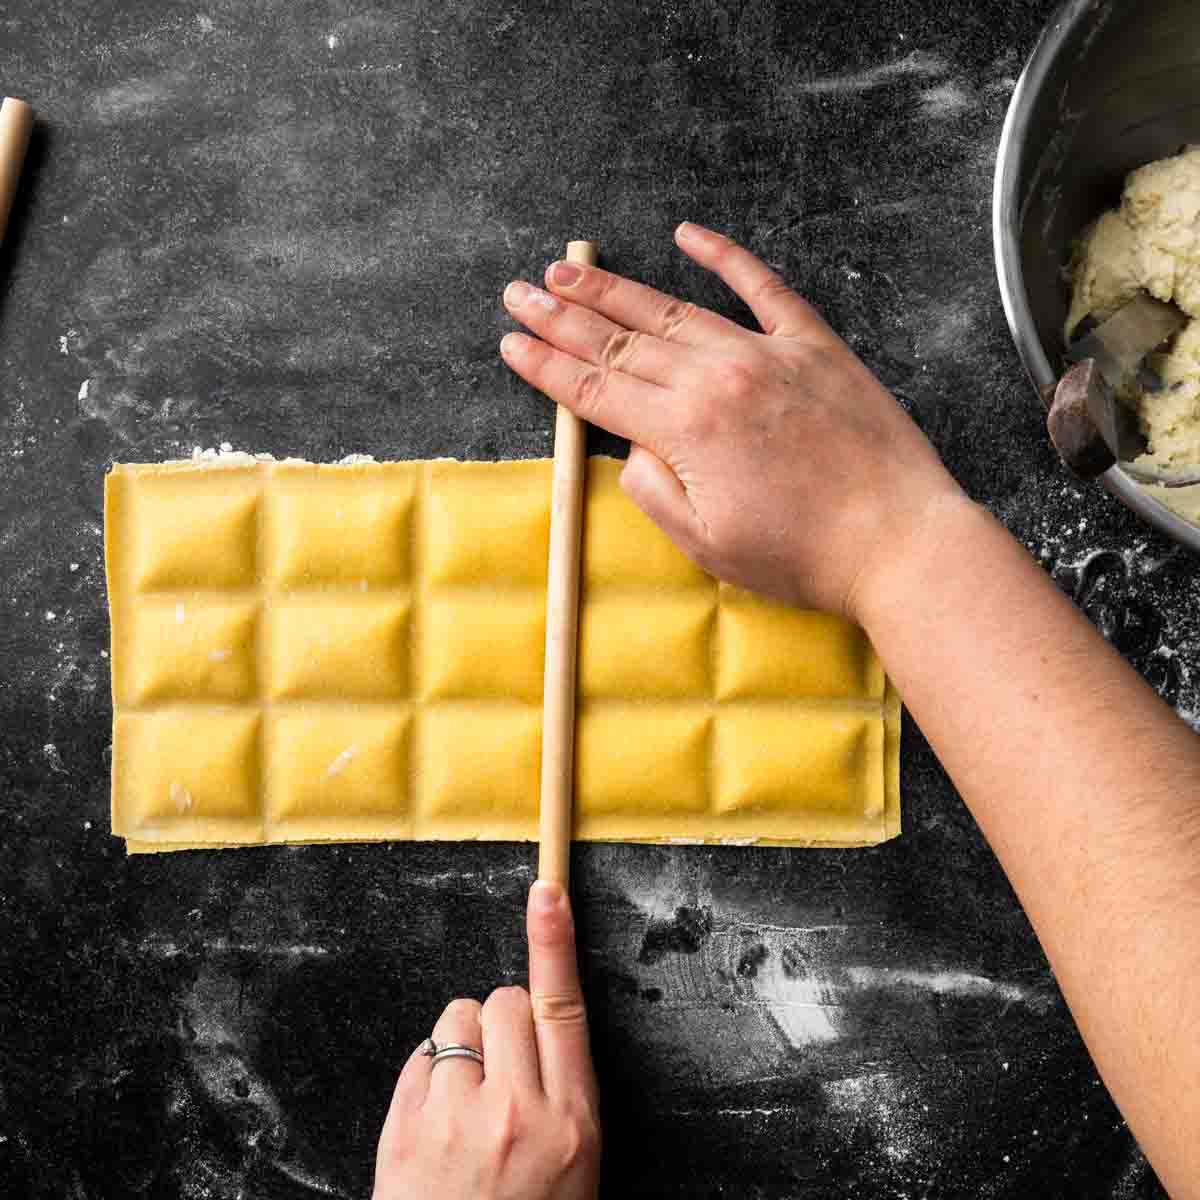
2. Lay the second sheet of pasta dough over the filling. Using wooden dowels, press into the dough in even increments. Roll the dowels back and forth slightly, while applying firm pressure, to properly seal the dough.
Seal lines in the dough going all in one direction first. Then, seal off sections perpendicularly. You can make the ravioli any size you want but I recommend keeping them around the size of 1 - 2 inch squares.
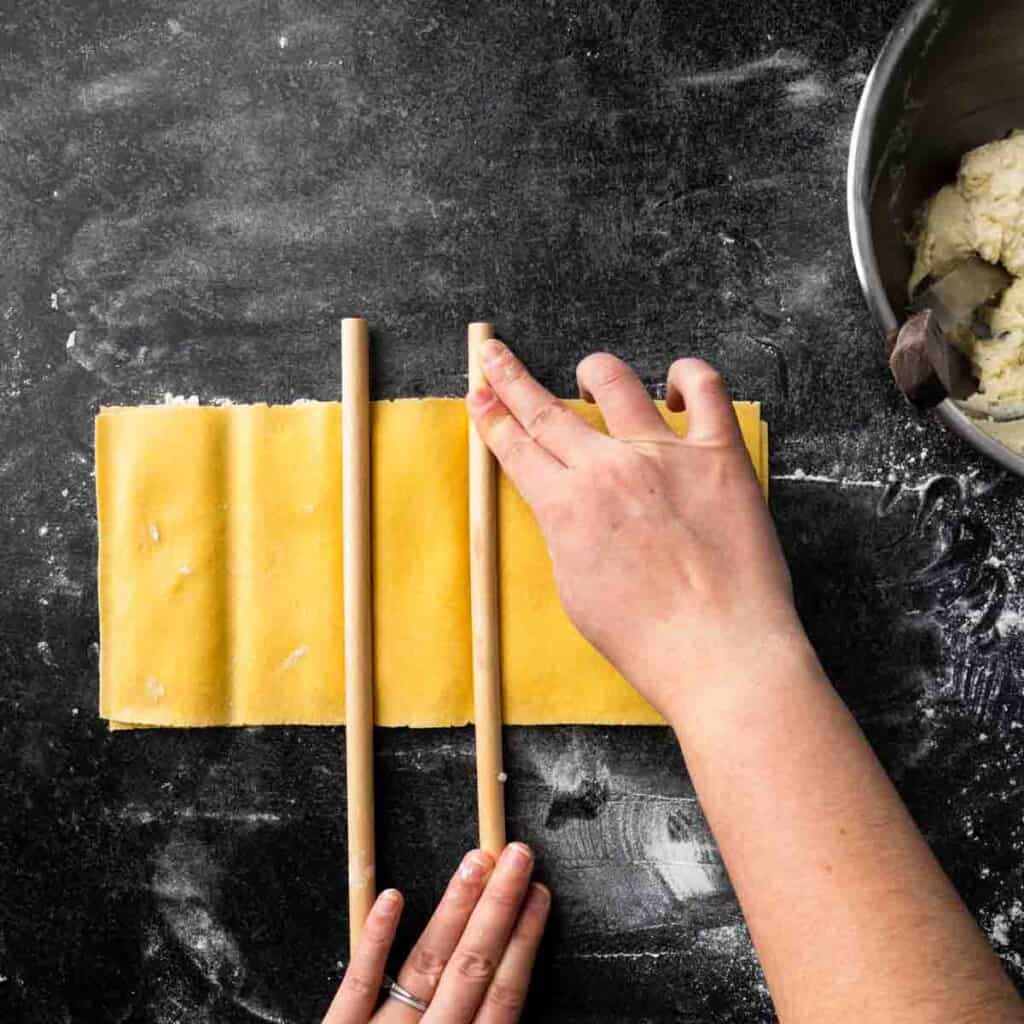
The dough will seal with the natural moisture of the filling. At the same time, the dowels will press the filling away from the seal, towards the center of the ravioli.
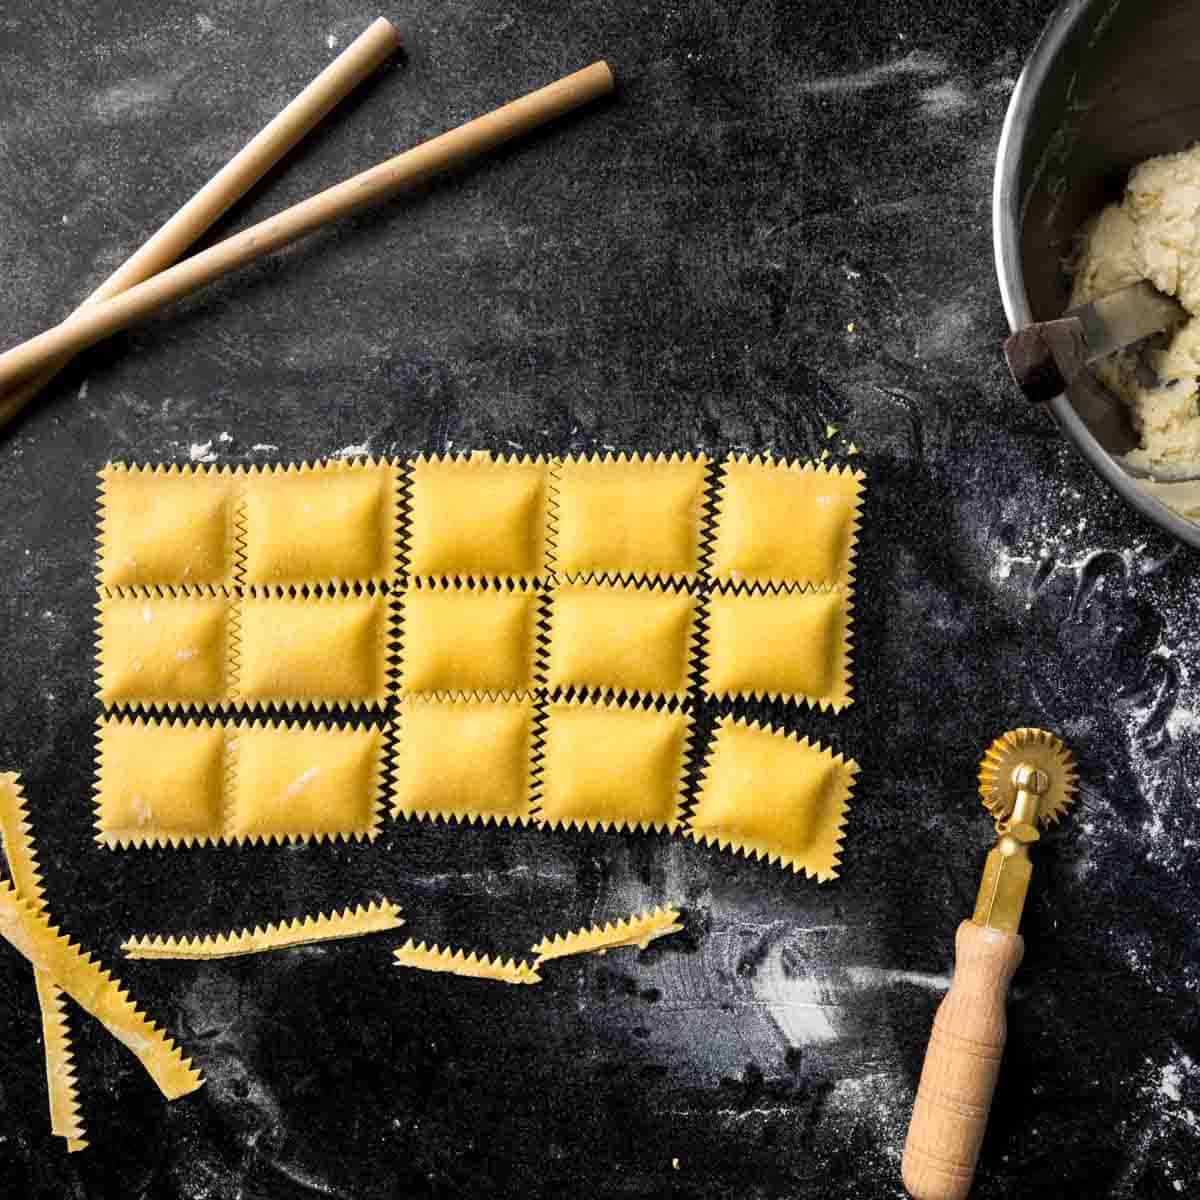
3. Once you create your grid pattern, press over each seal again to create evenly shaped and sealed ravioli.
4. Use a sharp knife or pasta wheel to cut the dough along the sealed lines. In my experience, a fluted pasta wheel helps to enforce a strong seal for this type of ravioli.
Tips for Making Filled Pastas
- Use dry farce (pasta fillings). Excess moisture is the enemy of handmade ravioli! For ricotta based fillings, I recommend draining off excess liquid through cheesecloth or a fine-mesh strainer. If your ravioli filling is too wet, try adding some breadcrumbs to help absorb the excess moisture.
- Make finely textured or pureed pasta fillings. It is easiest to create a properly sealed pasta when the fillings are smoother. Use a food processor or blender to help process the fillings until finely textured. You can always bring texture into the dish later with toppings such as toasted nuts, cheeses, breadcrumbs, proteins, etc.
- Avoid trapping air inside the ravioli! Air bubbles are the #1 cause of broken and burst ravioli. If you can see or feel an air bubble, use a toothpick to poke a small hole, squeeze out the air and press shut to re-seal. Slightly misshaped pasta is ALWAYS better than broken or water-logged pasta fillings.
- Make sure the edges are properly sealed. No matter which method you use, it's a good practice to run your pincer fingers around the edge and ensure you have a properly sealed parcel of pasta.
- Give the pasta space to dry. Avoid stacking and/or crowding.
- Don't overcrowd the pasta water! Ravioli (and other filled pastas) need to be able to "swim" in boiling water. Use a large pot and avoid overcrowding while cooking.
Drying Fresh Filled Pasta
As you are making homemade ravioli, transfer each piece to a semolina dusted baking sheet (or mesh pasta drying rack). Be sure to give each ravioli a little space to avoid sticking. The moisture from your filling will naturally absorb through the pasta dough and make it tacky. Do not stack!
After twenty or more minutes, flip each ravioli over to help dry the bottom side, as well. The ravioli can be cooked as soon as they are made. However, a brief drying period does help to cook them more evenly.
Keep in mind, fully dried ravioli make take a few additional minutes to cook.
Can This Recipe Be Stored For Later?
- Refrigerator: To make ahead of time, homemade ravioli can be kept in the refrigerator for 2 - 3 days. I recommend keeping them on the semolina dusted drying tray and covering them with a clean kitchen towel until ready to use.
- Freezer: Fresh ravioli can be frozen. However, beware that ravioli fillings will expand when frozen and can cause the pasta to crack. For this reason, I recommend slightly under-filling ravioli that you intend to freeze. Place frozen ravioli onto a sheet tray in the freezer, one at a time. Once completely frozen, the ravioli can be transferred to a freezer safe bag. For the best quality, I recommend eating frozen ravioli within a week, or so.
- For longer storage, the pasta dough and (most) pasta fillings freeze exceptionally well (before being shaped together). Pasta dough and most fillings can be frozen separately for 2 - 3 months while still maintaining great quality.
How To Cook Fresh Ravioli
- Bring a large pot of water to a rapid boil. Salt generously. To properly season my pasta, I like to make my pasta water nearly as salty as the ocean.
- Drop ravioli into the water, gently, one at a time. The goal is to keep the water hot enough to boil while adding the pasta to the pot.
- Cook until al dente. The exact cooking time will depend on the size of your ravioli and the thickness of your pasta dough. I generally cook my ravioli for about 6 - 8 minutes. Testing a ravioli for doneness is the best way to determine if you need more time.
- I recommend transferring the ravioli from the water with a slotted spoon or spider utensil. (It is more gentle than dumping them in a colander). Transfer cooked ravioli directly into your sauce of choice and top with cheese, breadcrumbs and herbs, as desired! Serve hot and enjoy your efforts!
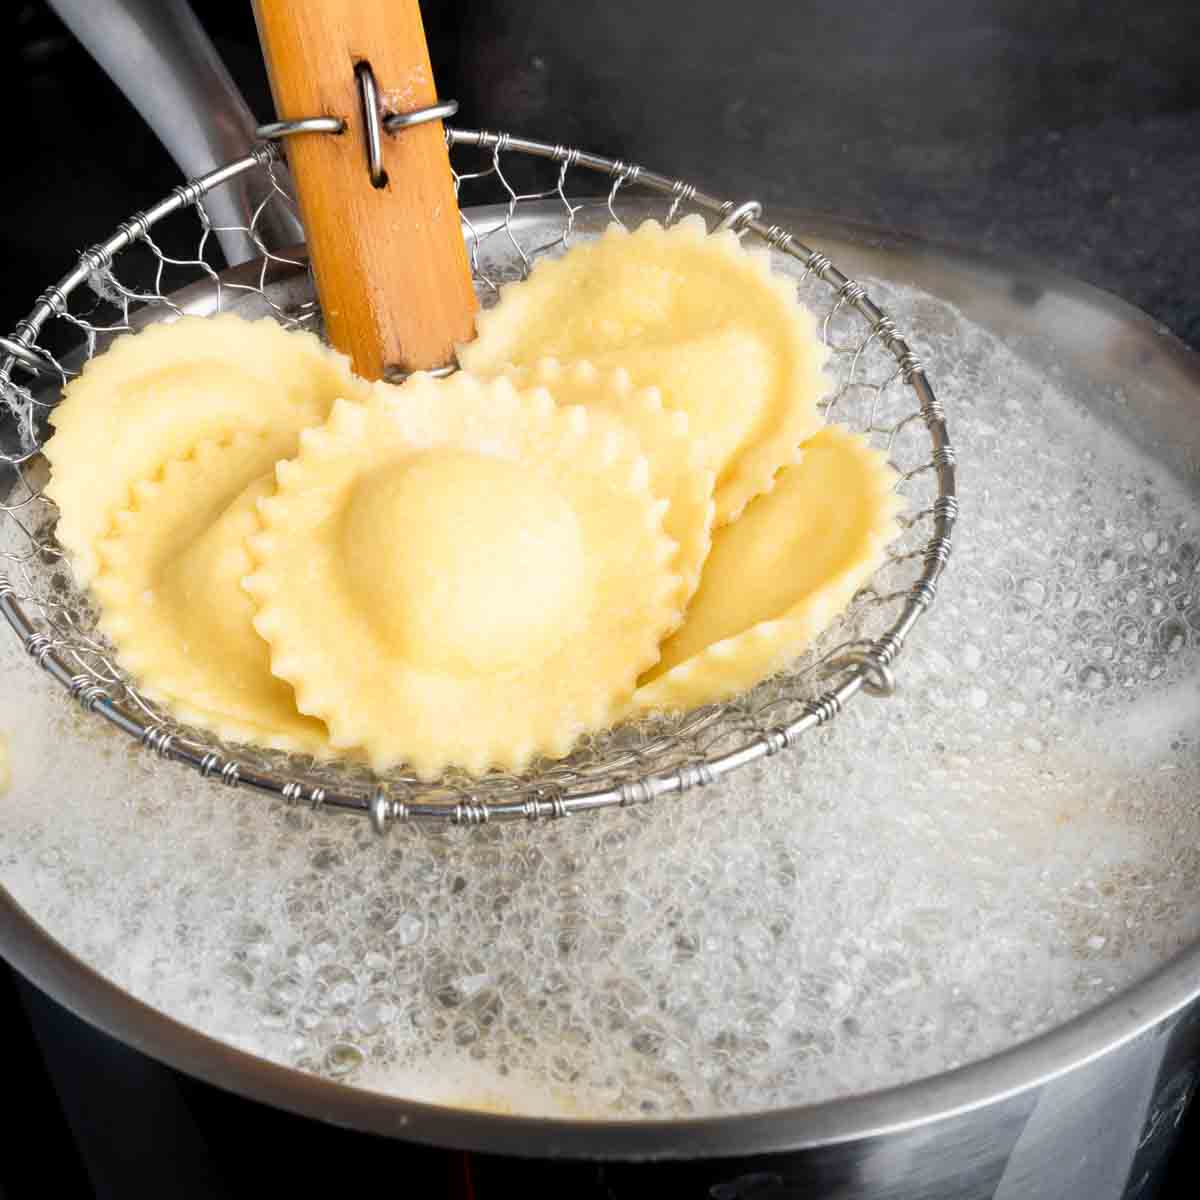
Chef's Note: Are Floating Ravioli Done Cooking? - Like me, you may have heard that ravioli are done cooking once they float to the surface of the boiling water. While that may be true for some brands of packaged ravioli, I have found this to be a myth for my homemade ravioli. In fact, my fresh ravioli typically float within 1 - 2 minutes but generally require 6 - 7 minutes for the pasta to be cooked until al dente.
Serving Suggestions
The combinations of ravioli fillings, sauces and toppings are endless!!! You can use this ravioli making tutorial with any of your favorite pasta fillings. You can even go the extra mile and make fillings with our fresh homemade ricotta recipe! Let us know your favorites in the comments below!
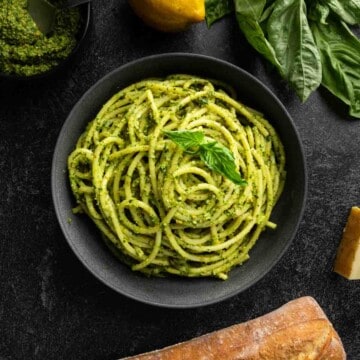
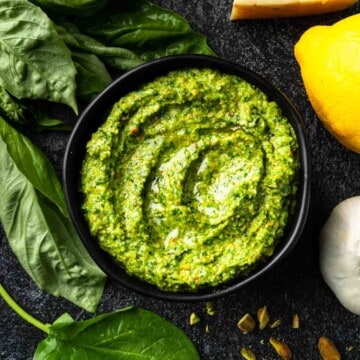
- Four Cheese Ravioli with San Marzano Tomato Sauce , slowly simmered Ragu alla Bolognese or our 5 Minute Spinach Pistachio Pesto
- Butternut Squash Ravioli in a Thyme Cream Sauce
- Sweet Potato Ravioli in Brown Butter with Sage
- Braised Beef Ravioli in Tomato Gravy
- Lobster Ravioli in a Lemon Wine Sauce
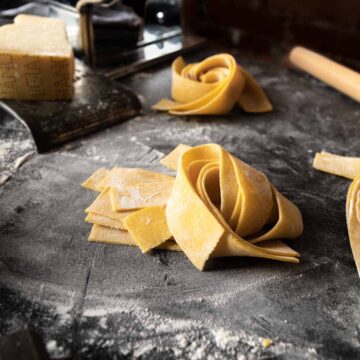
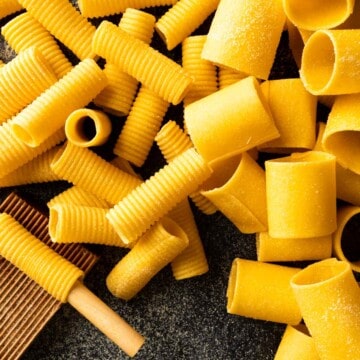
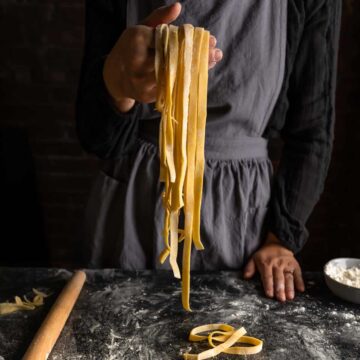
More Homemade Pasta Making Tutorials
Check out these other handmade pasta shapes using our Homemade Semolina Pasta Dough!
Recipe
How To Make Homemade Ravioli Step By Step (5 Easy Ways!)
ADJUST SERVINGS
Special Equipment
- Pasta Machine (Optional but recommended)
- Bench Scraper
- Rolling Pin
- Pastry Brush
- 1 inch Cookie Scoop or Piping Bag
- Ravioli Mold (Optional)
- Ravioli Stamp or Cookie Cutter (Optional)
- Sharp Knife (or Brass Pasta Wheel)
- ¼ Inch Dowels (2) (Optional)
Ingredients
Semolina Pasta Dough
- 1 ¼ Cups semolina flour plus more for drying pasta
- 1 ¼ Cups bread flour or all-purpose flour plus more to prevent sticking
- 1 large whole egg (about 1 ¾ ounces) room-temperature
- 5 large egg yolks (about 6 ¾ ounces) room-temperature
- Water as needed, about 2+ Tablespoons
- sea or kosher salt as desired for seasoning during boil
Ravioli (Yield 45 - 50 Pieces)
- 1 recipe Semolina Pasta Dough or 50 Wonton Wrappers
- 1 recipe Ravioli Filling Your choice; We used our 4 Cheese Ravioli recipe
Instructions
Semolina Pasta Dough
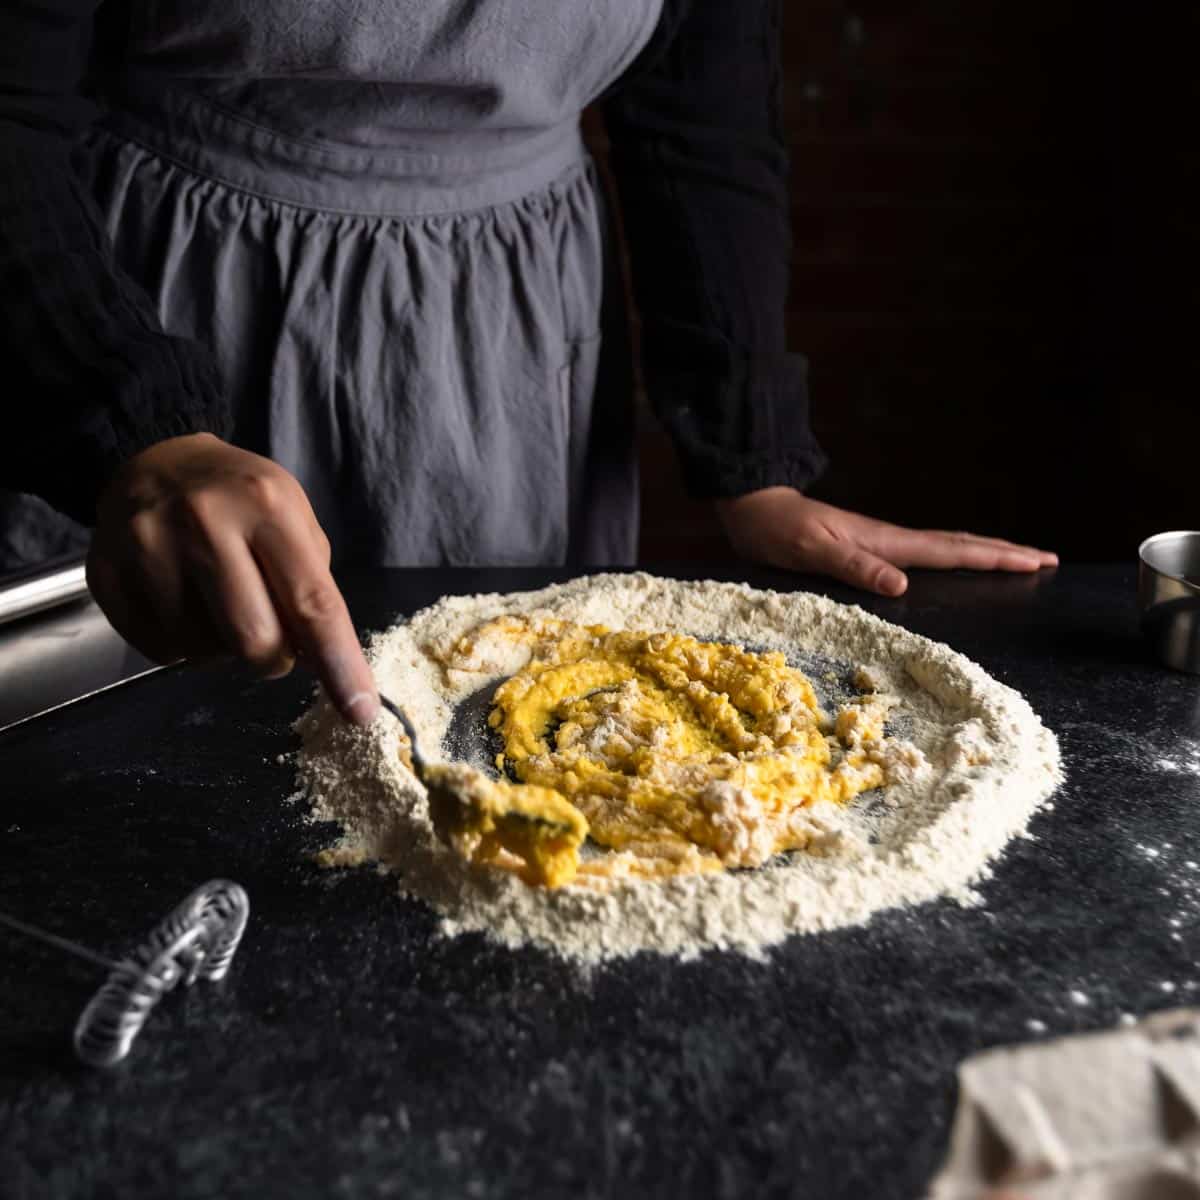
- Gather, measure and prepare the Semolina Pasta Dough ingredients as listed. In a medium mixing bowl, add semolina and bread flours and whisk to combine. Transfer flour mixture in a mound on a smooth, clean work surface. Use the bottom of the mixing bowl to shape a well in the center of your flour.
- Add the egg, egg yolks and about 1 Tablespoon of water to the well. Using a fork, begin to whisk the eggs and water together until smoothly combined. Continue whisking, while slowly bringing flour into the eggs to form a smooth paste.
- Once most of the pasta flour is incorporated and the dough begins to come together, switch from using the fork to using your bench scraper. Scrape the dough up from your work surface and fold it over itself. Use the bench scraper to chop the mixture together and evenly distribute the flour throughout a shaggy dough. If the dough is too dry to come together, drizzle a little additional water over the mass of dough and continue to combine with the bench scraper.
- Use your hands to pull the dough together and knead. Use the mass of dough to pick up any scraggly dough scraps or loose flour on your work surface. The dough should be firm and may be slighlty tacky but should not stick to your hands or the work surface.
- Once all the flour is incorporated and dough is homogenous, form into a ball. Cover the dough with a damp towel or plastic wrap to prevent drying. Allow the dough to rest for at least 30 minutes or overnight in the refrigerator.
- Once rested, you can begin sheeting your pasta to your desired pasta shape. Using a knife or bench scraper, divide your dough into six equal portions. Work with one portion at a time, keep the remaining dough covered with your damp cloth or plastic wrap to prevent drying.
- Flour your dough, work surface and kitchen tools as needed, to prevent sticking. With a rolling pin, or on the widest setting of your pasta maker, begin to roll out and flatten your dough into an elongated oval. Fold the tapered ends of your oval dough over itself, in thirds (like you would a letter) so your folded dough is approximately the shape of a 13 centimeter (5 inch) square or rectangle (*or the width of your pasta maker, if using). Repeat twice for each piece of pasta dough.
Ravioli
- Using a pasta machine or rolling pin to sheet two portions of pasta dough to about 1 millimeter thick (or use wonton wrappers).
- Shape ravioli using your desired method (Ravioli Mold, Ravioli Stamp, Hand-Cut, Fold & Seal (a.), Dowel Method). Detailed photo instructions of each method are included in the post text. Scoop or pipe ravioli filling onto the dough. Use a barely moistened pastry brush to apply moisture around the edges of the filling. Seal ravioli firmly while being careful not to trap any air bubbles.
- Allow ravioli to dry on a semolina dusted baking sheet. Meanwhile, repeat the ravioli making process until all dough and filling is used. Excess scraps of pasta dough can be rerolled several times.
- To cook ravioli, set a large pot of water to a rapid boil over high heat. Salt the water generously. Drop ravioli into the water, gently, one at a time. Boil ravioli for about 6 minutes or until your desired doneness is reached. Gently remove ravioli from the water with a slotted spoon or spider tool. Serve immediately with sauce of choice. Enjoy!
Notes
* A Note About Salt
Unless otherwise noted, all recipes on The Sage Apron are developed using Diamond Crystal Kosher salt. It is a great all-purpose salt for cooking and baking. If using table salt, reduce quantities by about half.

Comments
No Comments