


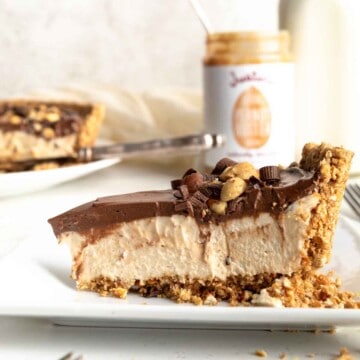
Friends, there is nothing more worthy of a celebration that this homemade Cookie Dough Ice Cream Cake!
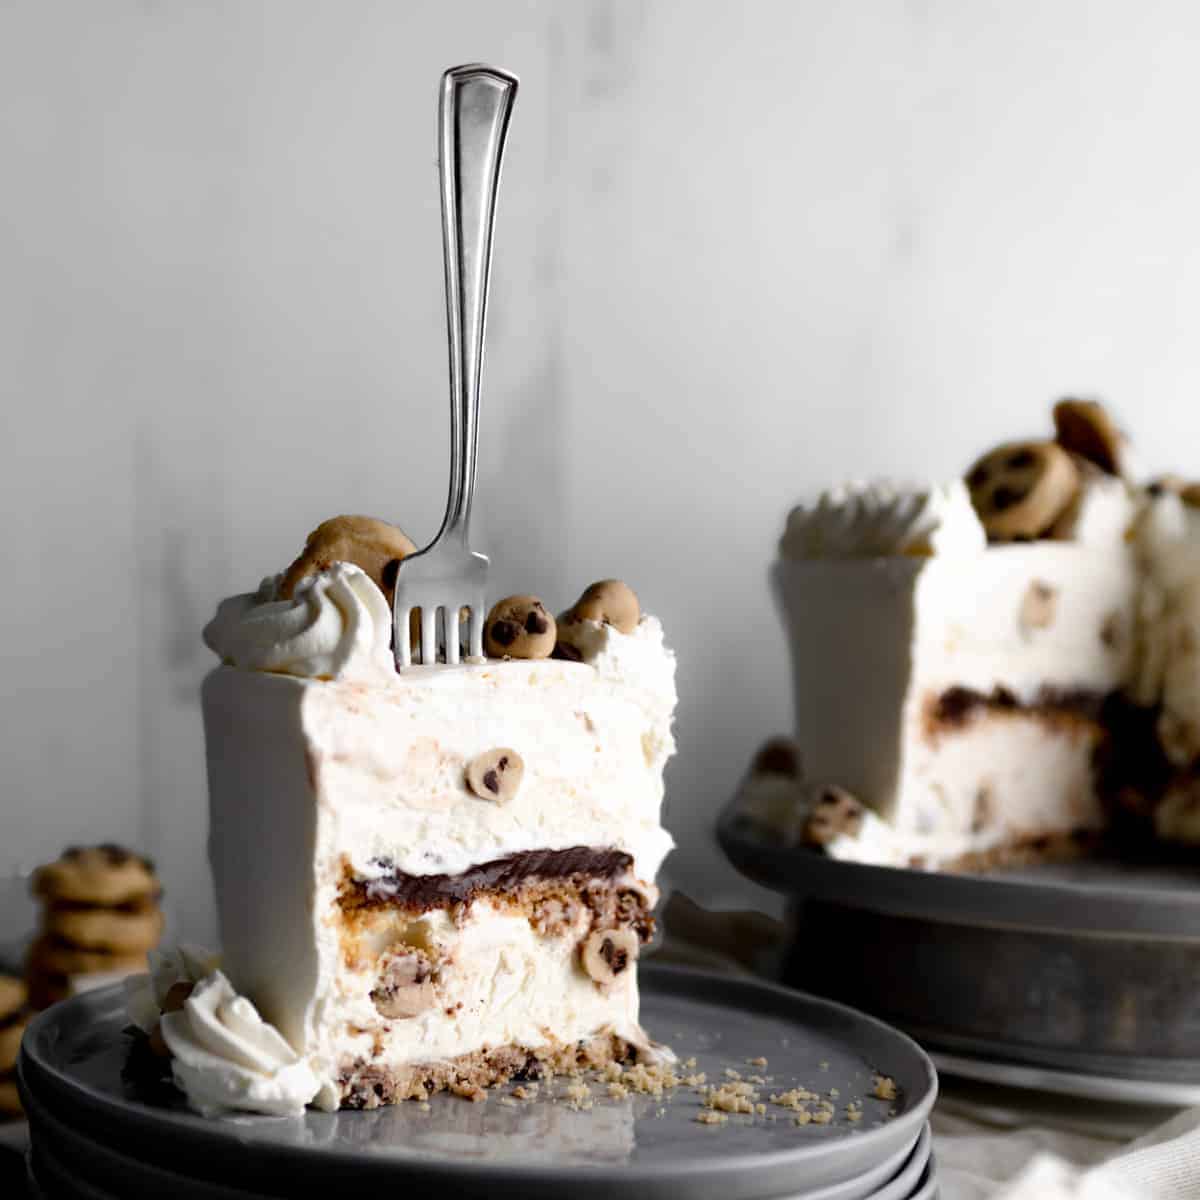
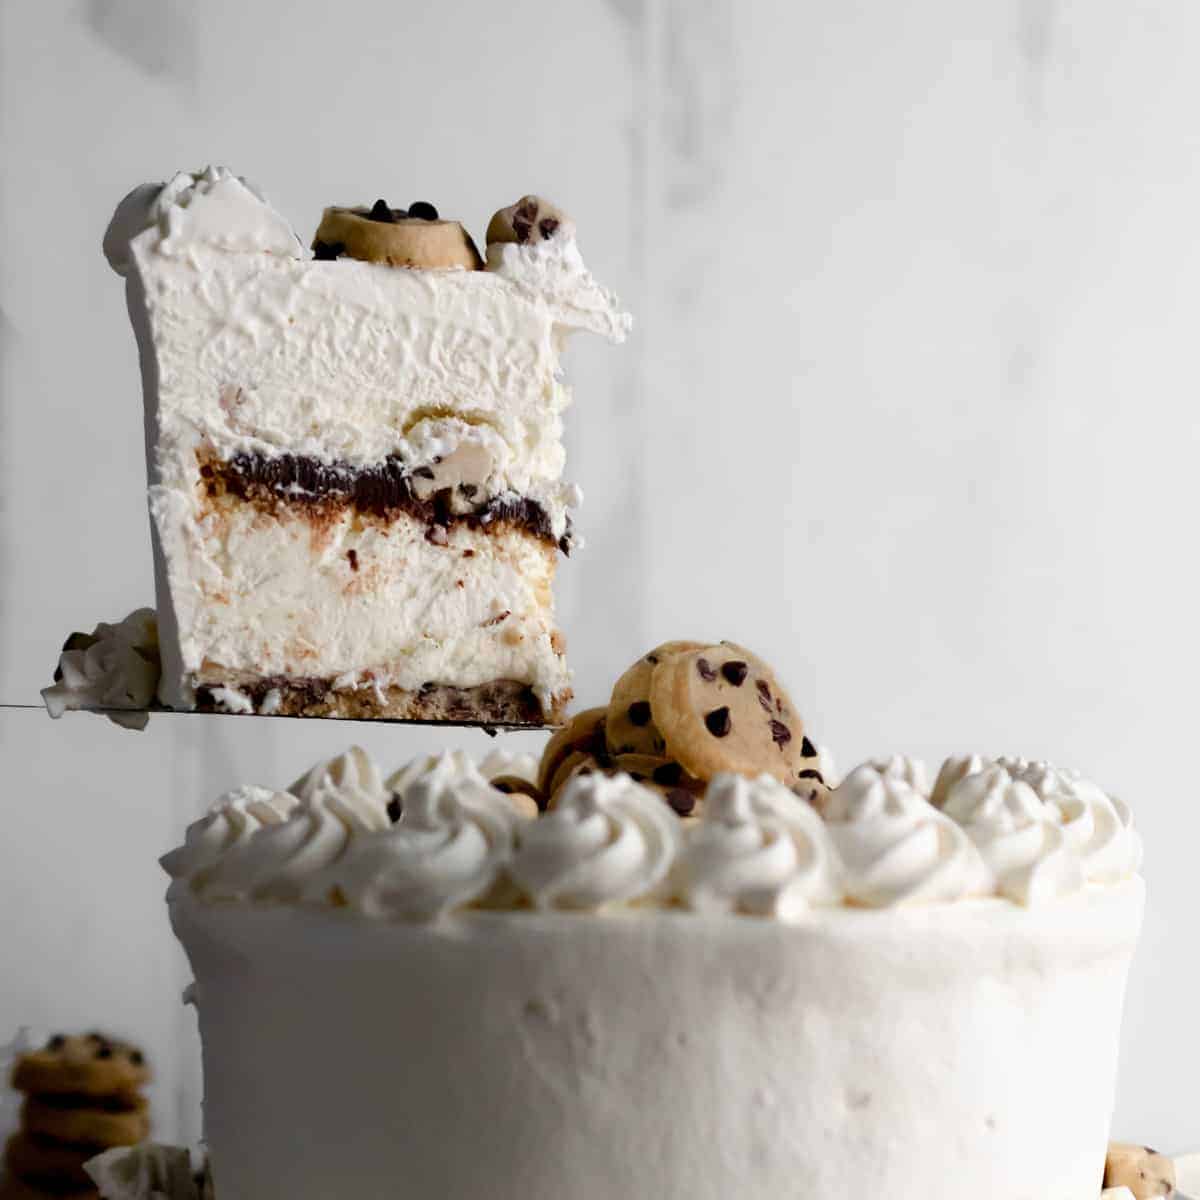
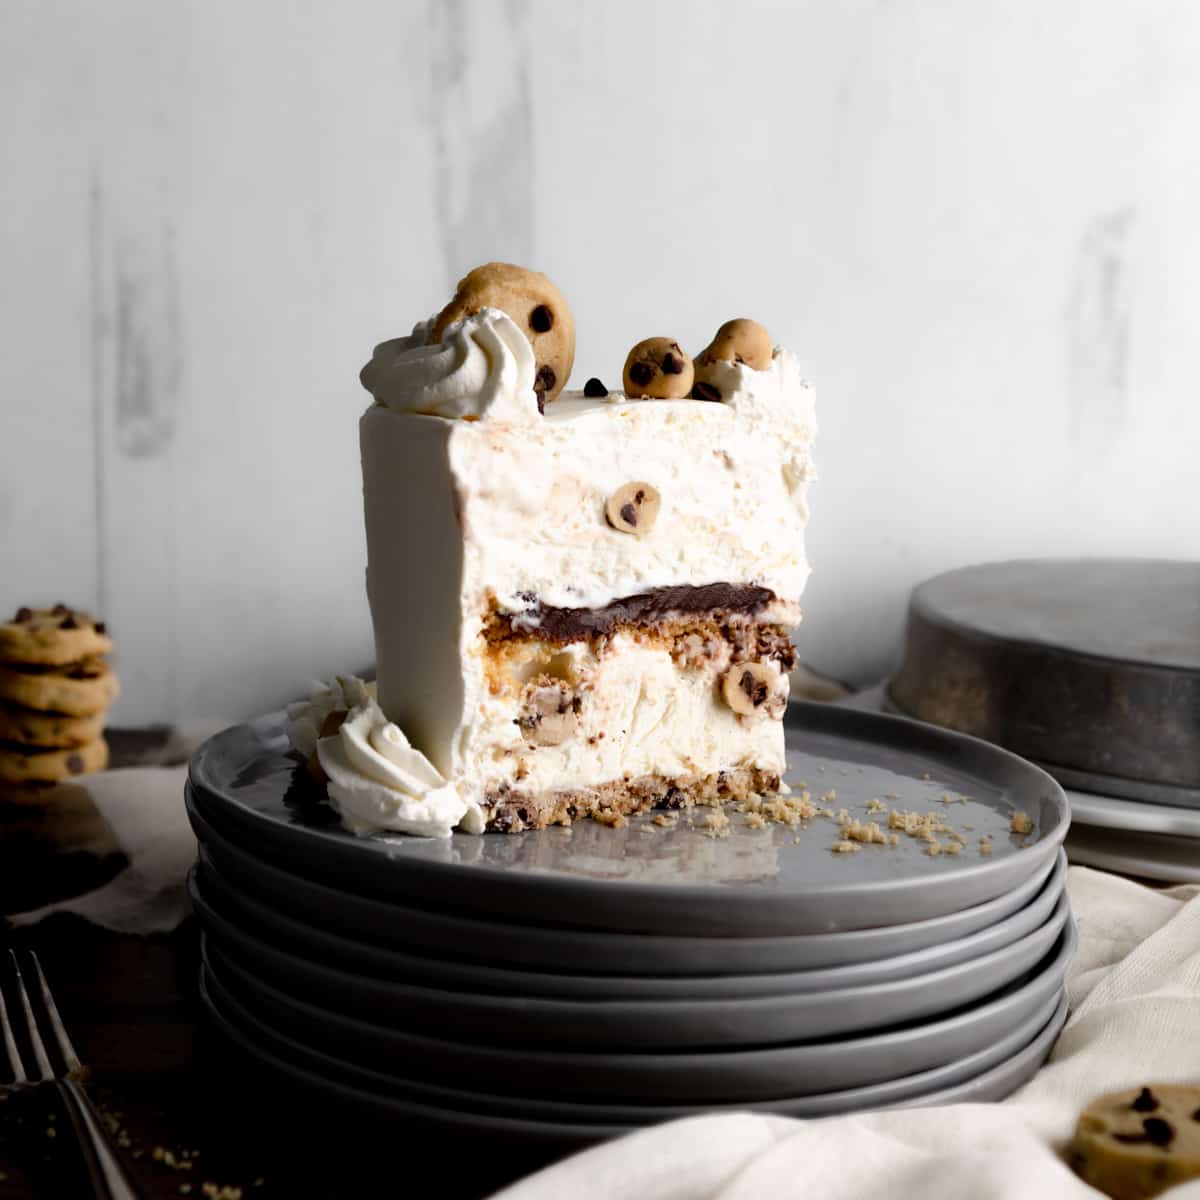
This scratch recipe features a chocolate chip cookie crumb crust, no-churn vanilla ice cream studded with edible cookie dough, a gooey chocolate ganache center and whipped cream icing! It’s an incredible, brain-freezing, crowd-pleaser that is sure to bring childlike joy to kids and adults alike! Serve this show-stopper at your next celebration for all the oohs, ahhs, mmms and smiles!
This recipe is made with no-churn vanilla ice cream. However, you can make this recipe with churned Old Fashioned Vanilla Bean Ice Cream instead.
Jump to:
IMPORTANT NOTE - If you ‘Jump to Recipe’ and read nothing else (we don’t blame you, *silly bloggers*) - hear this: freeze between each layer and do not rush the process! That’a all you really need to know. So, let’s get started. Clear some freezer space and let’s do this!
Cookie Dough Ice Cream Cake: The Components
Okay, hear us out! Before you get turned off by all of the seemingly-daunting steps of this recipe - LISTEN! It’s easy!!! If you’ve ever made cookies and whipped cream before, you can DO this! And, hey! If you’ve never made cookies or whipped cream before... you can DO this! Despite a slightly-intimidating, long-winded post and recipe...this Cookie Dough Ice Cream Cake is great for the novice baker.
Chocolate Chip Cookie Crust, Crumble & Mini Chippers
For this Cookie Dough Ice Cream Cake, a Brown Sugar Cookie recipe is used for the Chocolate Chip Cookie Crust, the Brown Sugar Cookie Crumble center and the Mini Chipper Cookies used to garnish the cake. Instead of the traditional chocolate chip cookie texture, this recipe resembles more of a shortbread style cookie. This Brown Sugar Cookie recipe has all of the flavors of chocolate chip cookie, but it crumbles and freezes better for this ice cream cake recipe.
Edible Chocolate Chip Cookie Dough
Since regular cookie dough can lead to tummy aches (all that raw flour) and, supposedly salmonella, the Edible Cookie Dough portion of this recipe utilizes pre-baked flour and skips the eggs, altogether. Though, has anyone ever contracted salmonella from raw cookie dough, I wonder? Nevertheless, this cookie dough is super delicious, tastes like it's straight off of grandma's wooden spoon and won’t make anybody sick. For this Cookie Dough Ice Cream Cake, the cookie dough is used in the No-Churn Vanilla Ice Cream and as a fun decoration.
How To Bake Flour for Edible Cookie Dough
- Preheat the oven to 350° celsius (180° celsius).
- Place your measured flour on a small sheet tray lined with parchment paper. If mounded, press the flour flat to bake evenly.
- Bake the flour for 5 minutes. Allow the flour to cool completely before using in the Edible Cookie Dough recipe. Once cooled, you can transfer the flour on the parchment paper directly into your recipe or into an air-tight container to be stored for later use.
No-Churn Vanilla Cookie Dough Ice Cream
No-Churn ice cream is such a simple and satisfying process! In fact, the No-Churn Vanilla Cookie Dough Ice Cream only requires a few ingredients, ten minutes and no special ice cream making equipment. Who knew homemade ice cream could be so easy? For the best flavor possible, we recommend using a fresh vanilla bean. That being said, if fresh vanilla is not an option, vanilla bean paste or extract will work, as well.
This Cookie Dough Ice Cream Cake recipe will require two batches of No-Churn Vanilla Cookie Dough Ice Cream. While it may seem easier to make a double batch, we recommend preparing each batch separately, just before freezing. The first batch can be prepared immediately after the crust is made. Allow the first layer of ice cream to freeze for, at least, one hour.
Then, once that layer has frozen, the Brown Sugar Cookie Crumble and Chocolate Ganache can be added. Allow those layers to chill in the freezer while you prepare the second and final batch of No-Churn Vanilla Cookie Dough Ice Cream. Taking your time and allowing each layer to freeze is key to having properly textured ice cream and clean, distinct cake layers.
Chocolate Ganache
No great Cookie Dough Ice Cream Cake is complete without a fudge-like chocolate center, am I right? The trick to getting a perfect layer of gooey chocolate ganache is the addition of a little corn syrup. Honestly, I don’t care to use too much corn syrup in my kitchen. However, for this recipe, a couple spoonfuls of corn syrup added to this ganache is essential. Without the use of corn syrup, the ganache layer would freeze firm, be difficult to cut through and be nowhere near as desirable.
Whipped Cream “Frosting”
Instead of a traditional cake icing (that would by cloyingly sweet with this recipe) we opted for a light and simple whipped cream “frosting”. Make sure the cake is completely frozen before attempting to frost. Have fun frosting the Cookie Dough Ice Cream Cake anyway that you please.
As pictured, I chose to decorate this cake in a traditional full-coverage style with piped borders. That being said, feel free to show off the layers by leaving the sides of this cake naked. Alternatively, you can skip the fancy frosting process, altogether. Instead, for a more relaxed vibe, top each slice with a dollop of whipped cream when serving. anyway you slice it, this dessert is delicious!
How To Make Cookie Dough Ice Cream Cake at Home
In this section, we will break down everything you need and all of our insider tips for making this recipe!
Tools of the Trade
This Cookie Dough Ice Cream Cake is simple to make at home but it does require some special equipment. Before you bite off more than you can chew, make sure you have these few items handy...
- 8 or 9 inch (20 - 23 centimeter) pastry ring OR an 8 or 9 inch (20 - 23 centimeter) springform pan
- Acetate cake collar - acetate is clear plastic that is usually sold in rolls. For this recipe, I used 4 inch acetate to extend the height of my pastry ring and create a tall layered cake. The acetate cake collar easily peels away before frosting the cake. Acetate is available online or in most cake shops. I purchase my acetate by the foot at a local cake store.
- 10 inch ( 25 centimeter) cardboard cake circle - If you do not have a cake circle, you could build this cake directly on the serving platter, instead.
- Stand Mixer with paddle and whisk attachments - Alternately, the cookie dough can be mixed by hand and the cream can be whipped with a hand-held mixer. While you can technically whip the cream by hand, too... it’s a lot of whipping and your arm will certainly be tired!
- Piping bag & Pastry Tip of choice - Optional, for decorating the Ice Cream Cake with the whipped cream. As pictured, I used a large open star tip for the cake’s border and topping. (Pastry tip #828, to be exact.)
Tips and Tricks for Lovely Layers, Decorations & Simple Serving
We’ll be honest, this recipe require a bit of patience! For the best results, each layer of this cake will need time to freeze before proceeding on. All in all, this Cookie Dough Ice Cream Cake doesn’t require much active preparation time. In fact, ninety percent of the process is hanging out and waiting for the freezer to do it’s thing. That’s #1. All of our special details, tips, tricks and advice for this recipe is listed below.
- Make sure you have ample (level) freezer space! This cake takes up some real-estate in the freezer, be sure to clear some room!
- Allow each layer to freeze before proceeding. For the best results, let each layer of Ice Cream Cake freeze before adding the next layer.
- Chill the Brown Sugar Cookie Dough and Mini Chipper dough before baking. This will help prevent spreading and uneven baking.
- Slightly over-bake the Brown Sugar Cookies for the Chocolate Chip Cookie Crust. While we love a soft, slightly under-baked cookie in any other circumstance, crisp cookies work best for this crumb and crust.
- Whip the cream while it is very cold. When whipping cream in the warmer Summer months, I like to pop my metal stand mixer bowl in the refrigerator for ten or so minutes before whipping.
- Gradually increase the cream whipping speed. - When making whipped cream, don’t put the mixer on full blast right away. (This will create larger air bubbles in the whipped cream that are likely to deflate. Instead, start the speed off slow and increase the speed every 30 - 60 seconds until desired consistency is reached.
- When ready to serve, let the cake temper at room-temperature for 10 - 15 minutes before slicing. Tempered Ice Cream Cake is easier to slice, serve and eat!
- For clean layered slices, use a sharp, hot knife. We like to heat a chef’s knife in a pitcher filled with hot water, before slicing. Dry the knife with a clean kitchen towel, and repeat the heating and wiping process between each slice.
You May Also Like...


Recipe

Cookie Dough Ice Cream Cake (No-Churn Scratch Recipe)
ADJUST SERVINGS
Special Equipment
- 8 or 9 inch (20 - 23 centimeter) pastry ring OR a 20 - 23 centimeter (8 or 9 inch) springform pan
- 30 inches (76 centimeter) length of 4 inch (10 Centimeter) wide acetate, for a cake collar
- 10 inch (25 centimeter) cardboard cake circle OR build directly on a large serving platter
- Stand mixer with paddle and whisk attachment
- Piping bag & Pastry Tip of choice (we used open star pastry tip #828)
Ingredients
Brown Sugar Cookies (Divided for Chocolate Chip Cookie Crust, Brown Sugar Cookie Crumble & Mini Chippers)
- 1 Cup unsalted butter room-temperature
- ½ Cup (lightly packed) light brown sugar
- 1 Tablespoon vanilla extract
- ½ teaspoon fine kosher salt*
- 2 Cups all-purpose flour
- ¼ Cup mini chocolate chips
Edible Chocolate Chip Cookie Dough
- 1 Cup unsalted butter room-temperature
- ½ Cup (lightly packed) light brown sugar
- 1 Tablespoon vanilla extract
- ½ teaspoon fine kosher salt*
- 2 Cups all-purpose flour baked at 350° Fahrenheit (180° celsius) for 5 minutes, cooled (See Edible Cookie Dough text above)
- ¼ Cup mini chocolate chips
Chocolate Chip Cookie Crust
- ¾ recipe Brown Sugar Cookies
- 2 Tablespoons unsalted butter melted and cooled
- 3 Tablespoons mini chocolate chips
No Churn Vanilla Cookie Dough Ice Cream
- 14 ounces sweetened condensed milk (1 can) divided in half portions of 7 ounces (198 grams)
- ½ split vanilla bean OR 1 Tablespoon of vanilla bean paste OR vanilla bean extract divided in half portions of ¼ of a split vanilla bean or ½Tablespoon
- 4 Cups heavy cream very cold, divided in half portions 2 Cups (473 milliliters)
- 1 recipe Edible Chocolate Chip Cookie Dough divided in thirds (one third of the Edible Cookie Dough will be reserved for decorating)
Chocolate Ganache
- 1 Cup mini chocolate chips
- ½ Cup heavy cream heated to simmer
- 2 Tablespoons light or dark corn syrup
Whipped Cream Frosting
- 2½ Cups heavy cream very cold
- 1 - 2 Tablespoons powdered sugar as desired for sweetness
- 1 teaspoon vanilla extract
Instructions
Brown Sugar Cookie Dough (For Chocolate Chip Cookie Crust, Brown Sugar Cookie Crumble & Mini Chippers)
- Gather, measure and prepare the Brown Sugar Cookie ingredients as listed. For the most consistent results, we recommend using metric weight measurements whenever possible. To view metric measurements, toggle the US Customary/Metric switch at the top of this recipe card.
- In the bowl of a stand mixer fitted with the paddle attachment, cream the butter and sugar together on medium speed for 3 - 4 minutes or until pale and fluffy.
- Add salt and vanilla. Mix to combine.
- Add flour and mix on lowest speed until just combined. Dough will be dry and crumbly, do not over-mix. If necessary, fold in remaining crumbs of flour at the bottom of the bowl with a rubber spatula. Gently press the dough together.
- Divide the dough, leaving about one fourth of the dough in the mixer. Transfer the other three-fourths of the dough to a work surface lined in plastic wrap. This dough will be used for the Brown Sugar Cookies. Shape the dough into a log about 2 ½ inches (6 centimeters) in diameter. Wrap tightly in the plastic wrap and chill in the refrigerator.
- Arrange two racks in top and bottom thirds of the oven. Preheat the oven to 350° Fahrenheit (180° celsius).
- Meanwhile, add ¼ Cup (43 grams) of the mini chocolate chips to the remaining dough in the stand mixer. Mix briefly to combine. This dough will be used for the Mini Chipper Cookies. Transfer the small portion of dough to a work surface lined with plastic wrap. Shape the dough into a log about 1 inch (2 ½ centimeters) in diameter. Wrap tightly in plastic wrap and chill in the refrigerator.
- While the dough is chilling, prepare two sheet trays with silicone baking mats or parchment paper.
For the Baked Brown Sugar Cookies:
- Once the larger portion of Brown Sugar Cookie Dough has chilled completely, after about 30 minutes, remove from the refrigerator. Slice the cookies in about ⅓ inch (1 centimeter) disks. Arrange the disks on the prepared sheet pans. Bake the Brown Sugar Cookies, turning the pan once, until edges are crisp and golden browned, about 18 - 25 minutes. Since these cookies will be crumbled for the crust and crumb filling, it is preferable to slightly over-bake the cookies.
- Once baked, transfer the Brown Sugar Cookies to a cooling rack to cool completely. These Brown Sugar Cookies (and the remaining mini chocolate chips) will be used for the Chocolate Chip Cookie Crust and Brown Sugar Cookie Crumble. Further Instructions will follow below.
For the Mini Chipper Cookies:
- Remove the smaller portion of Brown Sugar Cookie Dough from the refrigerator. Slice the cookies in ¼ inch (scant centimeter) slices and arrange on a prepared sheet pan. (We used the same parchment-lined pan from the previous batch of cookies.) Bake the Mini Chipper Cookies , turning the pan once, until edges are just beginning to brown, about 8 - 12 minutes. These cookies will be used as decorating the ice cream cake and should not be over-baked, as in the previous batch.
- Once baked, transfer the Mini Chipper Cookies to a cooling rack to cool completely. Set aside until ready to decorate the ice cream cake, in the final steps of this recipe.
Edible Chocolate Chip Cookie Dough
- Gather, measure and prepare the Edible Chocolate Chip Cookie Dough ingredients as listed. For the most consistent results, we recommend using metric weight measurements whenever possible.
- In the bowl of a stand mixer fitted with the paddle attachment, cream the butter and sugar together on medium speed for 3 - 4 minutes or until pale and fluffy. Add salt and vanilla. Mix to combine.
- Add flour and mix on lowest speed until just combined. Dough will be dry and crumbly, do not over-mix. Add mini chocolate chips and mix just until combined. If necessary, fold in remaining crumbs of flour at the bottom of the bowl with a rubber spatula. Gently press the dough together.
- Transfer the dough to a work surface lined in plastic wrap. Press dough into a rectangle about ½ inch (1 centimeter) thick. Wrap tightly in plastic wrap and chill in the refrigerator.
- Once chilled completely, after about 15 - 20 minutes, cut the dough into about ½ inch (1 centimeter) cubes. If desired, roll each piece in balls between your hands.
- Divide the pieces of dough into thirds. (One third will be used in each of the two separate batches of No Churn Vanilla Cookie Dough Ice Cream and the final third of Edible Cookie Dough will be used, as desired, for decoration.) Keep dough chilled in the refrigerator until ready to be used. Further instructions will follow.
Chocolate Chip Cookie Dough Crust
- In this stage of the recipe, we will begin to assemble the Cookie Dough Ice Cream Cake. On a cardboard cake circle or serving platter, arrange an 8 or 9 inch pastry ring (or springform pan). Insert the acetate cake collar.
- Gather, measure and prepare the Chocolate Chip Cookie Dough Crust ingredients as listed.
- In a food processor fitted with the blade attachment, by hand, or with a rolling pin, crush the Brown Sugar Cookies to a coarse crumb. Reserve about one third of the crumbs and set aside for the Brown Sugar Cookie Crumble.
- In a medium mixing bowl, combine the remaining two thirds of Brown Sugar Cookie Crumbs with Mini Chocolate Chips and melted butter. Toss to combine. Transfer the cookie crumb mixture to the pastry ring (or springform pan). Using your fingers or the flat bottom of a glass or measuring cup, press the crumbs down into a a flat disk that evenly covers the entire base of the pastry ring or pan.
- Transfer the Chocolate Chip Cookie Crust to the freezer while the first batch of No-Churn Vanilla Cookie Dough Ice Cream is prepared. Do not remove the pastry ring or acetate collar until the Cookie Dough Ice Cream Cake has been assembled, fully frozen and is ready to frost.
No Churn Vanilla Cookie Dough Ice Cream (Batch 1 of 2)
- Gather, measure and prepare the No Churn Vanilla Cookie Dough Ice Cream ingredients as listed. (This portion of the recipe describes making one batch of No Churn Vanilla Cookie Dough Ice Cream. This recipe will require two batches for each ice cream layer of this cake. For the best results, we recommend making each batch separately, as instructed.)
- First, combine the sweetened condensed milk with vanilla bean, paste or extract. Stir to combine and divide in half, equally. Use one half of this sweetened condensed milk mixture for each individual batch of No Churn Vanilla Cookie Dough Ice Cream. Chill each half in the refrigerator until ready to use.
- In a stand mixer fitted with the whisk attachment, add 2 Cups (473 milliliters) of heavy cream. Begin whipping on slow speed and gradually increase the speed to medium high until soft peaks form.
- Add in one half of the sweetened condensed milk mixture and whip until stiff peaks form.
- Fold in one third of the reserved Edible Cookie Dough.
- Briefly remove the Chocolate Chip Cookie Dough Crust from the freezer and evenly layer the first batch of No Churn Vanilla Cookie Dough Ice Cream into the pastry ring or pan.
- Return the ice cream cake to the freezer and allow to freeze for at least 1 - 2 hours before adding additional layers. Meanwhile, prepare the Brown Sugar Cookie Crumble.
Brown Sugar Cookie Crumble
- For this portion of the recipe, use the reserved Brown Sugar Cookie crumbs from Step 2 of the Chocolate Chip Cookie Dough Crust.
- Arrange the Brown Sugar Cookie crumbs on a sheet pan lined with parchment paper.
- In an oven preheated to 350° Fahrenheit (180° celsius), bake the Brown Sugar Cookie Crumbs for 5 - 7 minutes or until crispy.
- Allow the Brown Sugar Cookie Crumble to cool completely. Once cooled, layer the Brown Sugar Cookie Crumble over the first frozen layer of No Churn Vanilla Cookie Dough Ice Cream. We like to create a shallow well with the Brown Sugar Cookie Crumble that will hold the Chocolate Ganache neatly. To do this, use your fingers or the flat Botton of a glass or measuring cup to press the Brown sugar Cookie crumble slightly higher along the edges of the pastry ring or springform pan.
- Return the ice cream cake to the freezer to cool while preparing the Chocolate Ganache.
Chocolate Ganache
- Gather, measure and prepare the Chocolate Ganache ingredients as listed. For the most consistent results, we recommend using metric weight measurements whenever possible.
- In a medium mixing bowl, combine chocolate chips, heated cream and corn syrup. Allow to sit for 1 - 2 minutes to melt the chocolate. Whisk to combine until smooth. Allow to cool slightly.
- Once cooled, pour the chocolate ganache into the center of the cake. If desired, reserve a small amount of ganache for decorating the finished cake.
- Return the ice cream cake to the freezer to cool while preparing the second batch of No Churn Vanilla Cookie Dough Ice Cream.
No Churn Vanilla Cookie Dough Ice Cream (Batch 2 of 2)
- Gather, measure and prepare the No Churn Vanilla Cookie Dough Ice Cream ingredients as listed.
- In a stand mixer fitted with the whisk attachment, add 2 Cups (473 milliliters)of heavy cream. Begin whipping on slow speed and gradually increase the speed to medium high until soft peaks form.
- Add in the remaining half of the sweetened condensed milk mixture and whip until stiff peaks form.
- Fold in one third of the reserved Edible Cookie Dough.
- Briefly remove the Chocolate Chip Cookie Dough Crust from the freezer and evenly layer the final batch of No Churn Vanilla Cookie Dough Ice Cream into the pastry ring or pan.
- Return the ice cream cake to the freezer and allow to freeze for at least 1 - 2 hours or overnight before frosting with whipped cream.
Whipped Cream Frosting
- Once the Cookie Dough Ice Cream Cake is completely frozen and ready to be frosted with whipped cream, gather, measure and prepare the Whipped Cream Frosting ingredients as listed.
- In a stand mixer fitted with the whisk attachment, add the heavy cream. Begin whipping on slow speed and gradually increase the speed to medium high until soft peaks form.
- Add powdered sugar and vanilla. Continue Whipping until stiff peaks form. Keep Whipped Cream Frosting very cold in the refrigerator until ready to use.
Frosting, Decorating and Serving the Cookie Dough Ice Cream Cake
- Once the cake is completely frozen and the Whipped Cream Frosting has been prepared, remove the Cookie Dough Ice Cream Cake from the freezer. If using the cardboard cake circle, place the cake to a serving platter or cake stand. If at any stage of this process the ice cream cake begins to soften, return it to the freezer to firm up before proceeding.
- Gently remove the pastry ring from the cake. If needed, use your hands to gently warm the sides of the pastry ring until it is easily removed. Carefully, remove the acetate collar and discard.
- With a small offset spatula, or the back of a spoon, frost the top and side of the cake with the whipped cream frosting. Frost as desired. To decorate the Cookie Dough Ice Cream Cake as pictured, transfer the remains Whipped Cream Frosting to a pastry bag fitted with a large, open star pastry tip. Pipe a classic shell border along the base of the cake. On top, pipe rosettes along the perimeter of the cake. Pipe a large rosette of Whipped Cream Frosting in the center of the cake.
- Decorate with reserved Edible Chocolate Chip Cookie Dough, Mini Chipper Cookies and reserved Chocolate Ganache, if using. (We did not use any reserved ganache, as photographed).
- Return the Cookie Dough Ice Cream Cake for 20 - 30 minutes or up to 2 - 3 days before serving.
- Once ready to serve, allow the cake to temper at room-temperature for 5 - 15 minutes. Cut slices of the cake with a hot, sharp knife. Serve and enjoy the Cookie Dough Ice Cream Cake and lots of smiles!
* A Note About Salt
Unless otherwise noted, all recipes on The Sage Apron are developed using Diamond Crystal Kosher salt. It is a great all-purpose salt for cooking and baking. If using table salt, reduce quantities by about half.


Addie says
This is so great!!!
foodworthfeed says
Glad you like this Addie! It was a huge hit for our friend’s daughters birthday last year. (For the kids and the adults!). Thank you for the kind comment! 🙂