


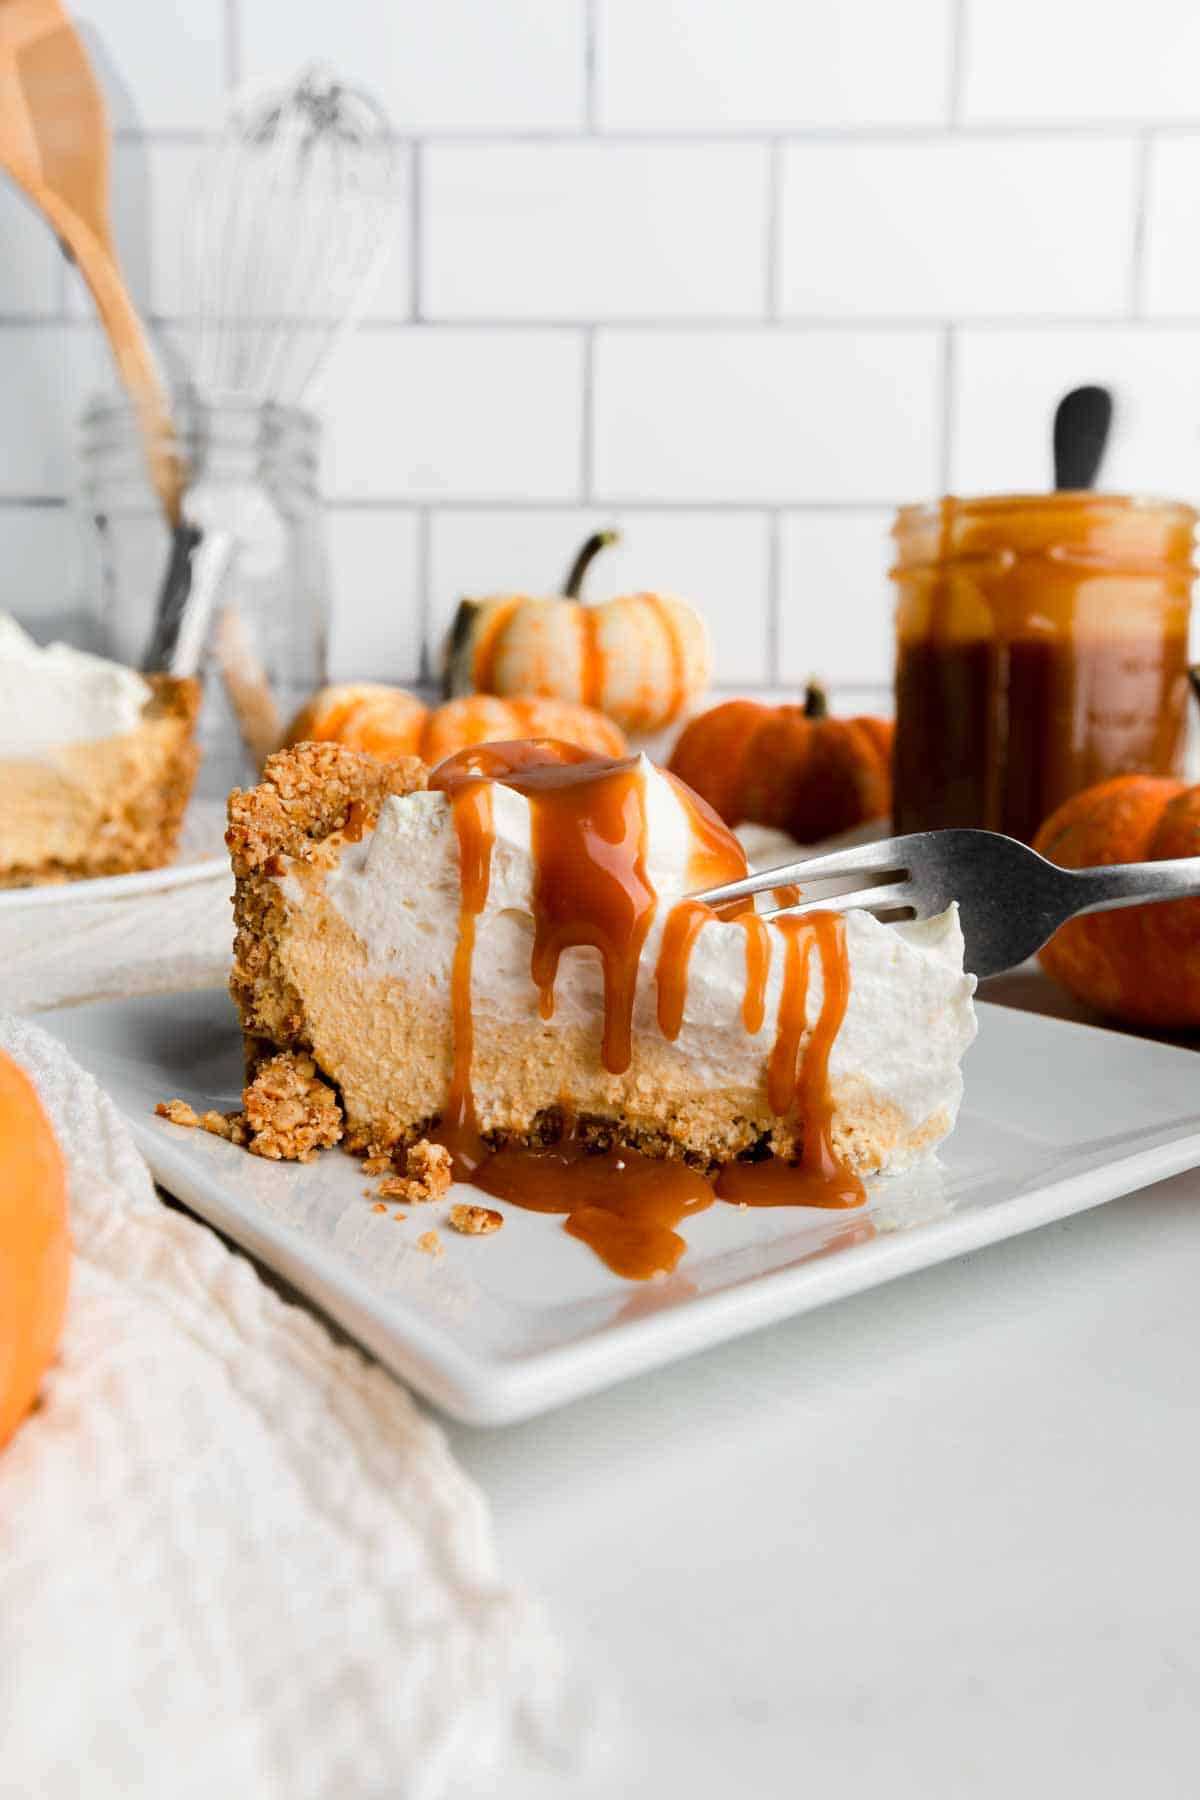
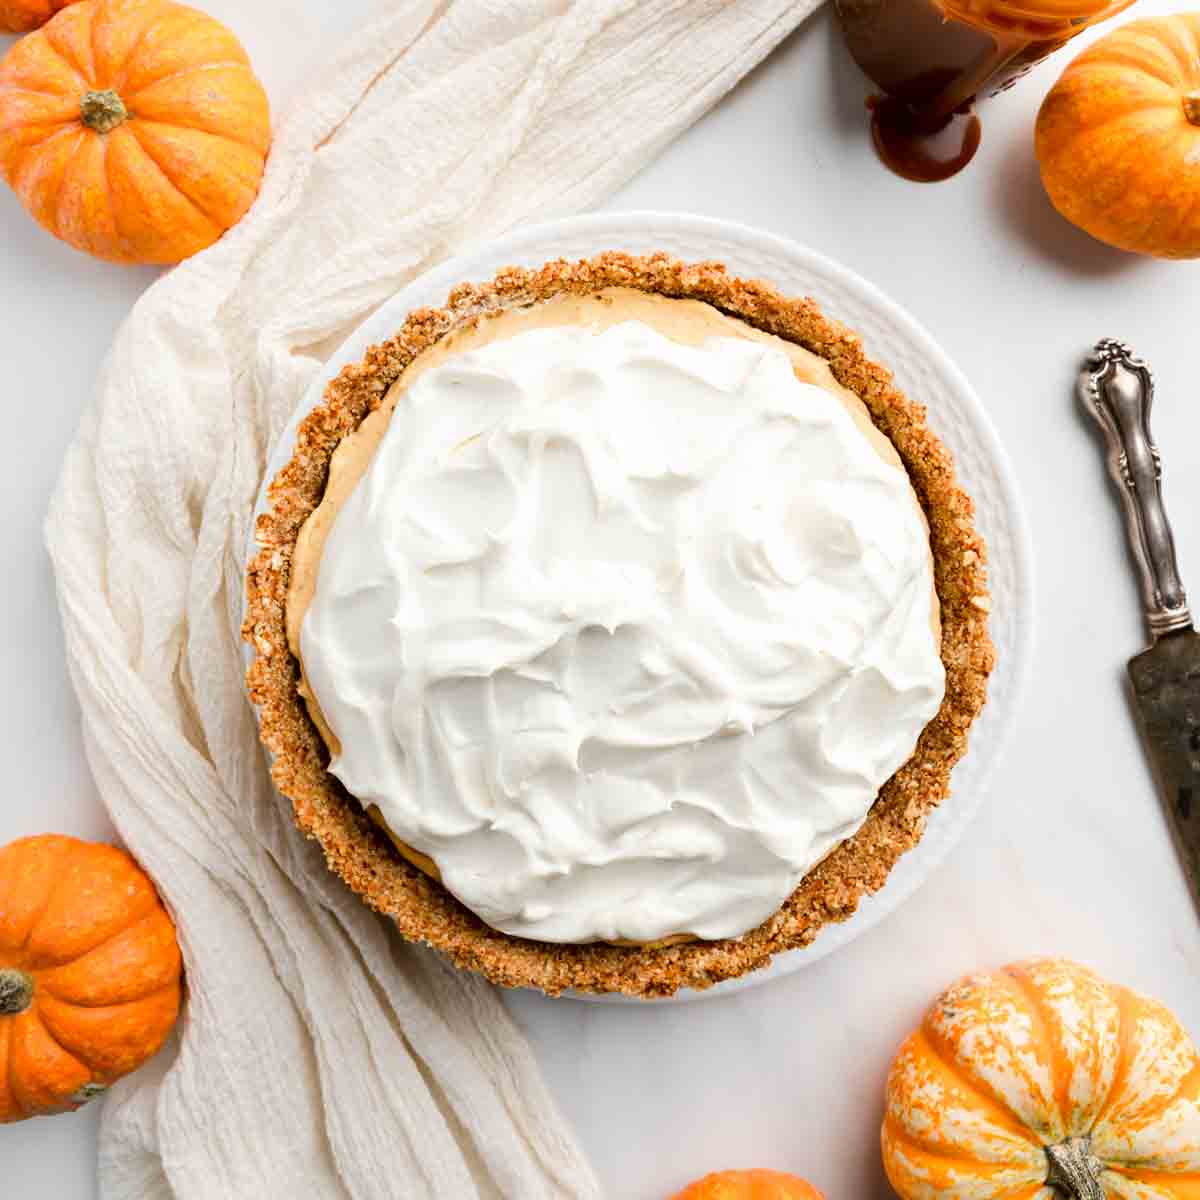
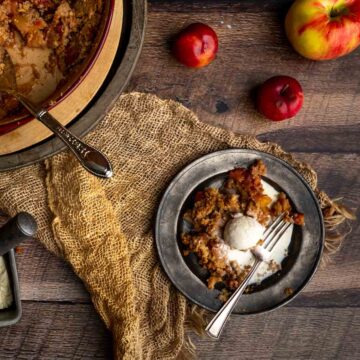
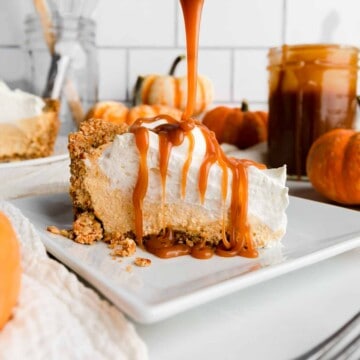
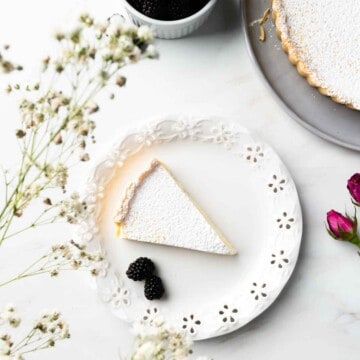
This no bake recipe features a fluffy pumpkin mousse filling, whipped cream, Sweet & Salty Pretzel Pie Crust and a generous drizzle of Homemade Salted Caramel Sauce! It’s the perfect Autumn dessert and is easy to make a day or two ahead of your Thanksgiving gatherings!
For another unique Thanksgiving pie recipe, try our Purple Sweet Potato Pie with Torched Meringue!
If you love no bake pie recipes, be sure to check out our Chocolate Peanut Butter Pretzel Pie, too!
5 Reasons Why You’ll Love This Recipe!
This recipe is a GEM and I am so excited to share it with you!! Here’s why we LOVE it, and you will too!
- Easy to make. Anyone, and I mean ANYONE can make this pie.
- No oven required! This no bake pumpkin pie recipe requires no oven! It’s especially great for Thanksgiving feasts when oven space is a hot commodity!
- Lighter texture than traditional pumpkin pie. Since this pie is made with pumpkin mousse and whipped cream, it has a light and fluffy texture that’s fun to eat!
- Perfect balance of sweet and salty deliciousness! This pie uses a pretzel crust and salted caramel to give the irresistible balance of sweet and salty!
- Make it ahead of time! Everyone knows Thanksgiving and holiday meal prep can be overwhelming! Luckily, this pie can be made a day or two ahead of time and served straight from the fridge at dessert time!
Ingredients
No Bake Pumpkin Pie is made from a handful of standard baking ingredients. Here’s what you’ll need:
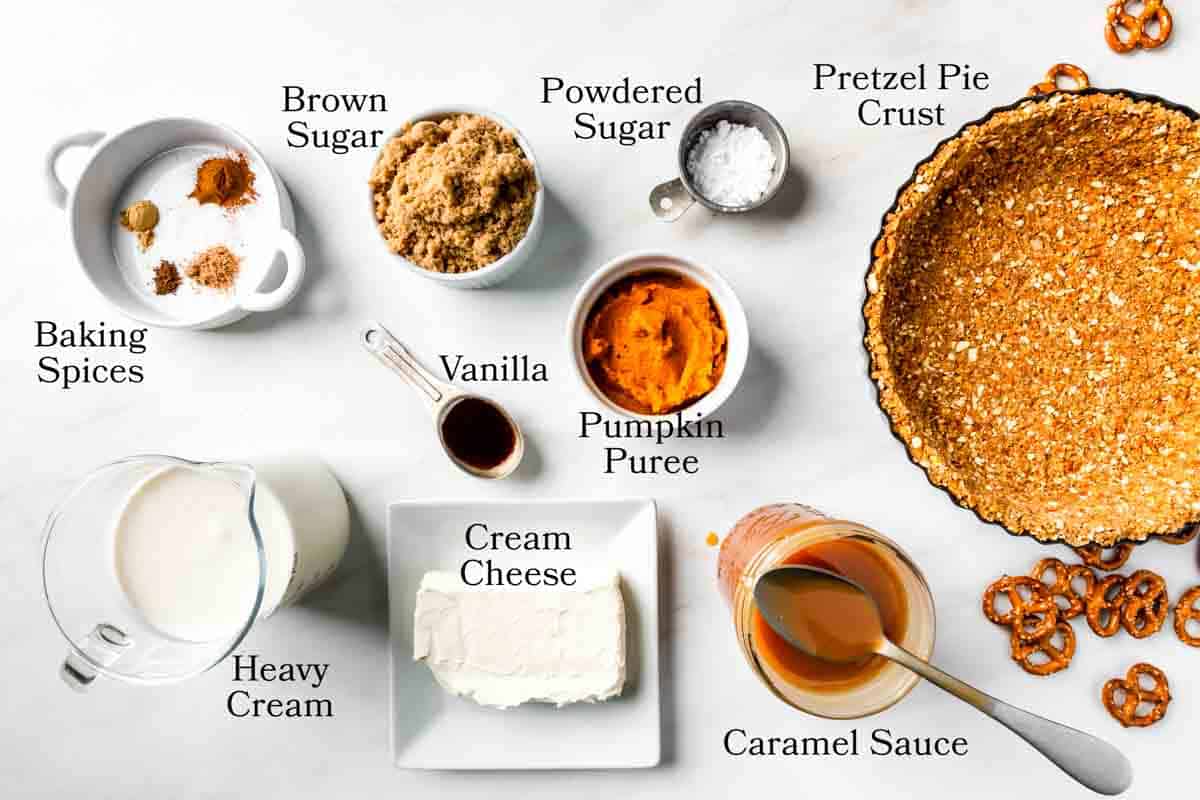
- Pretzel Pie Crust - If you need to save time, feel free to make this pie with a store-bought graham cracker crust, instead.
- Pumpkin Puree - Make sure to use puree and not pumpkin pie filling! You can used canned, or make your own from roasted sugar pumpkin.
- Baking Spices - We use cinnamon, nutmeg, ginger and allspice. If you don’t keep the individual spices in your pantry, you can substitute Pumpkin Pie Spice. Start with a teaspoon and increase, as desired, until you get the balance you’re searching for.
- Salted Caramel Sauce - We make a homemade caramel syrup from sugar, butter, heavy cream, vanilla extract and salt. It’s easier than you think! Of course, store bought caramel sauce works too!
How To Make This Recipe
This recipe is easy to make but it does have a lot of steps. It may seem intimidating at first but, I promise, it really is quite simple.
Start by preparing the pretzel pie crust (or use store bought graham cracker crust). Next, whip up the pumpkin mousse and refrigerate. You can top it with the whipped cream right away, or whip up some fresh whipped cream when you are ready to serve the pie. While the pie is chilling, prepare the homemade caramel sauce.
Here’s the step by step procedure:
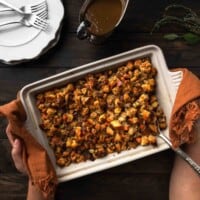
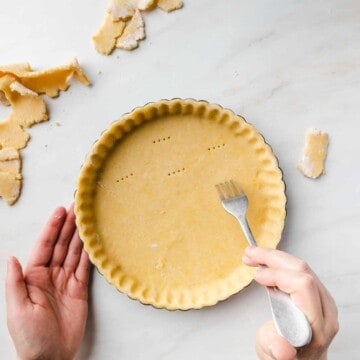
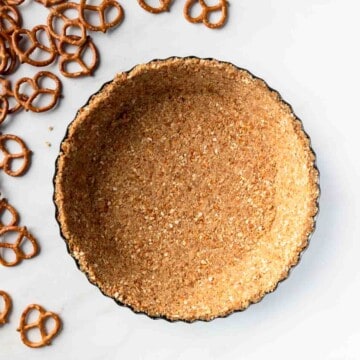
Sweet & Salty Pretzel Pie Crust
Oh how I love this pie crust! Sweet, salty, crumbly, crunchy goodness in every bite! It really goes so well with the pumpkin spice filling. Check out the full Sweet & Salty Pretzel Pie Crust recipe for other serving suggestions and details. For this No Bake Pumpkin pie, I like to make the pretzel crust with brown butter and cinnamon but, both are optional.
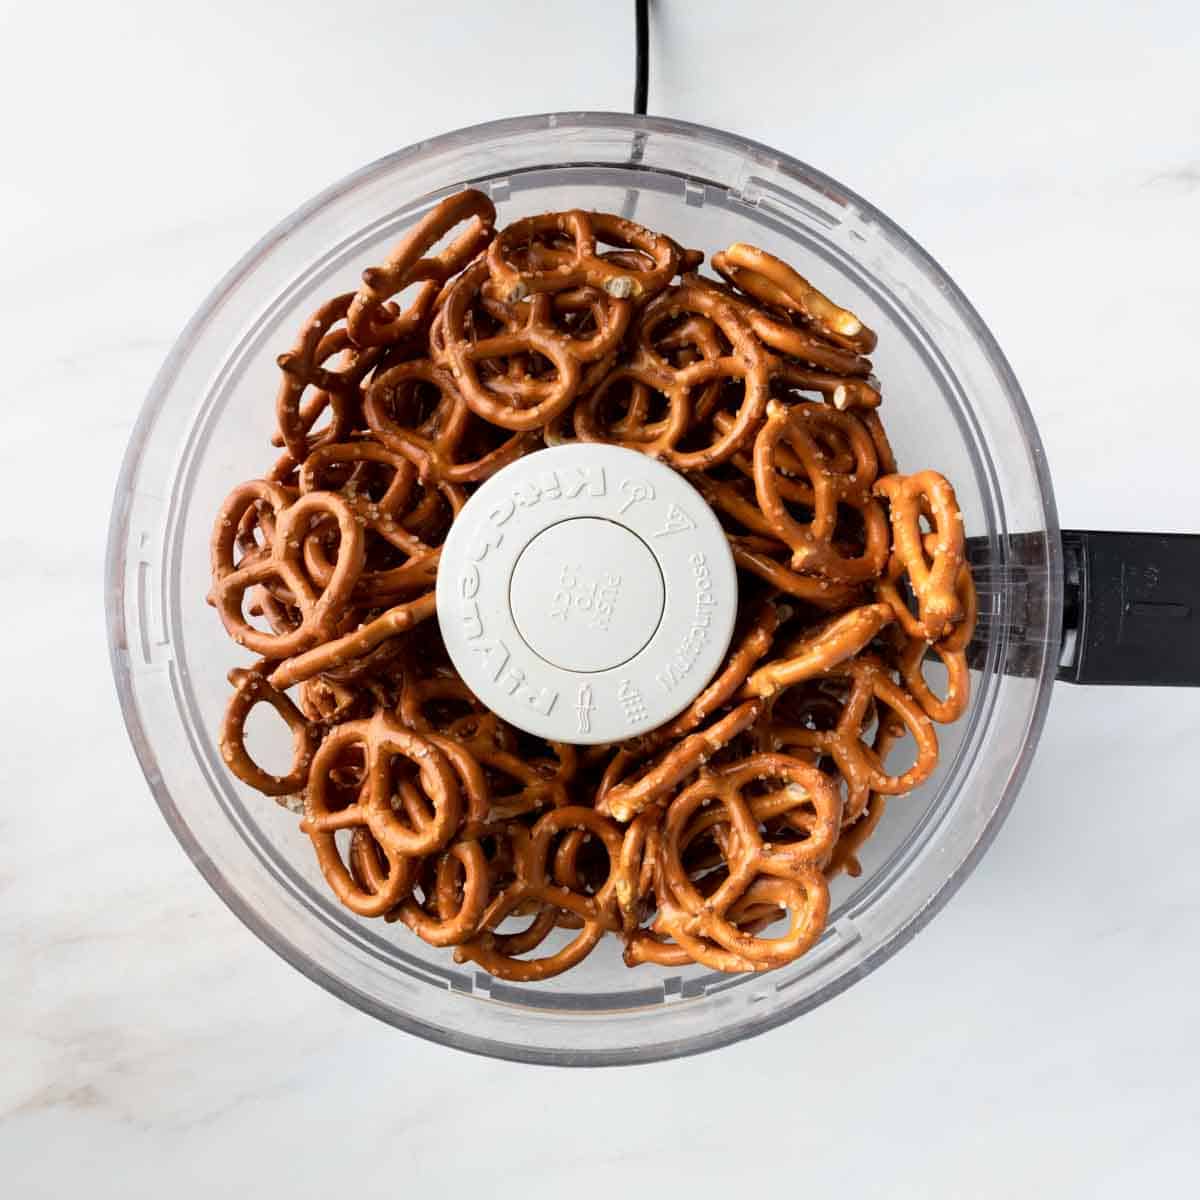
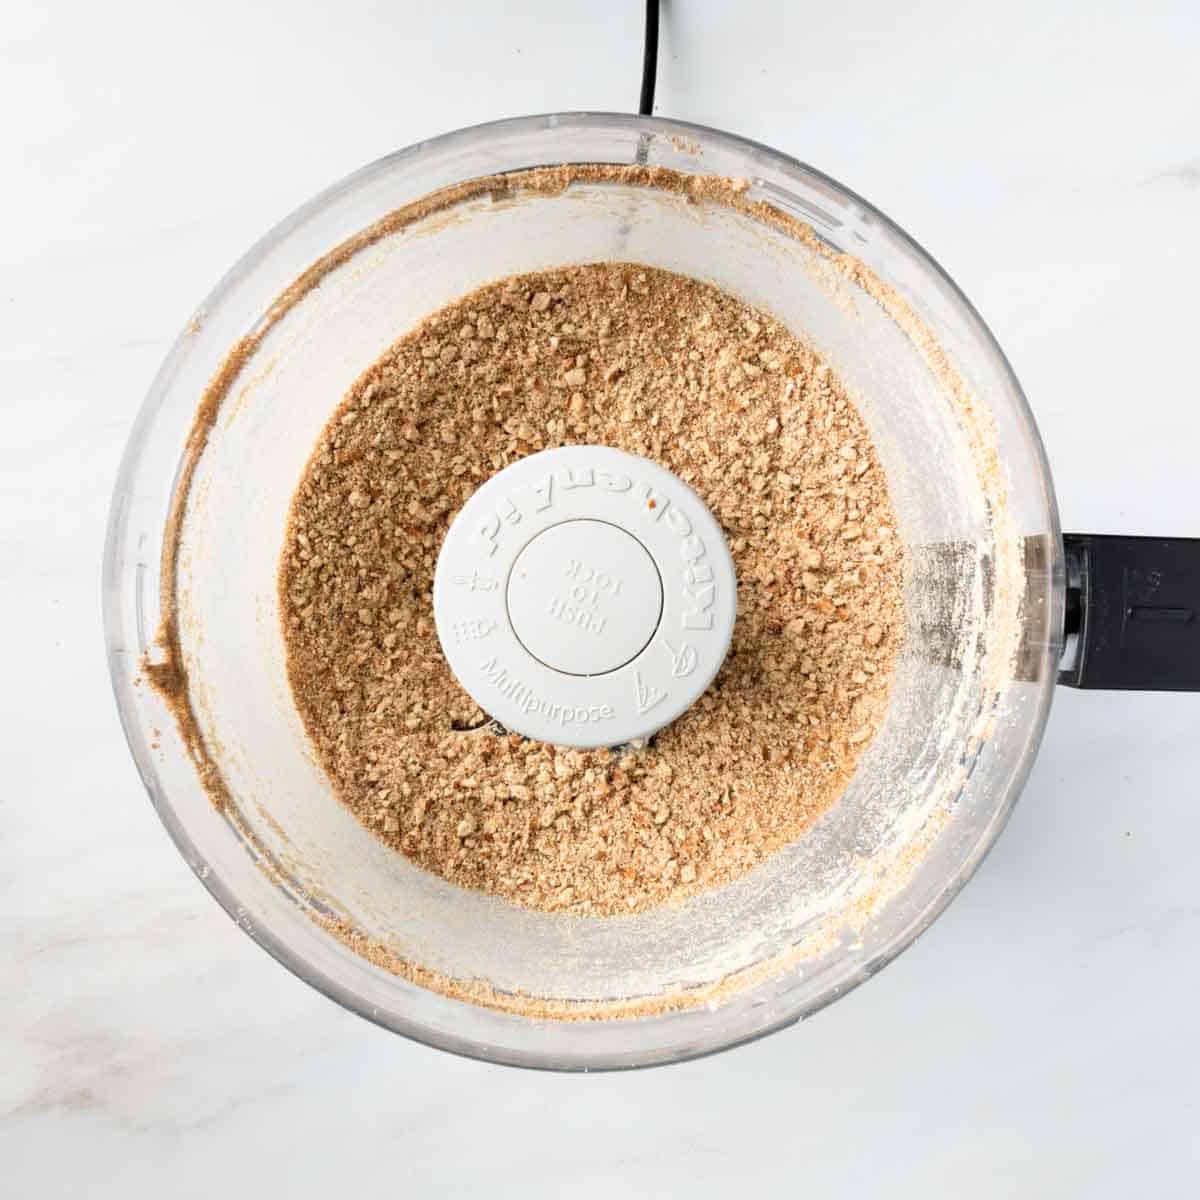
1. To make the pretzel pie crust, start by crushing the pretzels into crumbs. I like to use a food processor, but you can crush pretzels in bag with a rolling pin, if desired.
2. In a large bowl, combine the pretzel crumbs, melted butter (or brown butter), brown sugar and cinnamon, if using. Mix to combine.
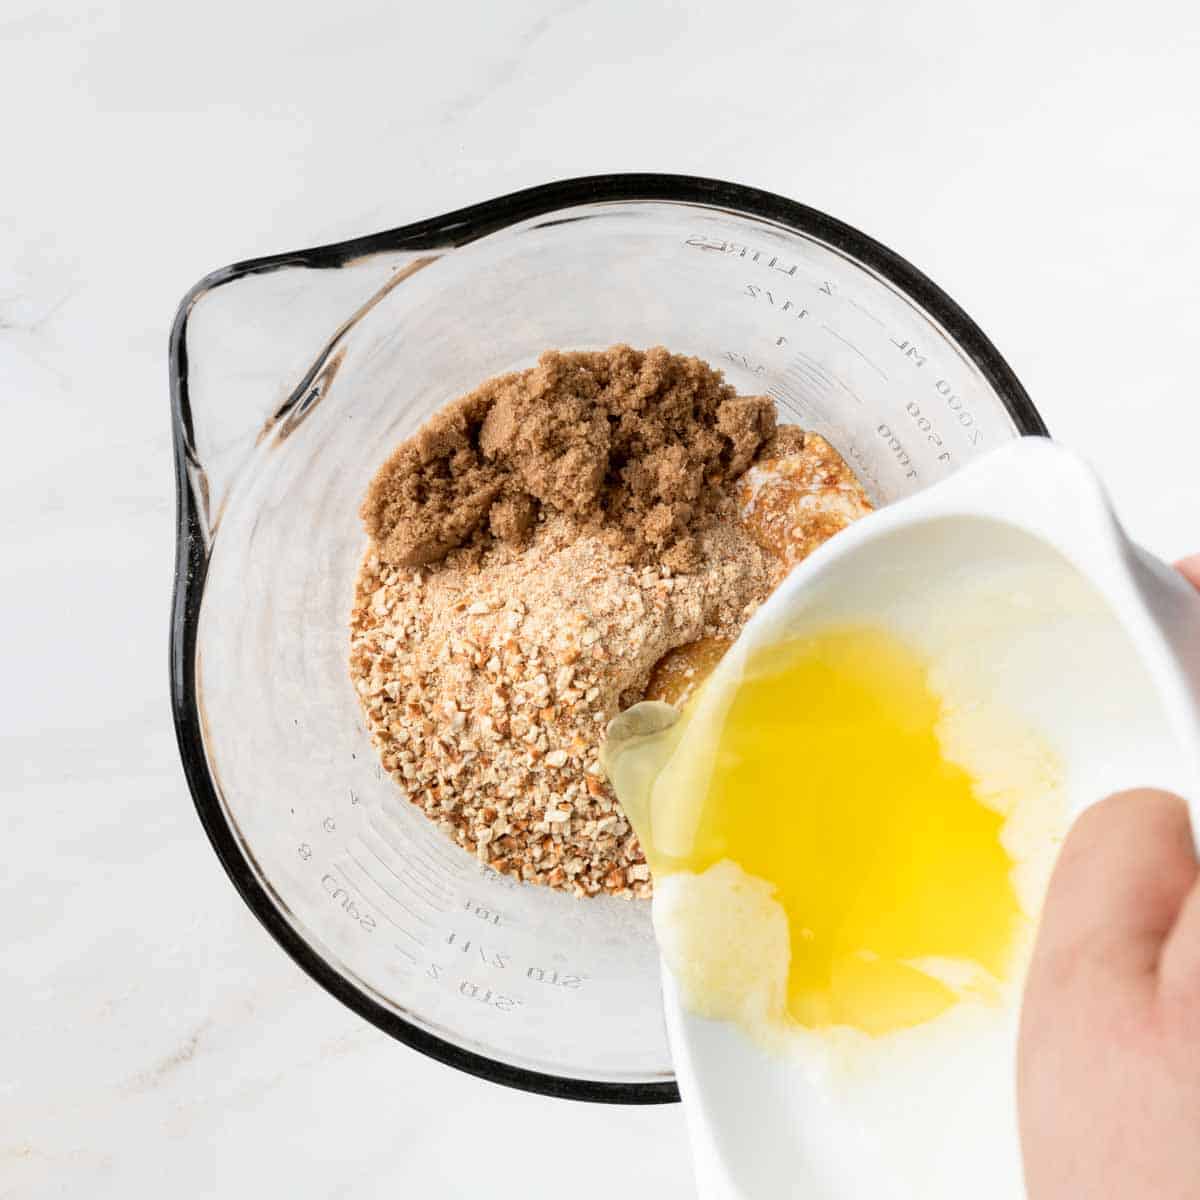
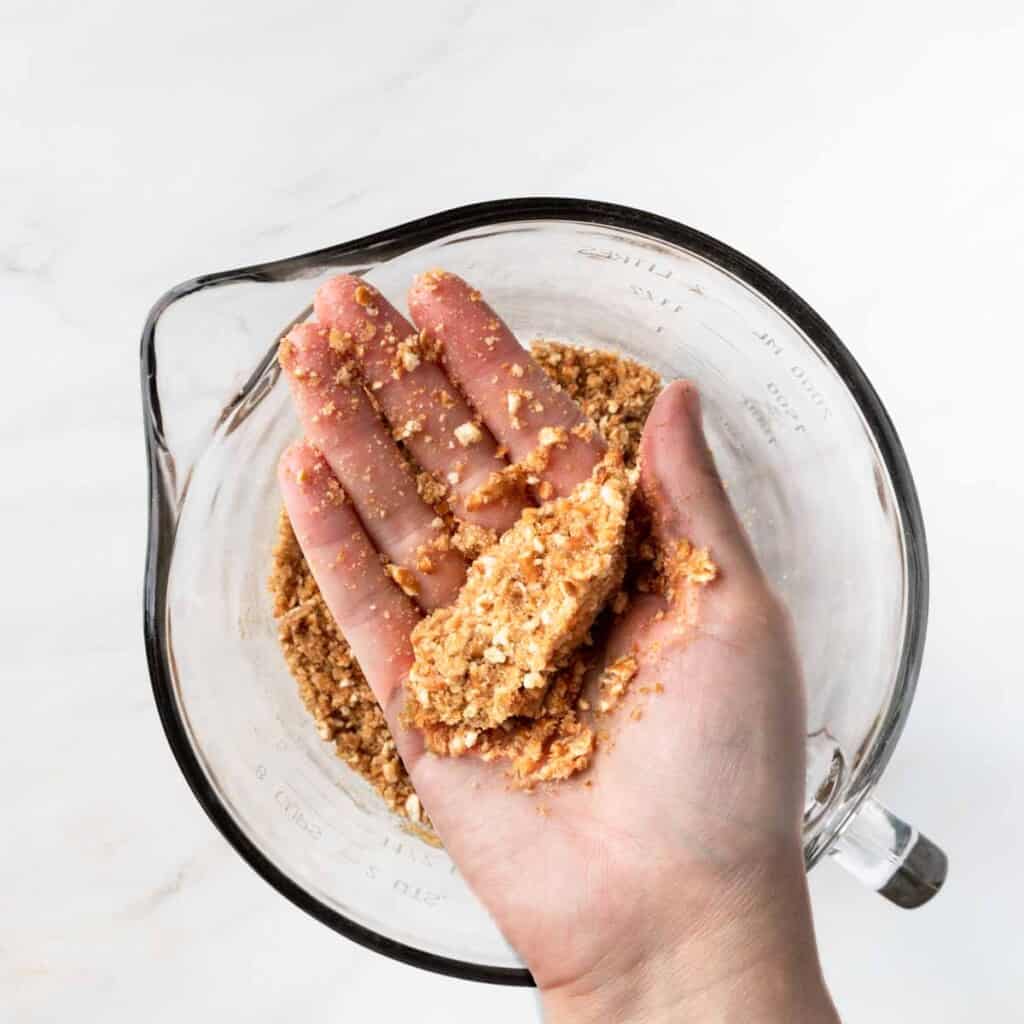
Pro Tip: Finding the Perfect Consistency - The pretzel mixture should hold together firmly when squeezed. Add an additional Tablespoon, or two, of melted butter, as necessary.
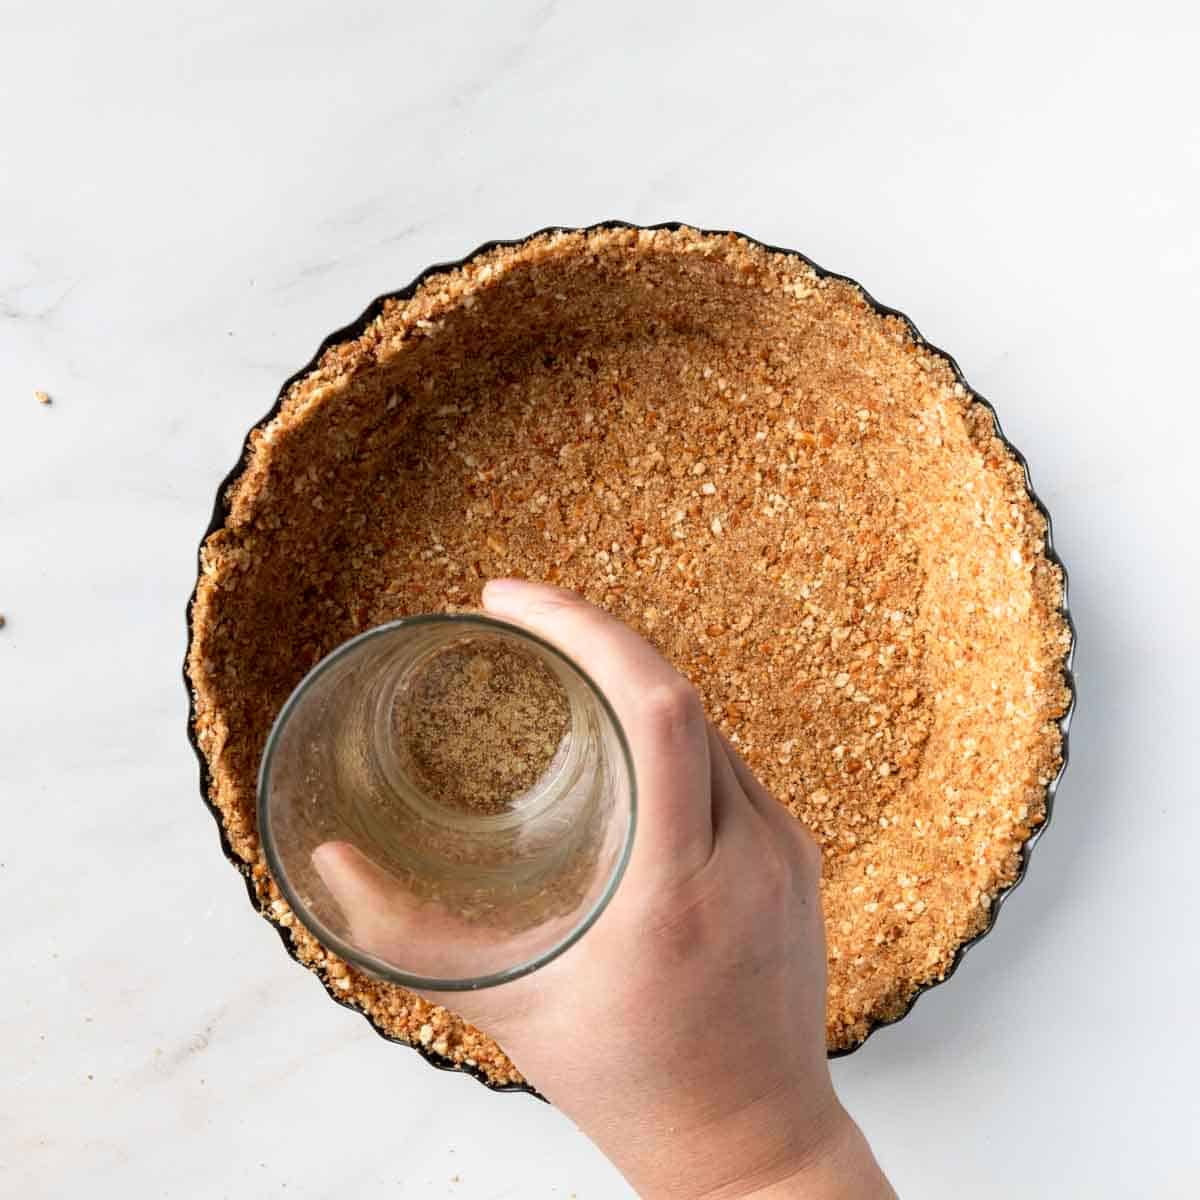
3. Transfer crumb mixture into a deep dish pie pan. I recommend using a non-stick tart shell with a removable bottom. With the bottom of a measuring cup or glass, press the crumbs into the pie pan to form the crust. Start with the edge first, then flatten the bottom of the pie. Transfer the pretzel pie crust into to fridge or freezer until firm.
Pumpkin Mousse & Whipped Cream
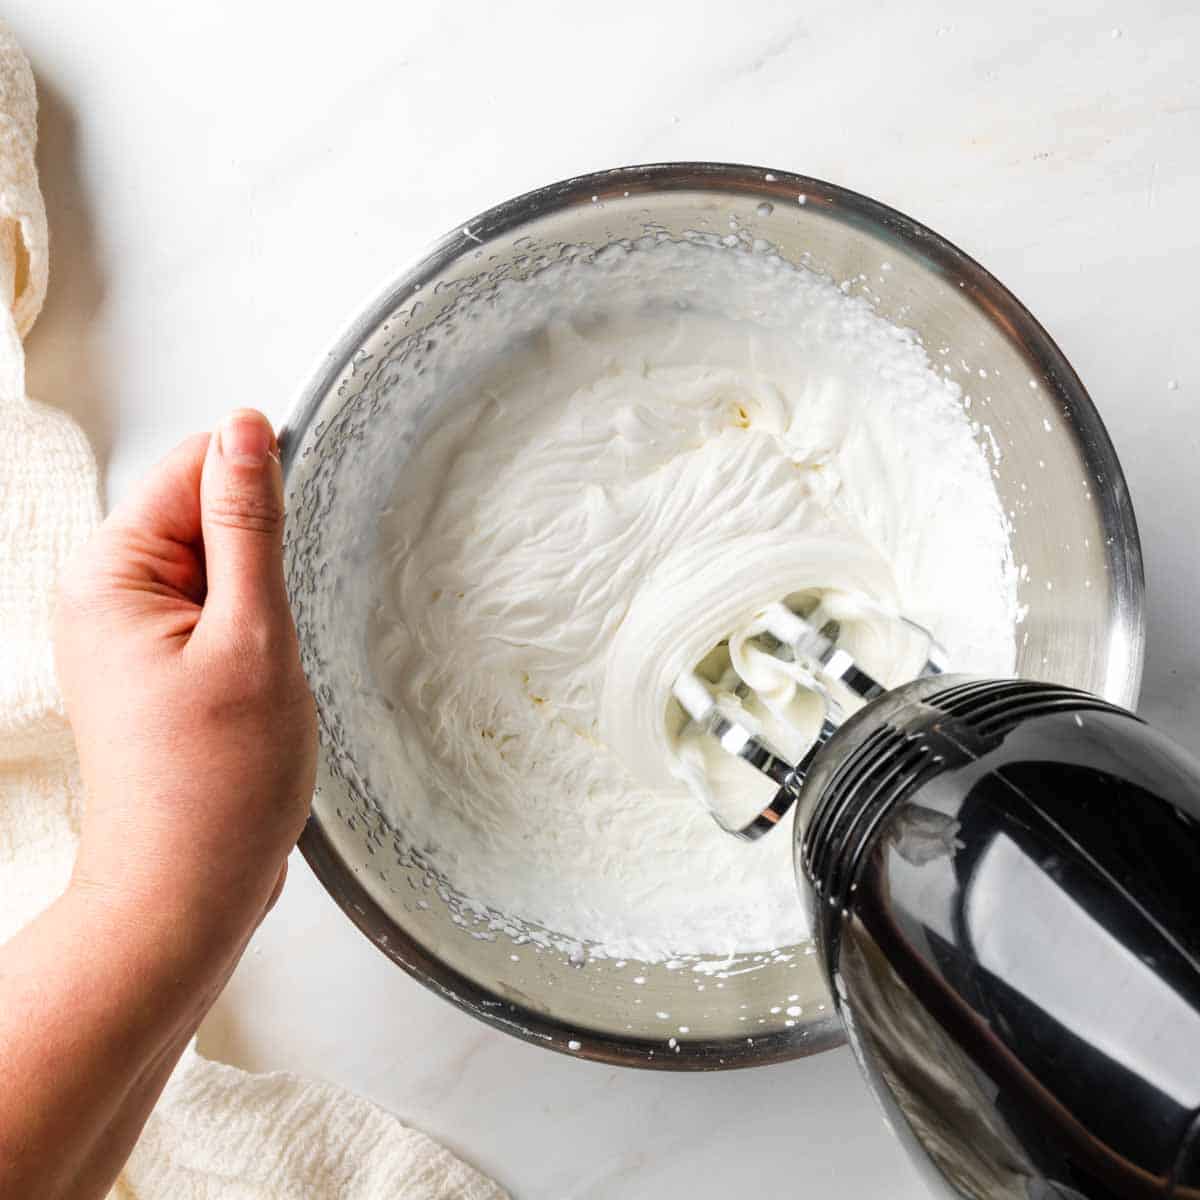
1. To make the pumpkin mousse, start by whipping 1 Cup of the heavy cream until stiff peaks form. For the best results, keep the cream very cold. For this reason, I like to whip cream in a chilled metal bowl. Set aside and keep refrigerated until ready to use.
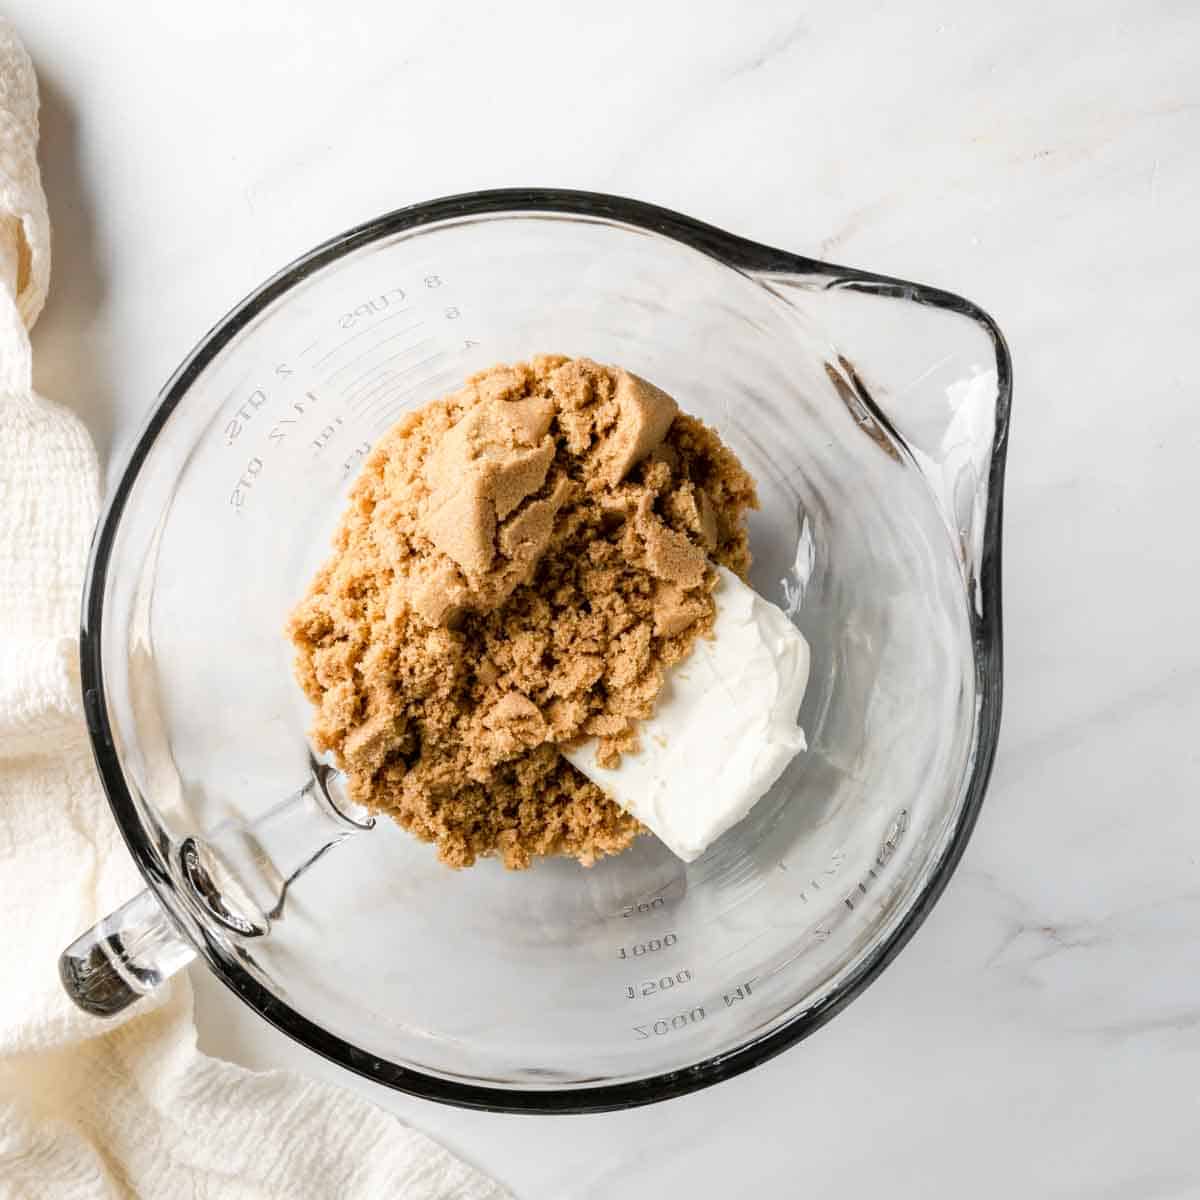
2. In a medium mixing bowl, combine room temperature cream cheese and brown sugar. To avoid lumps, make sure the cream cheese is completely tempered and not at all cold. Use an electric mixer to whip the cream cheese and sugar together. Once completely combined, continue whipping on high speed for 2 minutes, until light and fluffy.
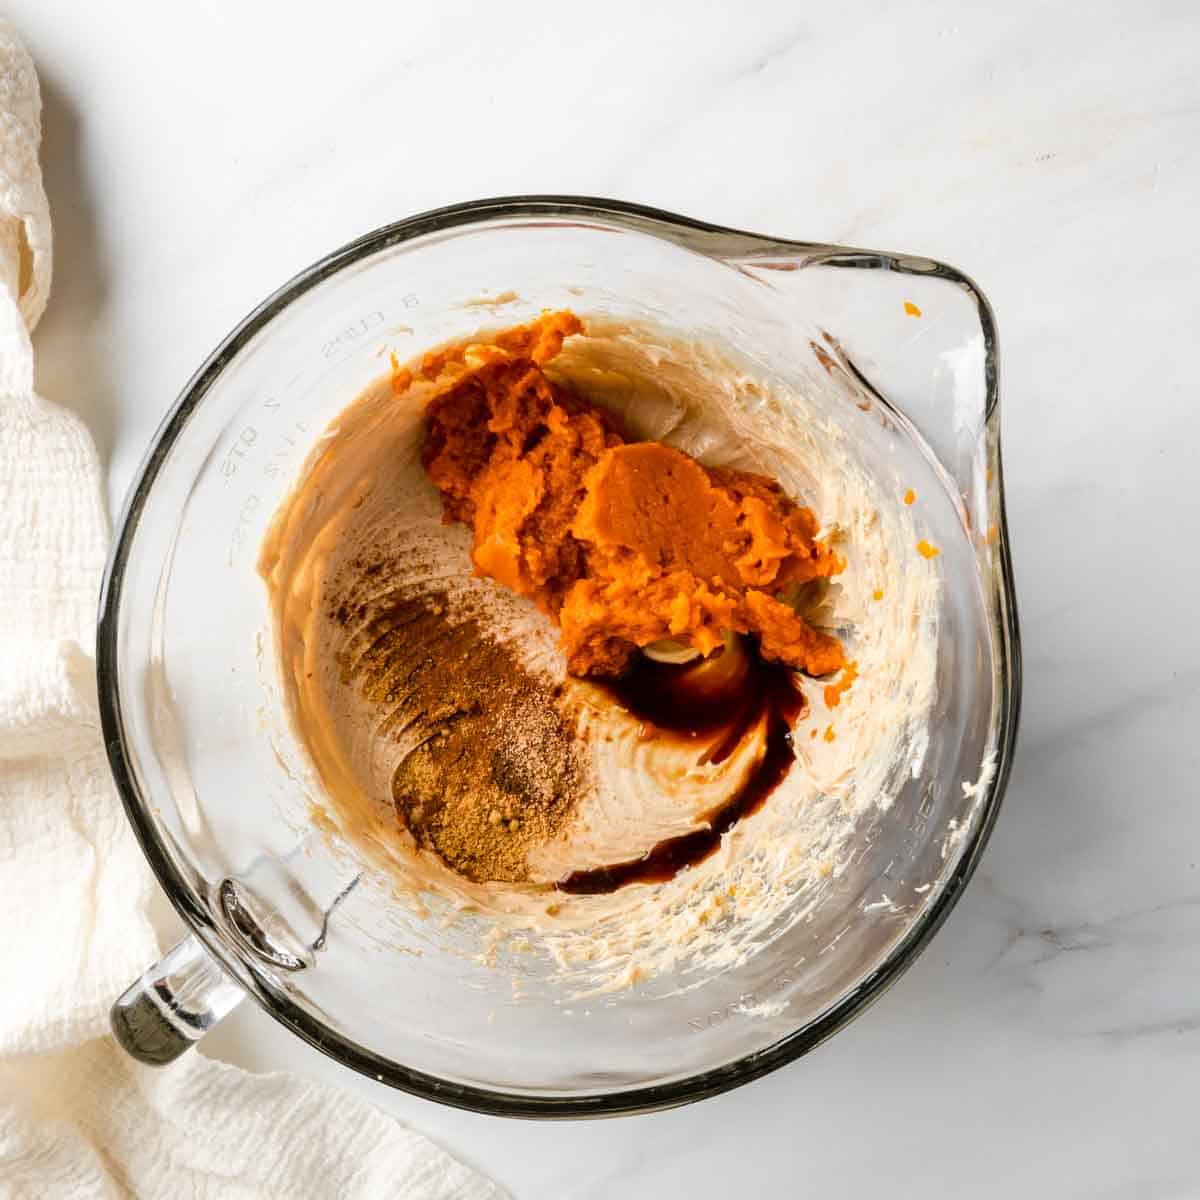
3. Next add in the pumpkin puree, vanilla extract and baking spices. Whip until completely combined and smooth, scraping the bowl an necessary.
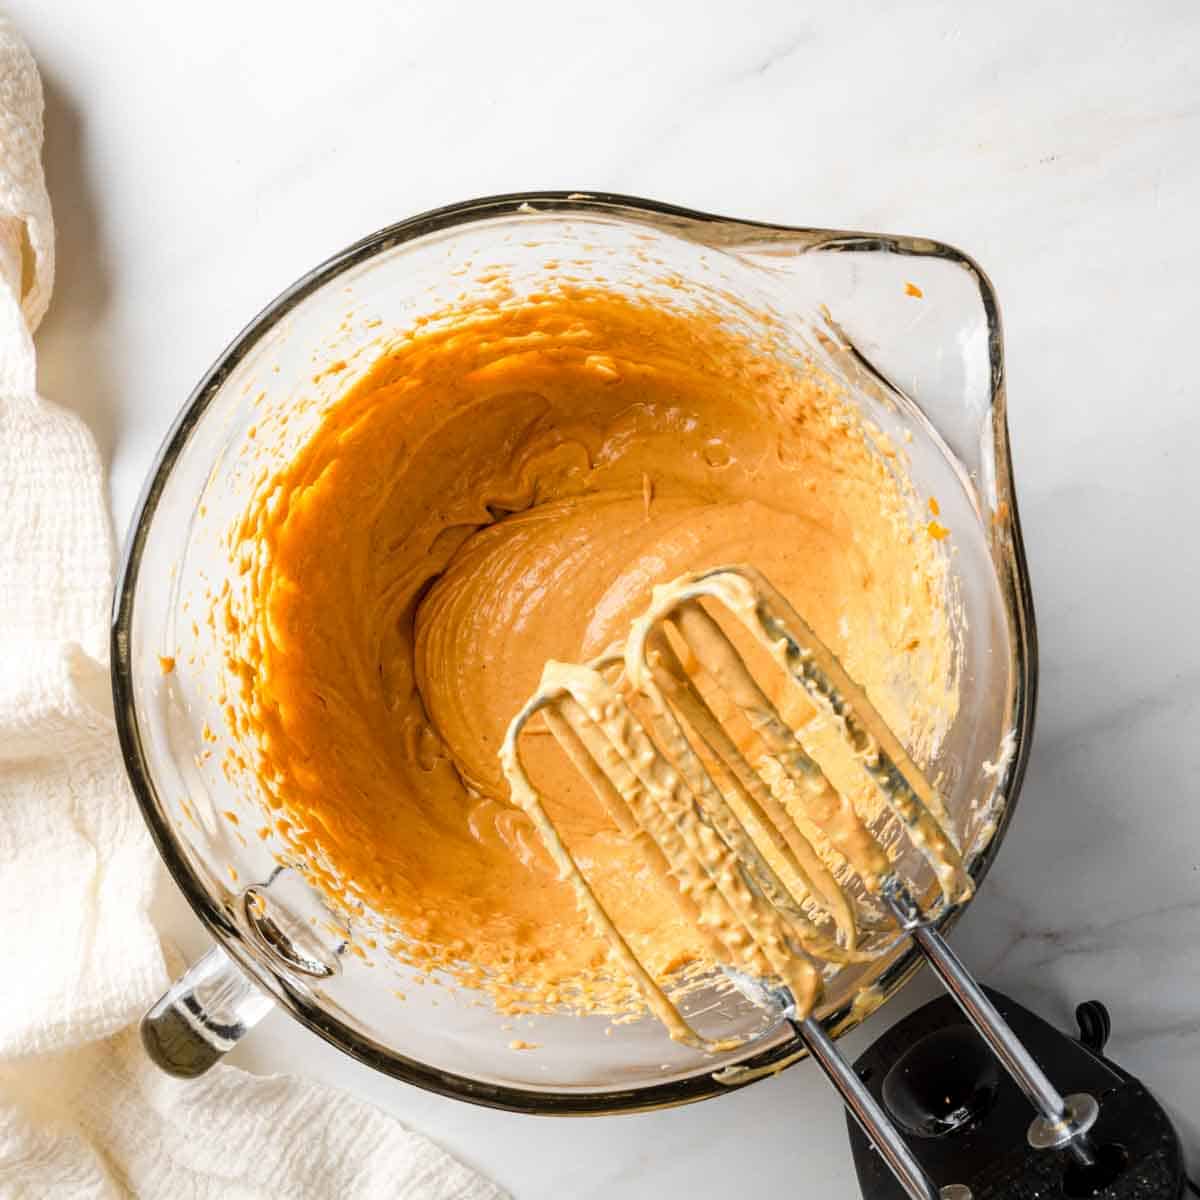
4. Fold in the whipped cream a little at a time. Be careful not to over mix and deflate the mousse.

5. Add the pumpkin mousse into the pie crust. Use a small offset spatula to smooth the mousse to the pies’ edges. You can continue to top with the whipped cream layer immediately, or make fresh whipped cream when ready to serve.
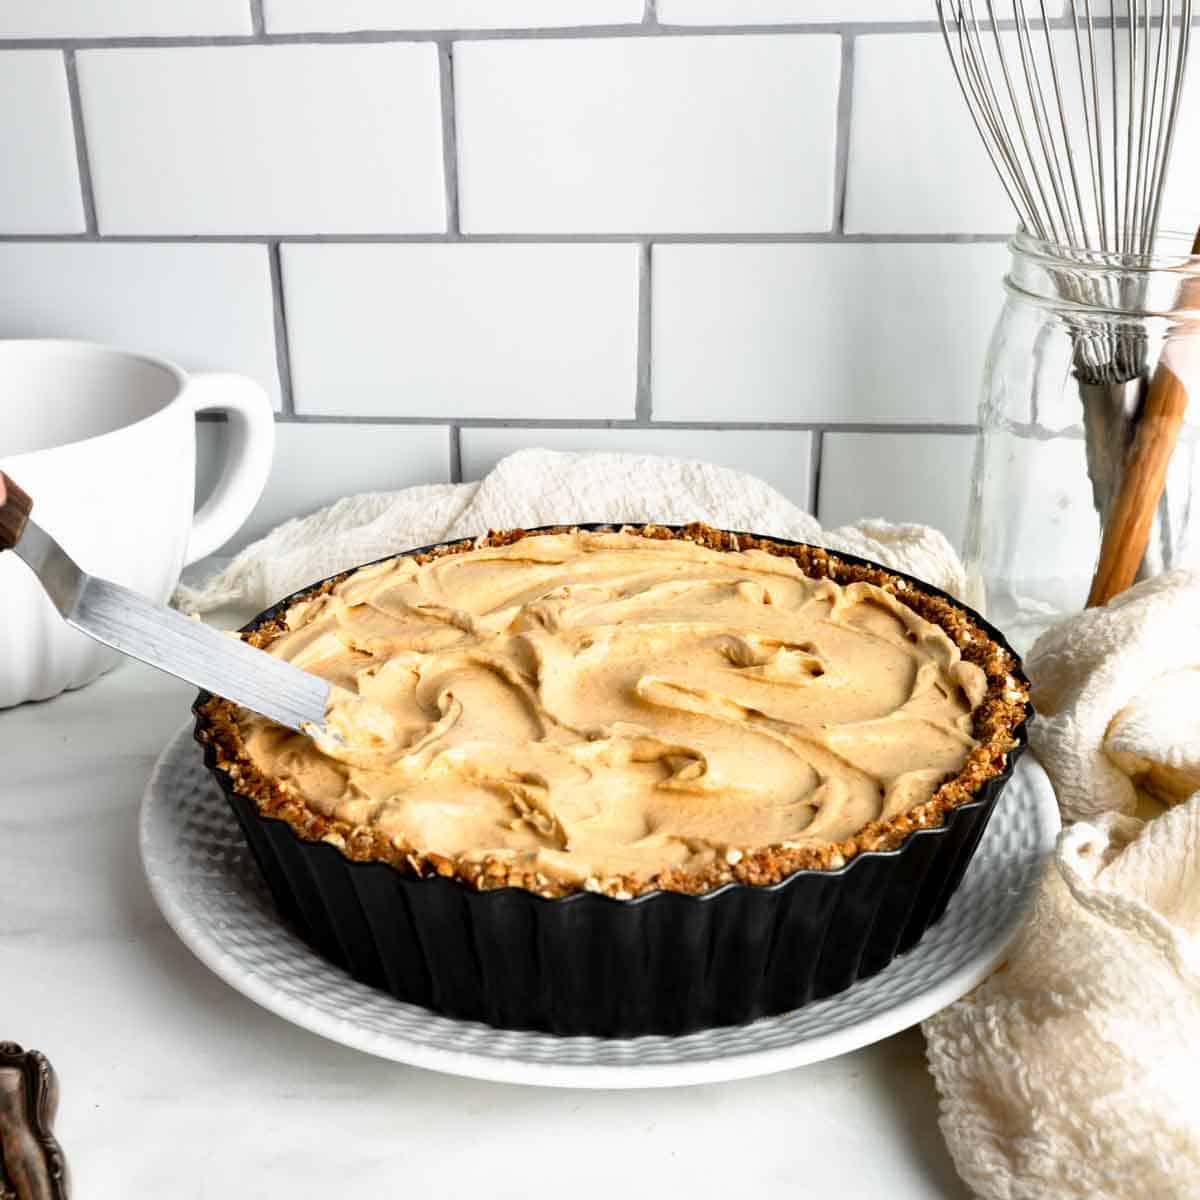
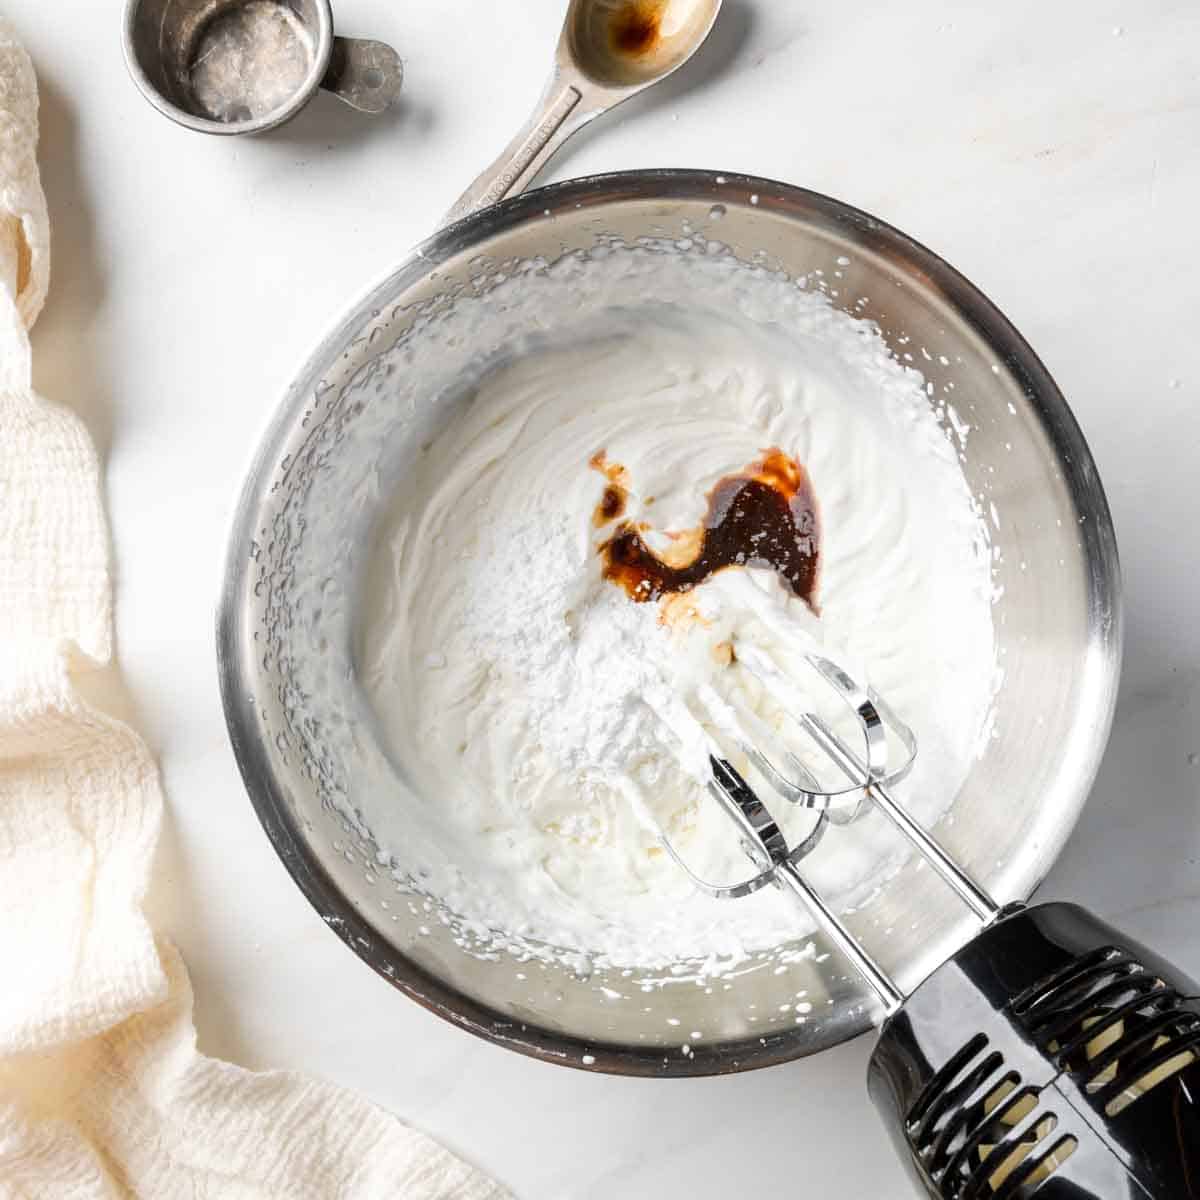
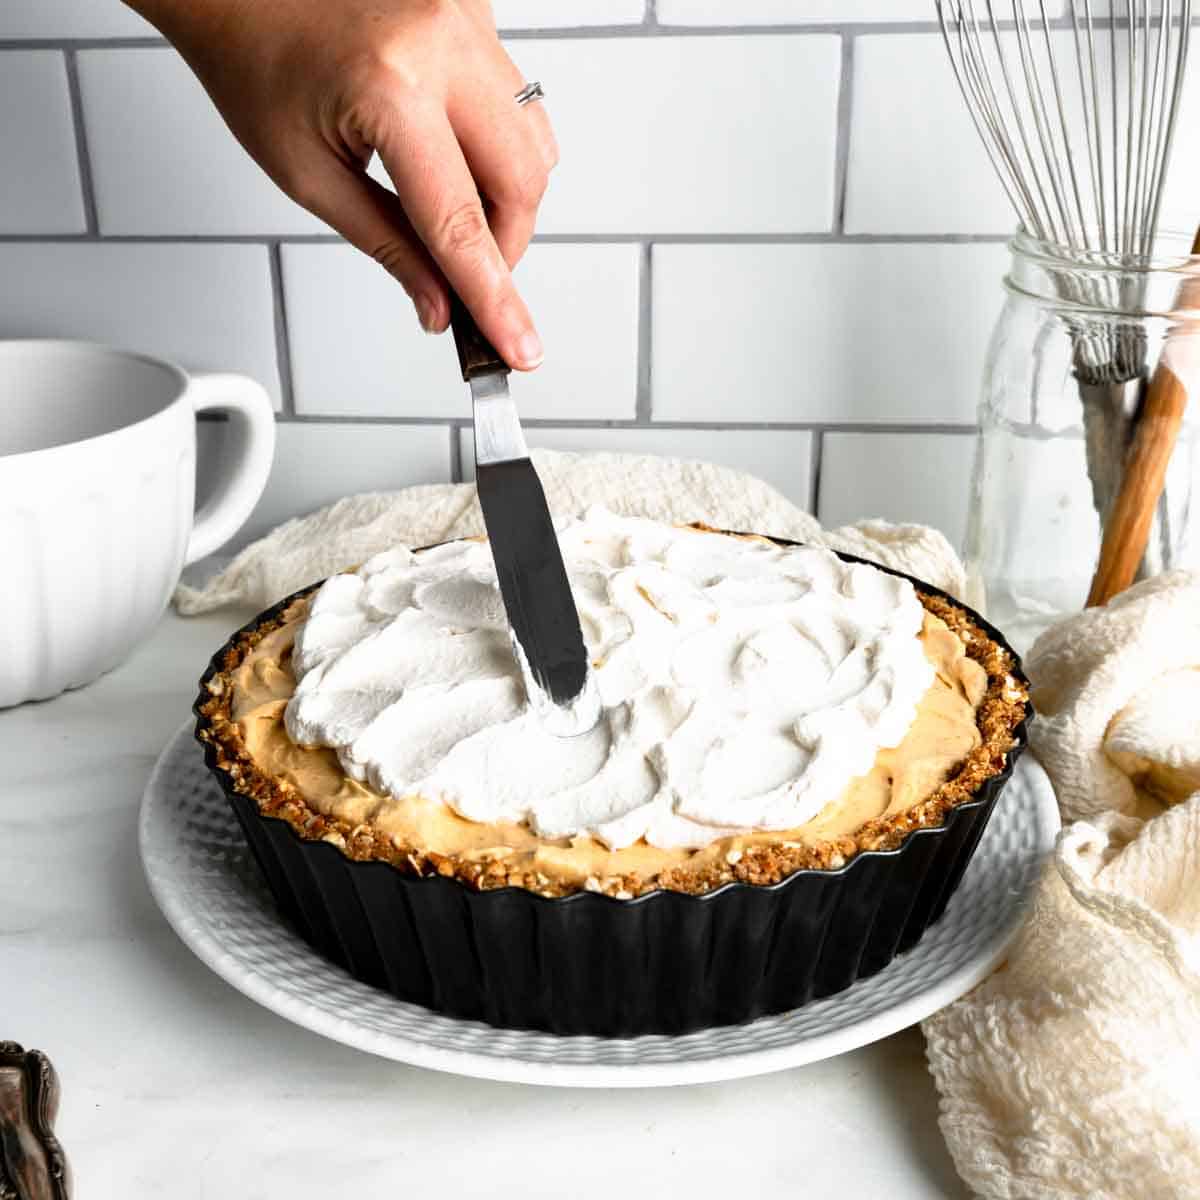
6. To make the whipped cream layer, whip the remaining 2 Cups of heavy cream. Remember to keep it cold. Add in vanilla extract and powdered sugar. I like to whip the topping somewhere between soft and stiff peaks. Place the whipped cream in the center of the pie and use an offset spatula to spread it a bit.
7. Allow the pie to chill in the refrigerator for at least 3 hours, or ideally, overnight. This no bake pumpkin pie can be made 1 - 2 days ahead of time and served straight from the fridge!
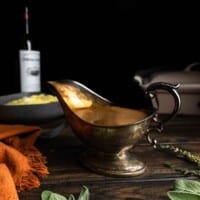
Salted Caramel Sauce
You can make the caramel sauce 2 -3 days before assembling the pie, if you wish. If you have a store bought caramel sauce you love, you can use that too - just make sure it’s thick enough to not be a runny mess!
If you have never made caramel before, fear not! It really is quite simple. You can check out the full homemade caramel recipe post for more details and serving suggestions!
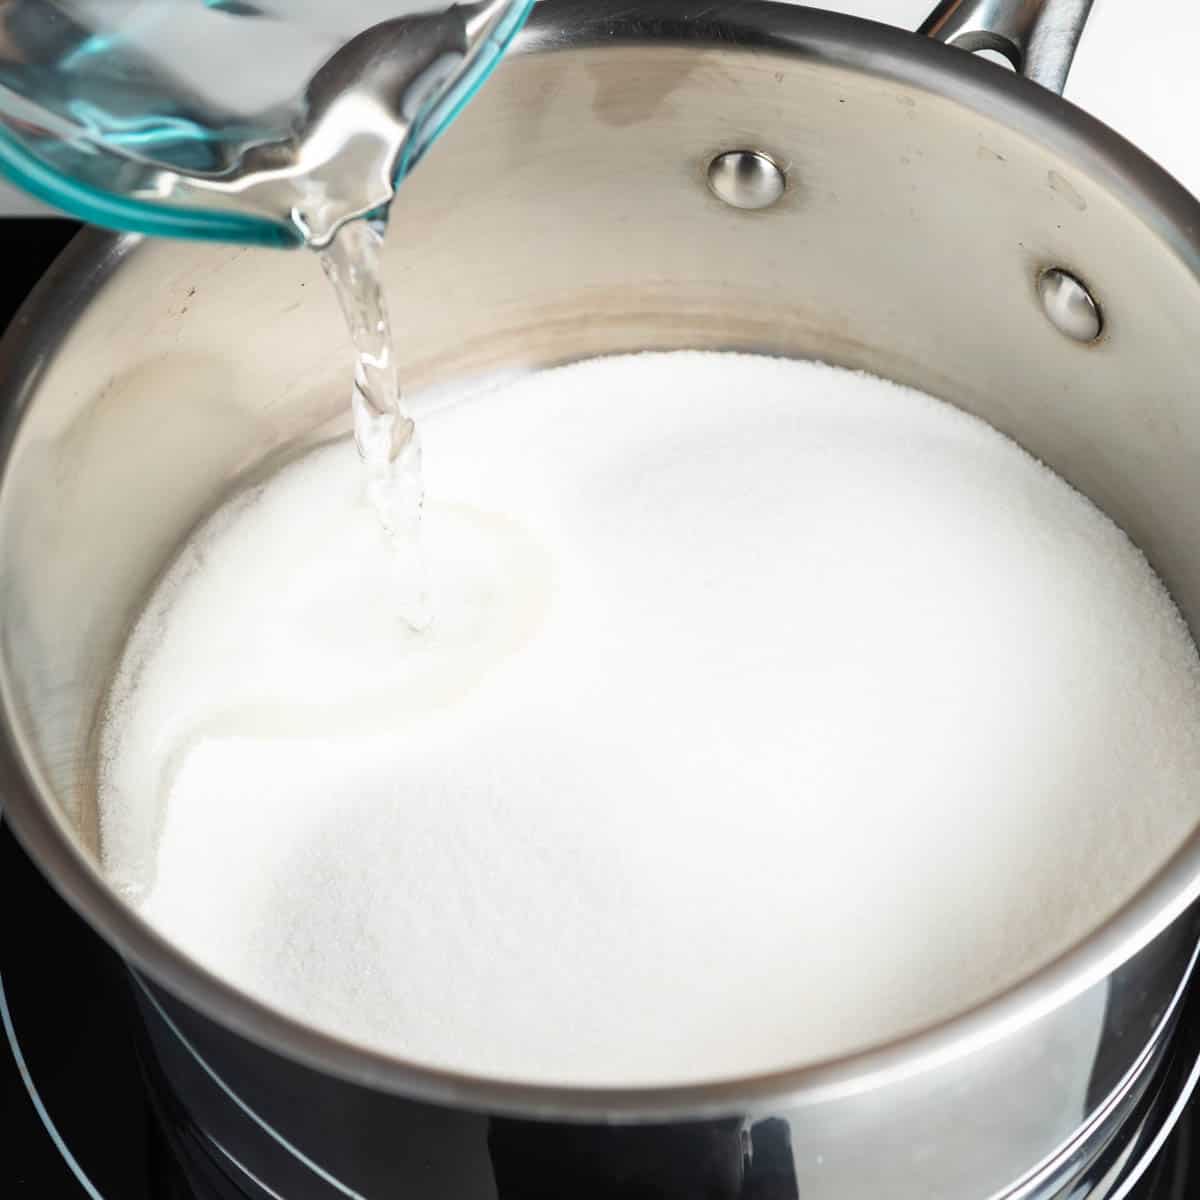
We will be making caramel with the wet method, which includes water. I find this method easier to cook and avoid burning the sugar. It can, however, crystalize if you are not careful.
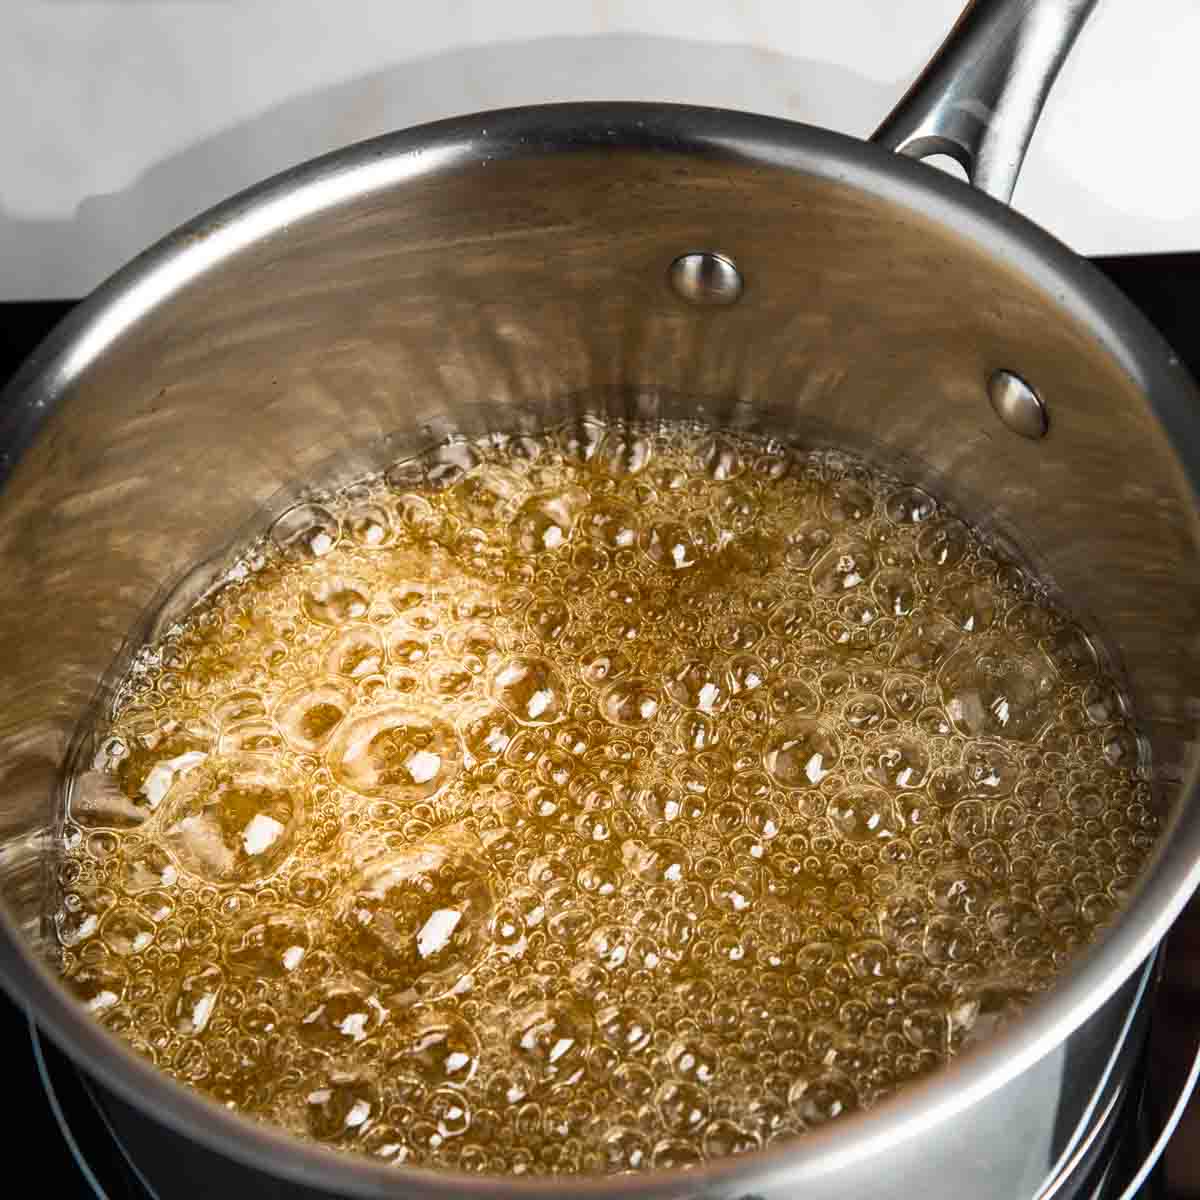
1. Start by adding the sugar and the water to a medium heavy-bottomed pot over medium heat. Stir gently to help dissolve the sugar into the water and create a clear syrup. Be mindful to avoid splashing the sugar onto the sides of the pot - that’s how crystals form!
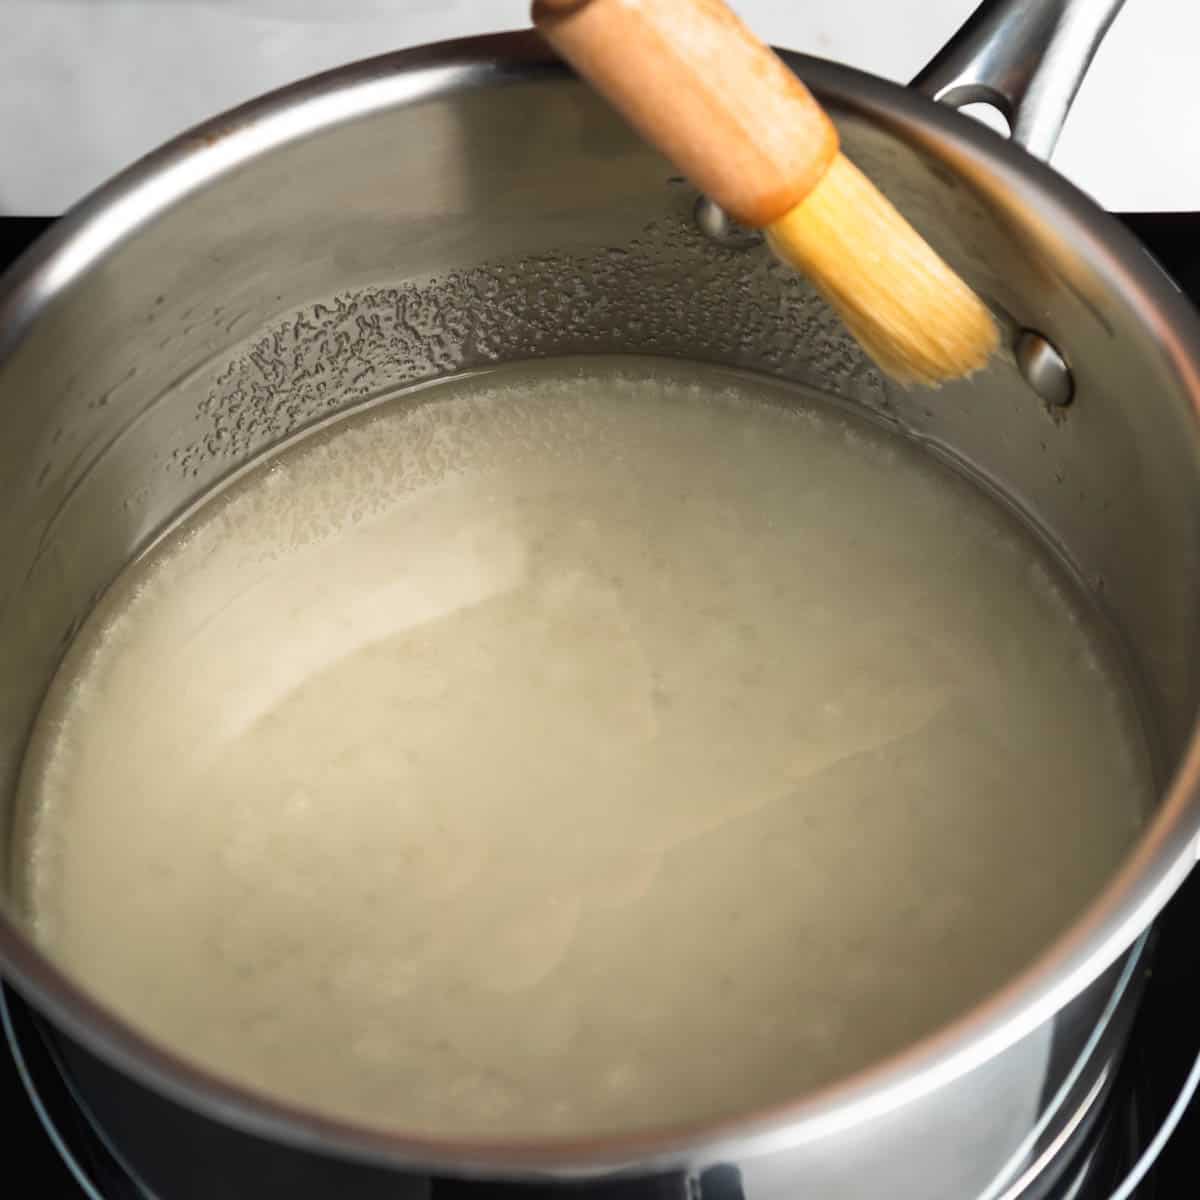
2. Once the sugar has dissolved - STOP STIRRING! This is key to avoiding crystallization. Use a wet pastry brush to wipe down the edges of the pot. The water from the brush will wipe any granules of sugar back down into the syrup. Don’t worry about additional water getting into the mixture, it’s all going to evaporate out anyway.
3. Let the sugar and water boil. Avoid stirring or swirling the pot. After about 8 - 10 minutes, the boiling mixture will begin to caramelize. (Caramelization begins at about 320° Fahrenheit.)
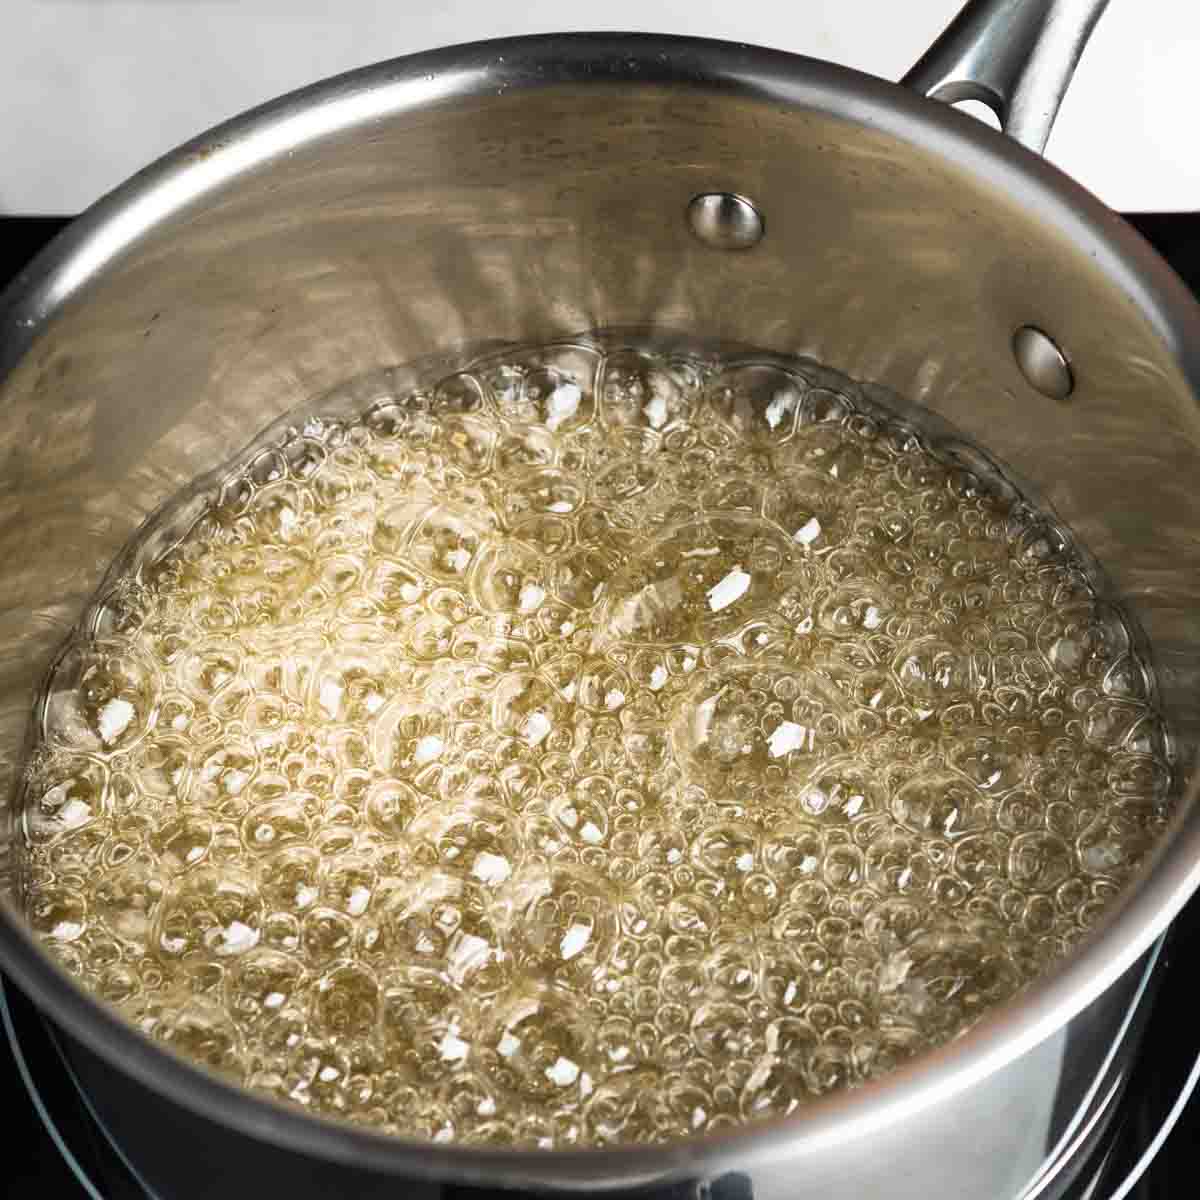
4. Watch closely! The caramel will deepen in color rather quickly. Cook the caramel until it is a rich amber color. For the best results, use an instant read thermometer (we love our Thermoworks thermometer) and cook the caramel to 330° - 335° Fahrenheit.
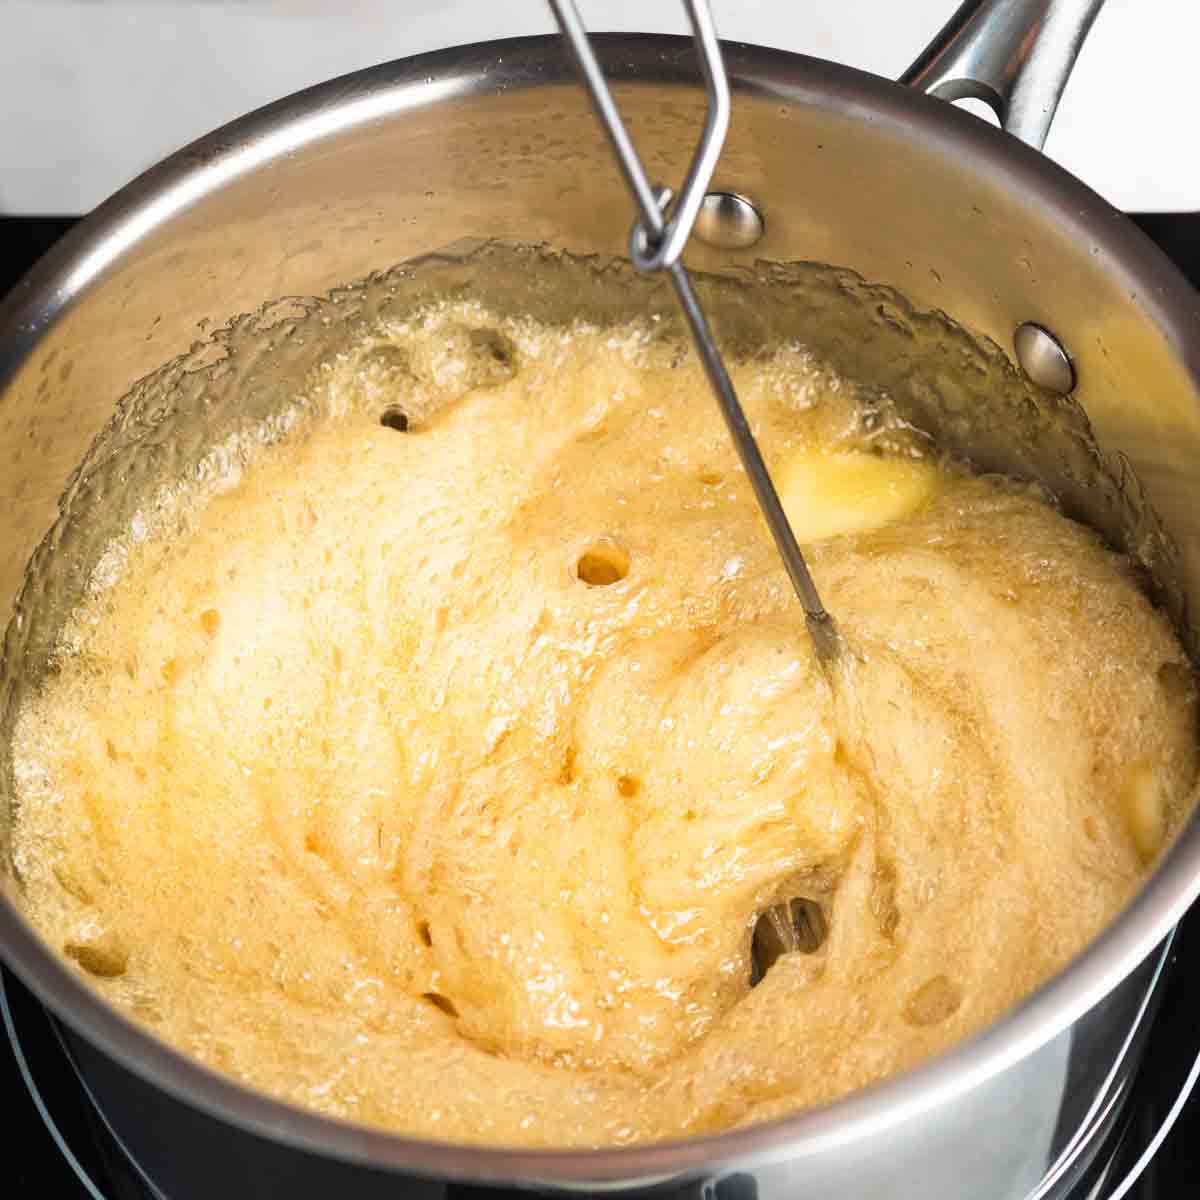
5. Immediately remove the caramel from the heat source. Whisk in butter, one Tablespoon at a time. It will bubble and foam up, this is normal, be careful! Meanwhile, warm some cream in the microwave, for about one minute.
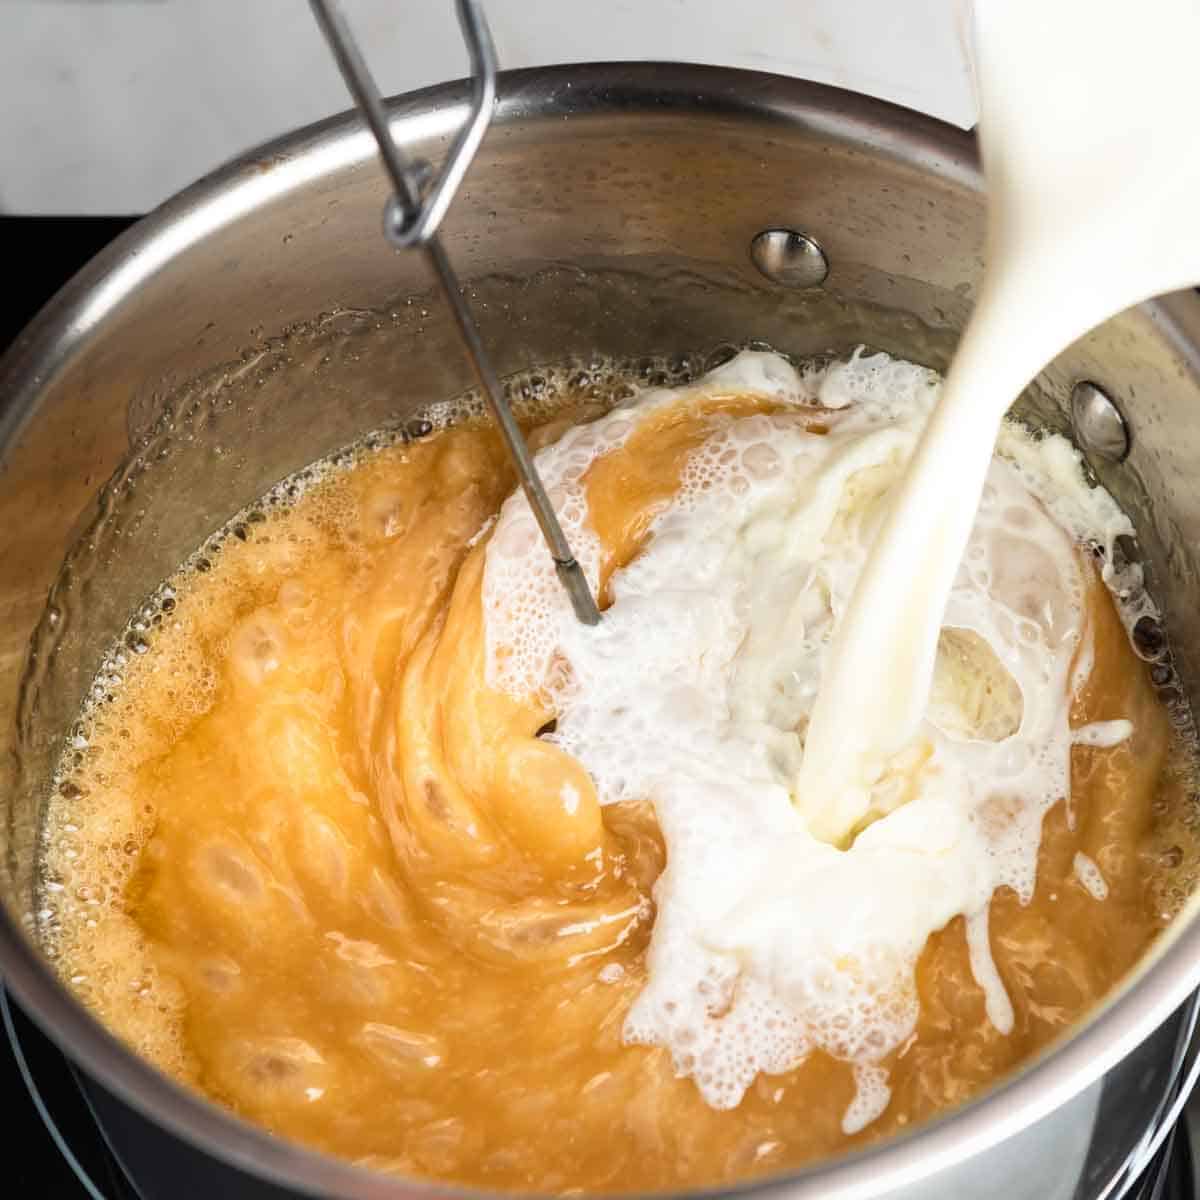
6. After the butter has been incorporated, whisk in the warm cream, a little at a time. The caramel sauce should we smooth and glossy. If it clumps up at all, the temperature was lowered too quickly. Put it back on low heat and whisk just until melted and smooth. (Longer cooking will make the caramel thicker and firmer than desired for this pie.)
7. Allow the caramel to cool slightly. Then, transfer caramel to a heat safe jar. If any hardened sugar remains on the side or bottom of the pot - leave it! Scraping it up and into the caramel can be the cause of a grainy texture.
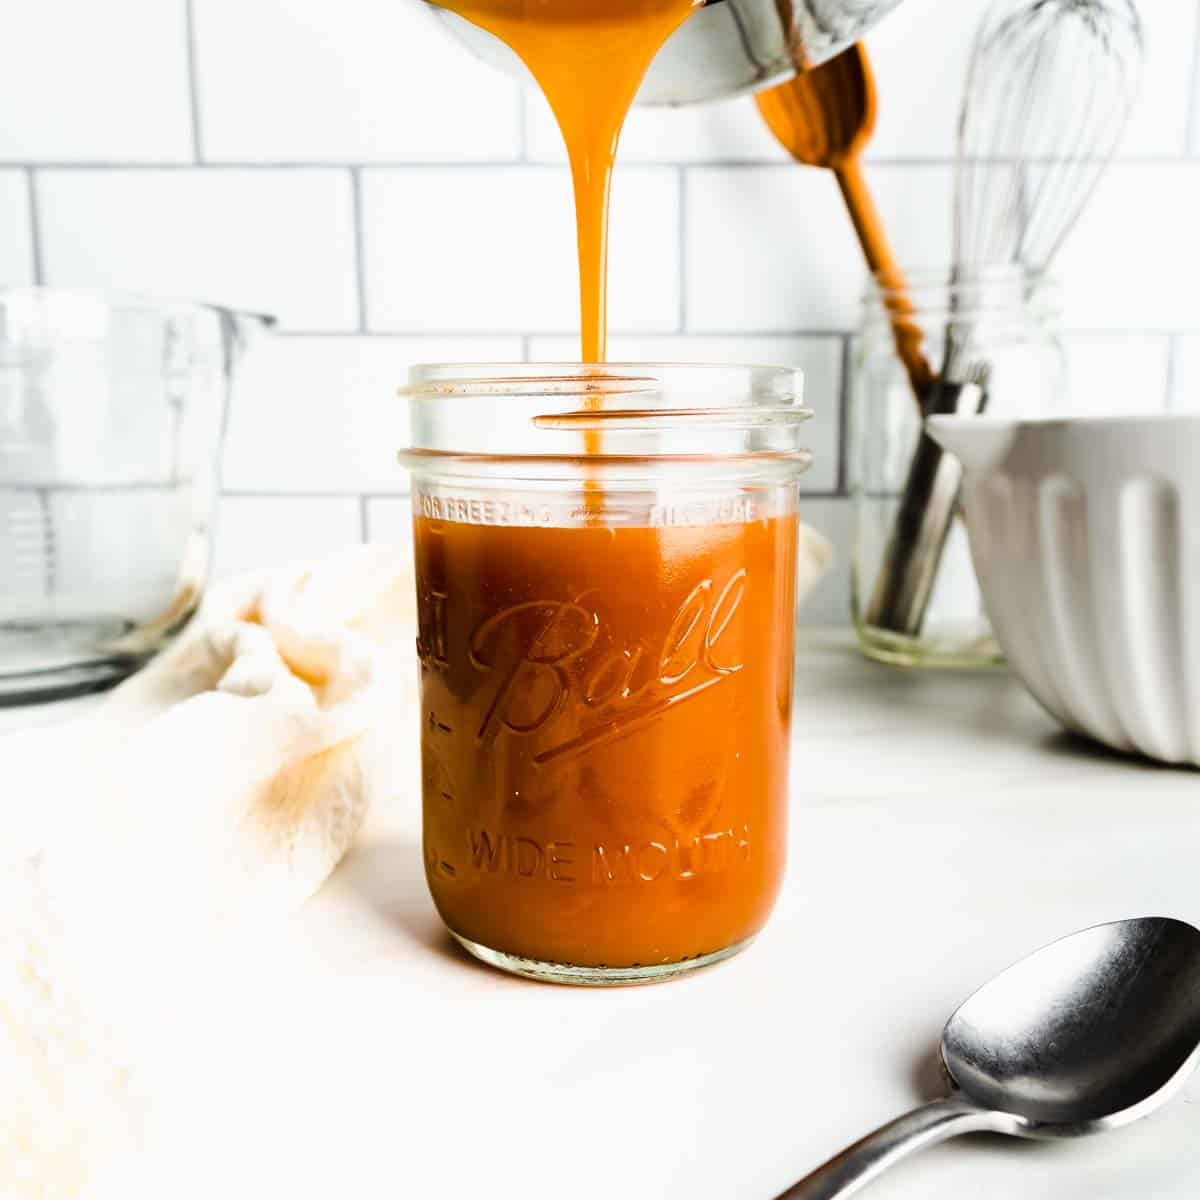
The caramel will thicken significantly, as it cools. Caramel sauce can be refrigerated for up to one week. When ready to serve, microwave in ten second intervals until the desired drizzling consistency!
Slicing, Serving & Saving
Once ready to serve, remove the tart pans’ fluted ring. To do this, gently warm the edges of the pie pan with the heat from your hands, or brief exposure to a kitchen torch or gas range. The outer ring should slide off easily.
- Slicing: The key to getting pretty, clean slices is using a hot knife. Heat a sharp chef’s knife under hot water and wipe dry between each and every slice.
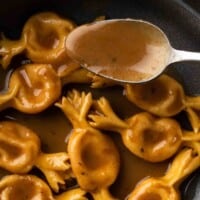
- Serving: Warm the caramel sauce, just a little bit, for about 10 - 20 seconds in the microwave. Stir well. You want it to be warm enough to be pourable but not so hot that it is very thin or will melt the whipped cream. Drizzle it over the whole pie or over individual slices.
- Saving: Leftover pumpkin and salted caramel pie can be kept refrigerated and enjoyed for up to 5 days.

More Fall Recipes To Love
Autumn is our favorite cooking and baking season! Check out these other Fall-centric recipes:


Recipe
No Bake Pumpkin Mousse Pie with Salted Caramel
ADJUST SERVINGS
Special Equipment
- 1 Instant Read Thermometer ((Optional, but recommended))
- 1 9.5 inch Deep Dish Tart Shell with a Removable Bottom
- 1 Electric Mixer or Stand Mixer fitted with the whisk attachment
Ingredients
Sweet & Salty Pretzel Pie Crust
- 7 ounces salted pretzels (1 ¾ Cups pretzel crumbs); regular or gluten-free
- ¼ Cup light brown sugar lightly packed
- 8 - 10 Tablespoons butter or brown butter melted; as needed
- 1 teaspoon ground cinnamon optional
- 1 teaspoon fine kosher salt* optional if using unsalted butter
No Bake Pumpkin Pie Mousse
- 1 Cup heavy cream cold
- 8 ounces cream cheese room-temperature
- 1 Cup light brown sugar lightly packed
- ½ Cup pumpkin puree
- ½ teaspoon ground cinnamon
- ¼ teaspoon ground ginger
- ¼ teaspoon ground nutmeg
- ⅛ teaspoon ground allspice
- 1 Tablespoon vanilla extract
Whipped Cream
- 2 Cups heavy cream cold
- 2 Tablespoons powdered sugar
- 1 Tablespoon vanilla extract
Salted Caramel Sauce
- 1 ½ Cups granulated sugar
- ½ Cup water
- 6 Tablespoons butter cut in 1 Tablespoon pieces
- ¾ Cup heavy cream warmed
- ¾ + teaspoon fine kosher salt* to taste
- 1 teaspoon vanilla extract
Instructions
Sweet & Salty Pretzel Crust
- In a food processor (or sealed bag with rolling pin) crush the pretzels until a fine crumb forms. Transfer to a mixing bowl. Stir in brown sugar, 8 Tablespoons (1 stick) melted butter (or melted brown butter) and cinnamon and salt (if using).
- The consistency of the pretzel mixture should resemble wet sand and hold firmly together when squeezed. If too dry, drizzle in an additional 1 - 2 Tablespoons of melted butter, as needed. Transfer the crumb mixture to a removable-bottom tart shell.
- With a smooth-edged drinking glass (or measuring cup) press the crumbs into the tart shell. Start by forming the edges of the pie crust and then level the bottom. Freeze or refrigerate the crust while preparing the filling.
No Bake Pumpkin Pie
- In medium mixing bowl, use an electric mixer to whip cold heavy cream until stiff peaks form. Set aside in refrigerator until ready to use.
- In a separate medium mixing bowl, beat cream cheese and brown sugar together, scraping the bowl as necessary. Beat on high speed 1 - 2 minutes or until light and fluffy.
- Add pumpkin puree, ground spices and vanilla extract. Whip together until fully combined. Use a rubber spatula to gently fold in the whipped cream. Transfer the pumpkin mousse filling into the prepared pie crust and refrigerate (with or without whipped cream topping) for at least 3 hours, or overnight.
Whipped Cream
- In a medium mixing bowl, whip cold heavy cream. Add in powdered sugar and vanilla extract. Whip until desired consistency (I like it somewhere between soft and stiff peaks).
- Top pie with whipped cream and use an offset spatula to swoosh the cream into pretty peaks. When ready to serve, slice pie with a sharp, hot knife. Drizzle with salted caramel sauce, as desired.
Salted Caramel Sauce
- In a medium heavy-bottomed pot, combine granulated sugar and water over medium heat. Stir gently until sugar is just dissolved. Stop stirring.
- Use a wet pastry brush to brush any granules of sugar from the sides of the pot. Let the water from the pastry brush wash the sugar crystals down into the syrup, repeat as necessary. Do not stir or swirl the syrup. Allow the syrup to boil. Watch closely. After about 8 - 10 minutes the syrup will reach 320° Fahrenheit and begin to caramelize. Quickly, the color will change to a deeply caramelized amber color. Once the mixture has reached 330° - 335° Fahrenheit, remove it from the heat.
- Whisk in butter, 1 Tablespoon at a time. Be careful, the caramel will foam and bubble up. Meanwhile, warm the heavy cream in the microwave for 1 minute.
- Once the butter is fully incorporated, stream in the warmed cream while whisking. Again, be careful, the caramel will continue to bubble and spit. Whisk until the cream is fully incorporated and the bubbles die down. Whisk in vanilla and salt. (Add salt to taste. I usually use about 1 teaspoon for salted caramel.)
- Cool slightly then, transfer caramel sauce to a heat-safe jar or container. This sauce can be made 2 - 3 days ahead of time. Caramel sauce will thicken significantly as it cools/ once it is refrigerated.When ready to serve, microwave caramel sauce in 10 second intervals until the desired consistency is reached. Drizzle over slices of pie. Leftover caramel sauce can be refrigerated for up to one week. Enjoy!
* A Note About Salt
Unless otherwise noted, all recipes on The Sage Apron are developed using Diamond Crystal Kosher salt. It is a great all-purpose salt for cooking and baking. If using table salt, reduce quantities by about half.

Cameron says
Amazing recipe. Have had it twice and made it once. The crust is amazing and could be used with a variety of fillings. The filling is fluffy and rich. Great pie all around
Victoria says
Hi Cameron- do you know what size tart shell you used? Thank you
Victoria says
Hi- I want to make this pie but I need to buy a non-stick tart shell with a removable bottom but not sure which size. Can you please let me know what size you used for this recipe? Thank you so much!
The Sage Apron says
Hi Victoria! I just sent you an email! We used a 9.5 inch deep dish tart shell (but anything in the 8 - 10 inch range would work well). I will update the post to clarify. Thank you for brining this to my attention and I hope you love the pie!
- Taylor
Jenny Hunkin says
Can you use a springform pan instead of a tart pan?
The Sage Apron says
I don’t see why not! Depending on how deep the pan is, the crust may not go all the way up the sides, but it should still work out to be delicious! 🙂