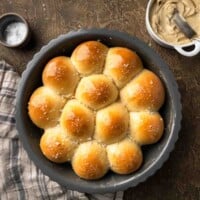
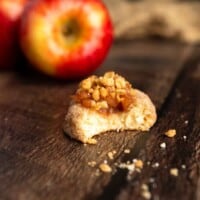

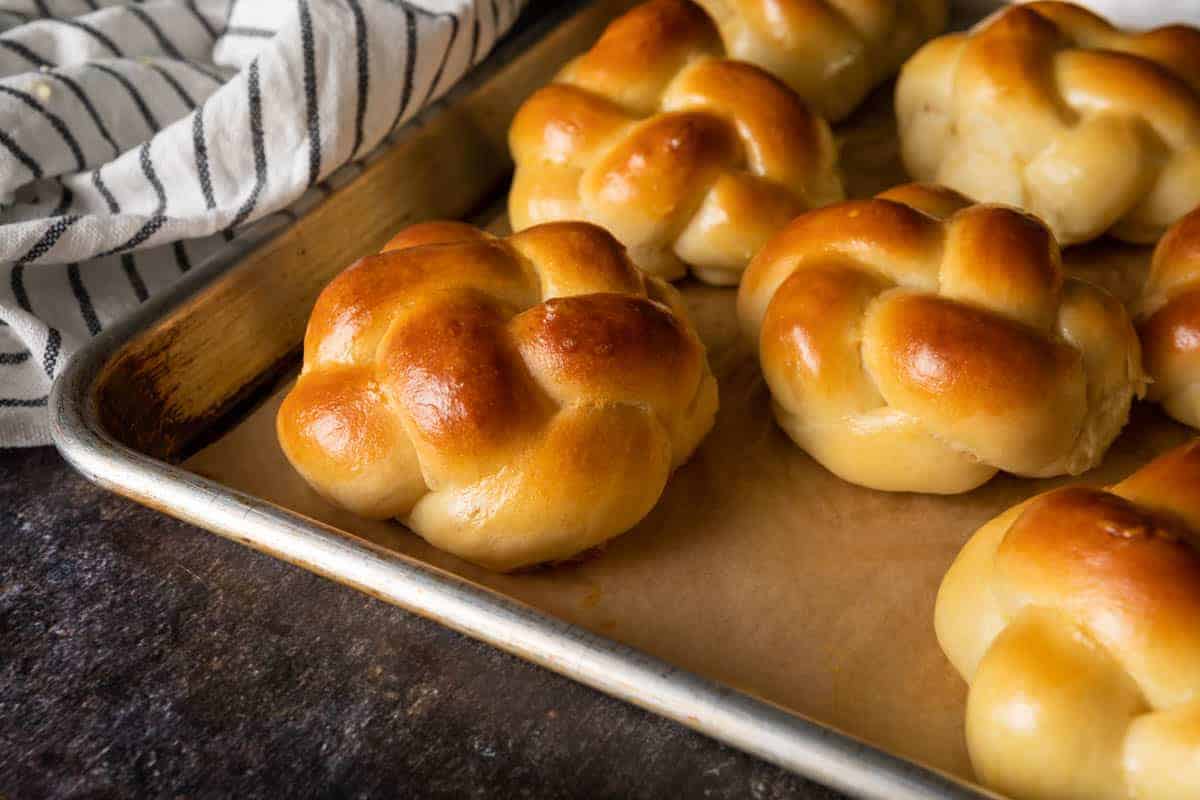
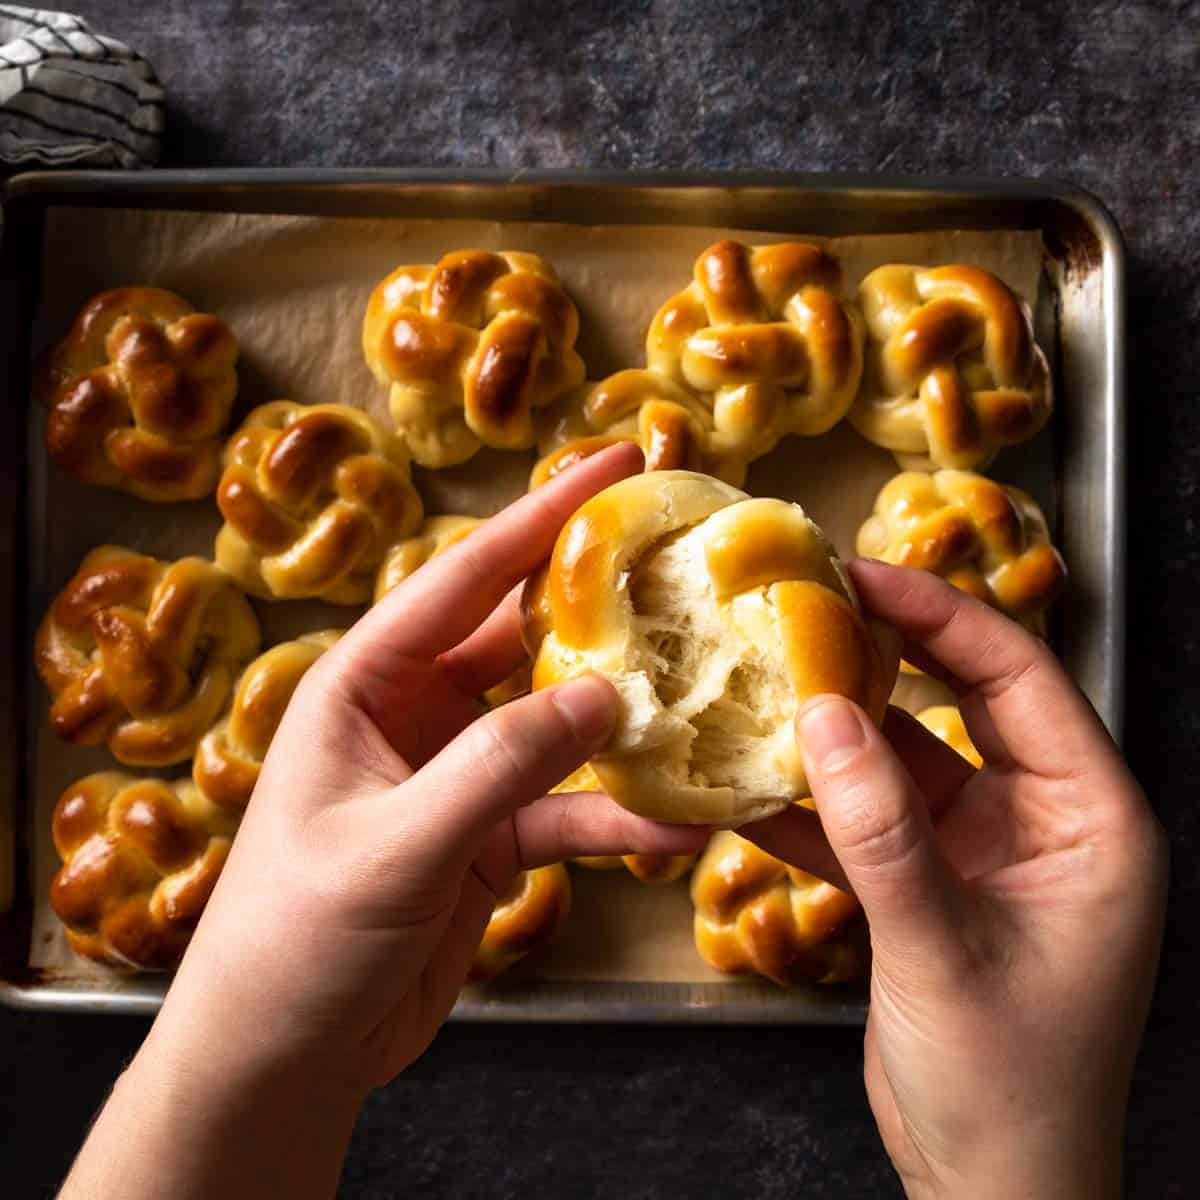
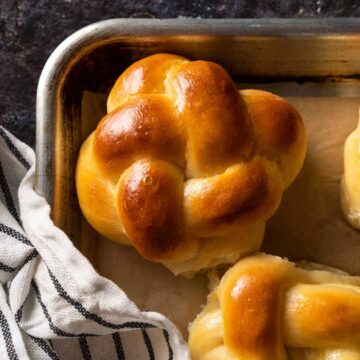
The braided challah buns are a must for Jewish holidays and family celebrations. These baby challah bread rolls are a lightly sweet, fluffy white bread that are as tasty as they are beautiful!
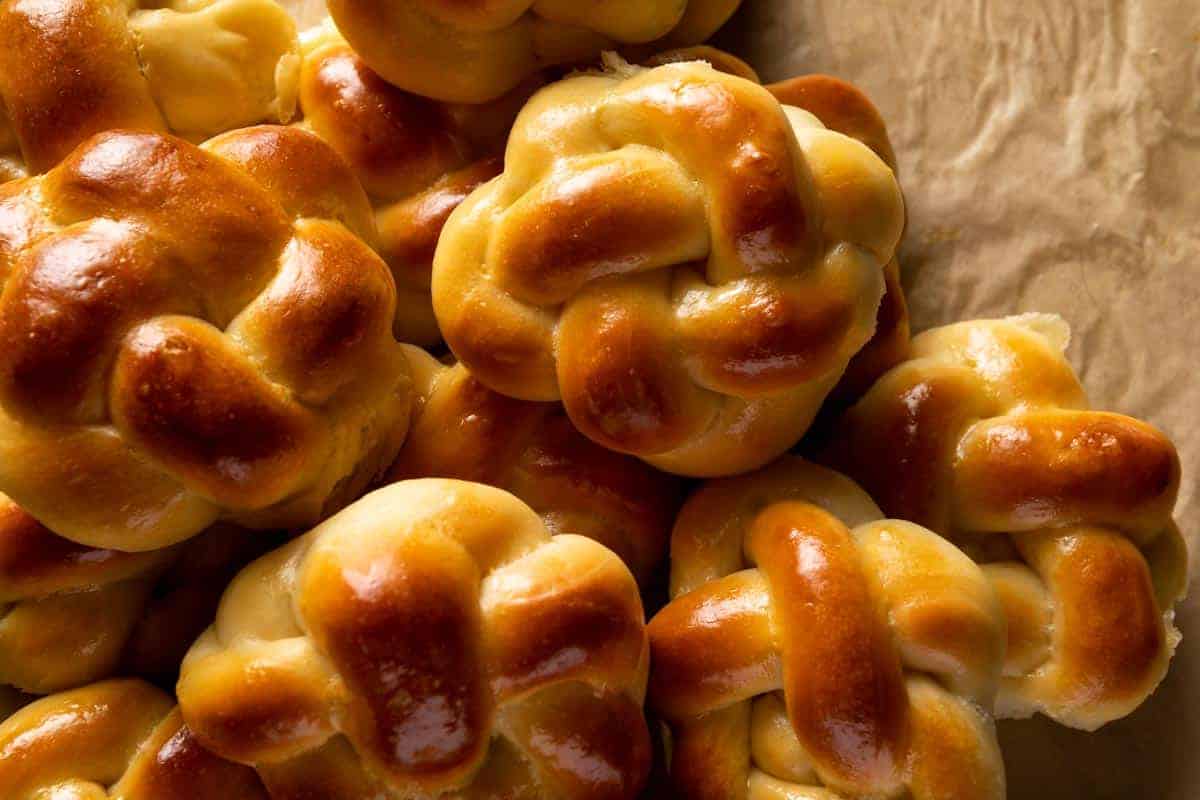
These challah rolls are the perfect festive addition to the dinner table. Whether it be for major Jewish holidays like Chanukah or Rosh Hashanah, weekly Shabbat or just a special delight for any day of the year - fresh baked challah is always amongst the best breads.
These buns are made using a simple four strand braid that results in lovely, intricate looking dinner rolls. Their beautiful golden brown exterior paired with their soft and fluffy interior make this one of my all time favorite bread recipes.
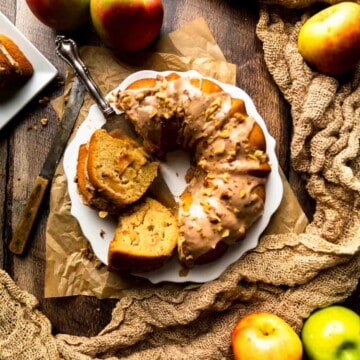
To see how we braid these buns, check out the step-by-step how to photos below. Oh, and be sure to save room for dessert! My Jewish Apple Cake with Cider Glaze is a Rosh Hashanah favorite!
Ingredients
Braided Challah Buns are made from a simple enriched bread dough. Whole eggs, egg yolks, oil and a touch of honey are the ingredients that give this classic challah recipe its signature soft, rich, and slightly sweetened crumb.
If you would like, a sprinkle of sesame seeds or poppy seeds can be added to the buns, as well.
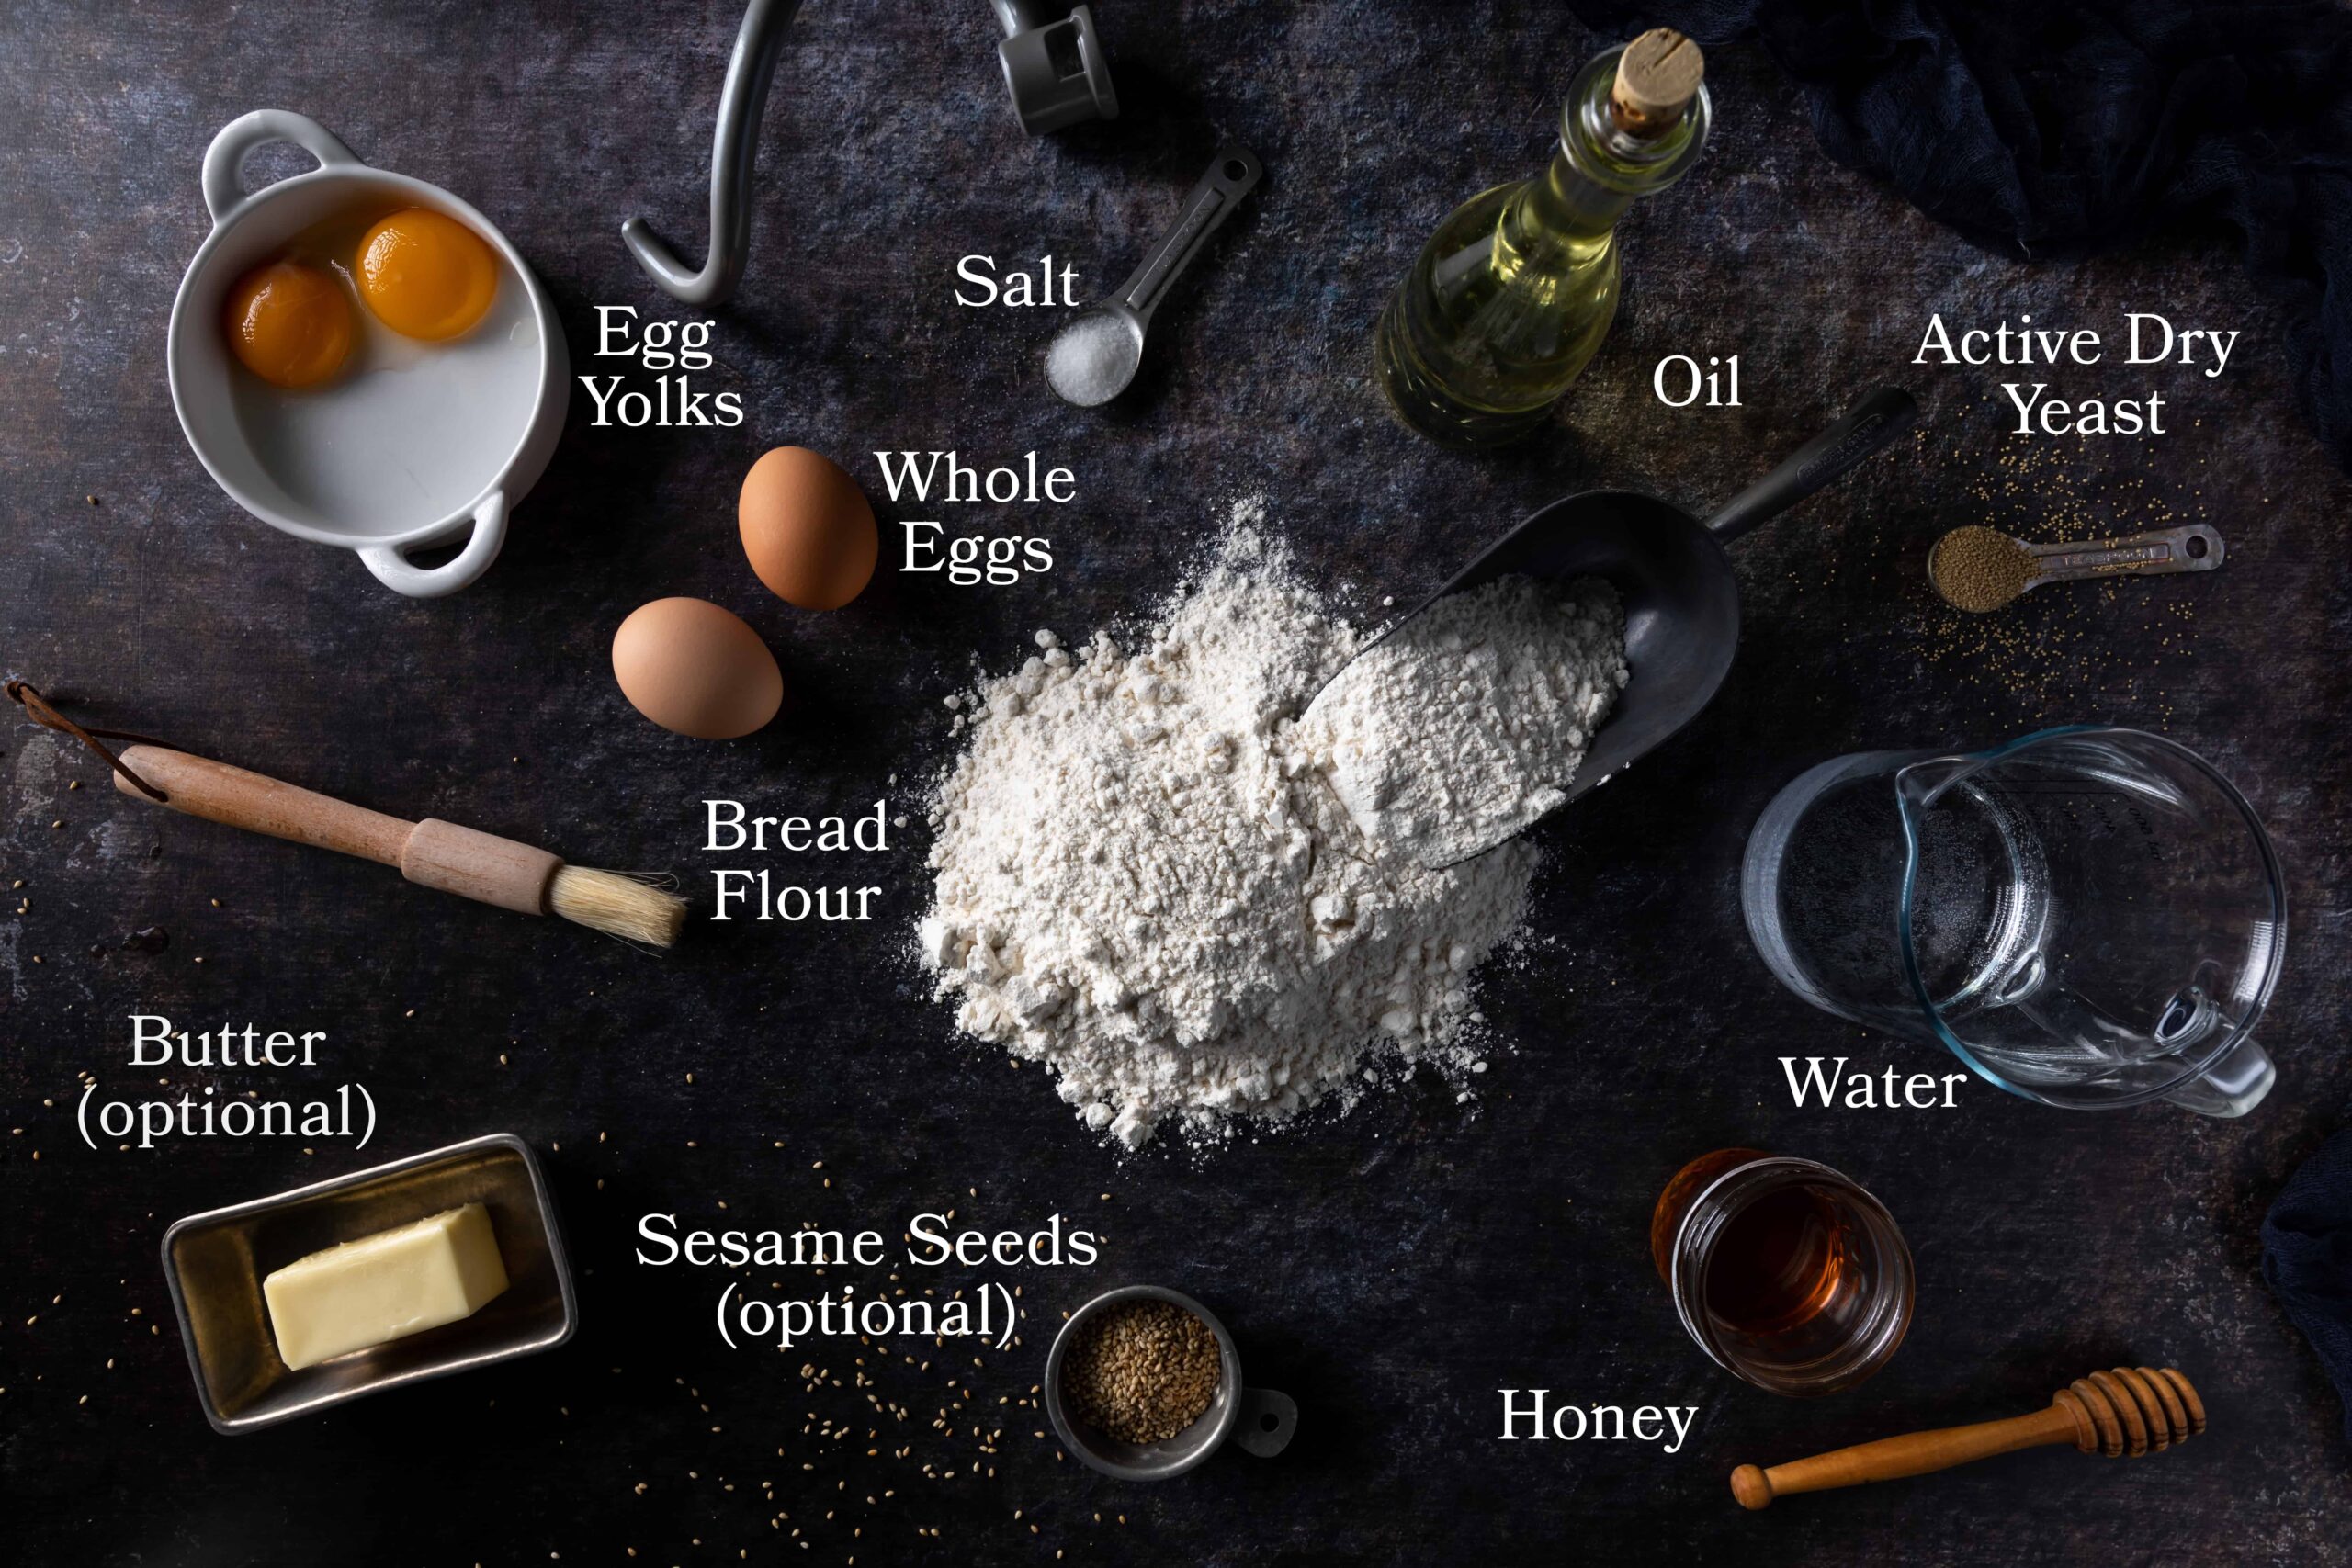
- Bread flour - This recipe works best with bread flour, which creates a stronger gluten. However, in a pinch, all-purpose flour can be substituted for slightly different results.
- Sesame Seeds - Totally optional! Add a sprinkle of sesame or poppy seeds to your buns for a little added texture and flavor.
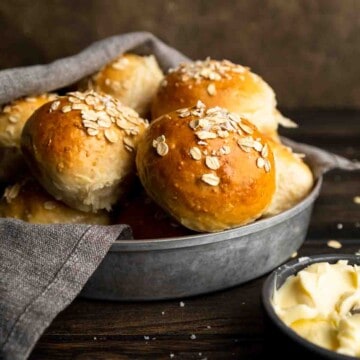
- Butter - Simply for serving! Challah dough is made with oil, not butter. However, if you're not kosher, we recommend serving the rolls warm with a schmear of soft butter!
- Egg Wash - Not pictured but essential to these challah buns shiny, soft and golden brown crust. Simply whisk one egg with a splash of cream, milk, or water and glaze the buns prior to baking. (Just use water for a kosher loaf!)
Mixing The Dough
This challah bread recipe is easy to make by hand or in a stand mixer fitted with the dough hook attachment.
- First, dissolve the honey in warm water. Then, add the active dry yeast and set aside to allow the yeast to bloom (hydrate). The yeast mixture will become frothy - indicating that the yeast is alive and activated. In a separate bowl, lightly whisk the eggs, yolks and oil together and set aside, also.
- Then, in a the bowl of a stand mixer (or medium mixing bowl) whisk the flour and salt together. With the mixer on its lowest speed (or with a wooden spoon), slowly mix the dry ingredients as you add in the yeast mixture and the egg and oil mixture.
Stir until a shaggy mass of dough forms and then increase the speed (or turn out onto a lightly floured work surface) to knead until a smooth and elastic dough forms. (You may need to add a couple teaspoons, or so, of warm water to fully incorporate any dry flour mixture at the bottom of the stand mixer.)
After mixing, challah will start as a sticky dough. However, after proper kneading the challah dough should be smooth, and a little tacky but not stick to your hands. - Knead the dough into a round ball and transfer to an oiled bowl. Cover the bowl with plastic wrap or a clean, damp towel and begin to proof in a warm place. The proofing (rising) process for this challah dough is very important and requires more time than other bread recipes. Read more about perfect proofing below.
Proofing Makes Perfect
The KEY to pillow soft challah dinner rolls is a long proofing time! The addition of whole eggs, egg yolks and oil all slow down yeast activity in the bread. Because of this, challah dough takes much longer to rise and become fully proofed and ready-to-bake. Don't rush the process!
This type of yeast bread needs the extended proof time to create it's characteristic soft and fluffy texture. The exact times will rely on many factors including the temperature of your warm water and the temperature of your kitchen. Try and keep your proofing dough at a constant 70° Fahrenheit in a place free from drafts. Here is a sample timeline to get your bread on the table for a 6pm dinner time! (I included a little extra time to account for a little additional proofing time, if needed.)
Sample Baking Timeline
| 12:00pm - 12:30pm | Mix the dough |
| 12:30pm - 2:00pm | First proofing until dough is nearly doubled in size |
| 2:00pm - 2:30pm | Shaping the Braided Challah Buns |
| 4:15pm | Preheat the oven |
| 2:30pm - 4:30pm or 5:00pm | Second proofing until challah dough stays dented and does not spring back when gently poked. |
| 4:30 or 5:00pm | Bake for approximately 25 minutes |
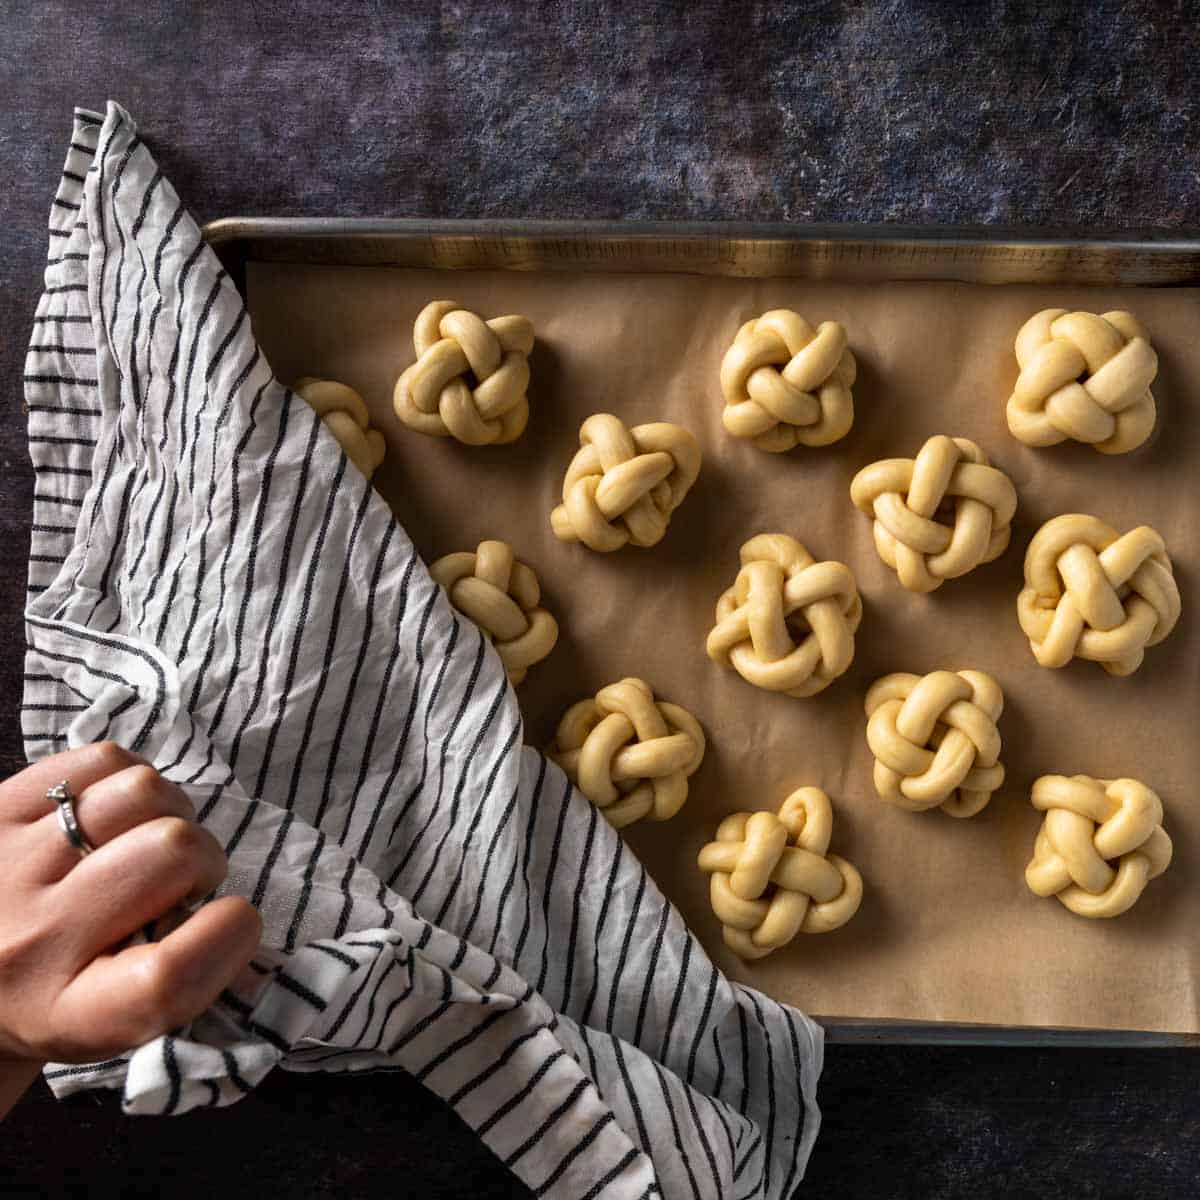
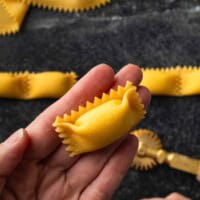
Braiding The Buns
Now for the fun part! These Challah Buns have a beautiful, intricate look but the process is actually pretty simple and quite repetitive. While the shaping process might take a little getting used to, you'll be a pro by your third or fourth bun. Here is a step-by-step photo guide to help you. This process begins after the first proof (or around 2pm on the provided timeline above).
If you are just going to make traditional round rolls, go ahead and skip straight to the Tips & Tricks.
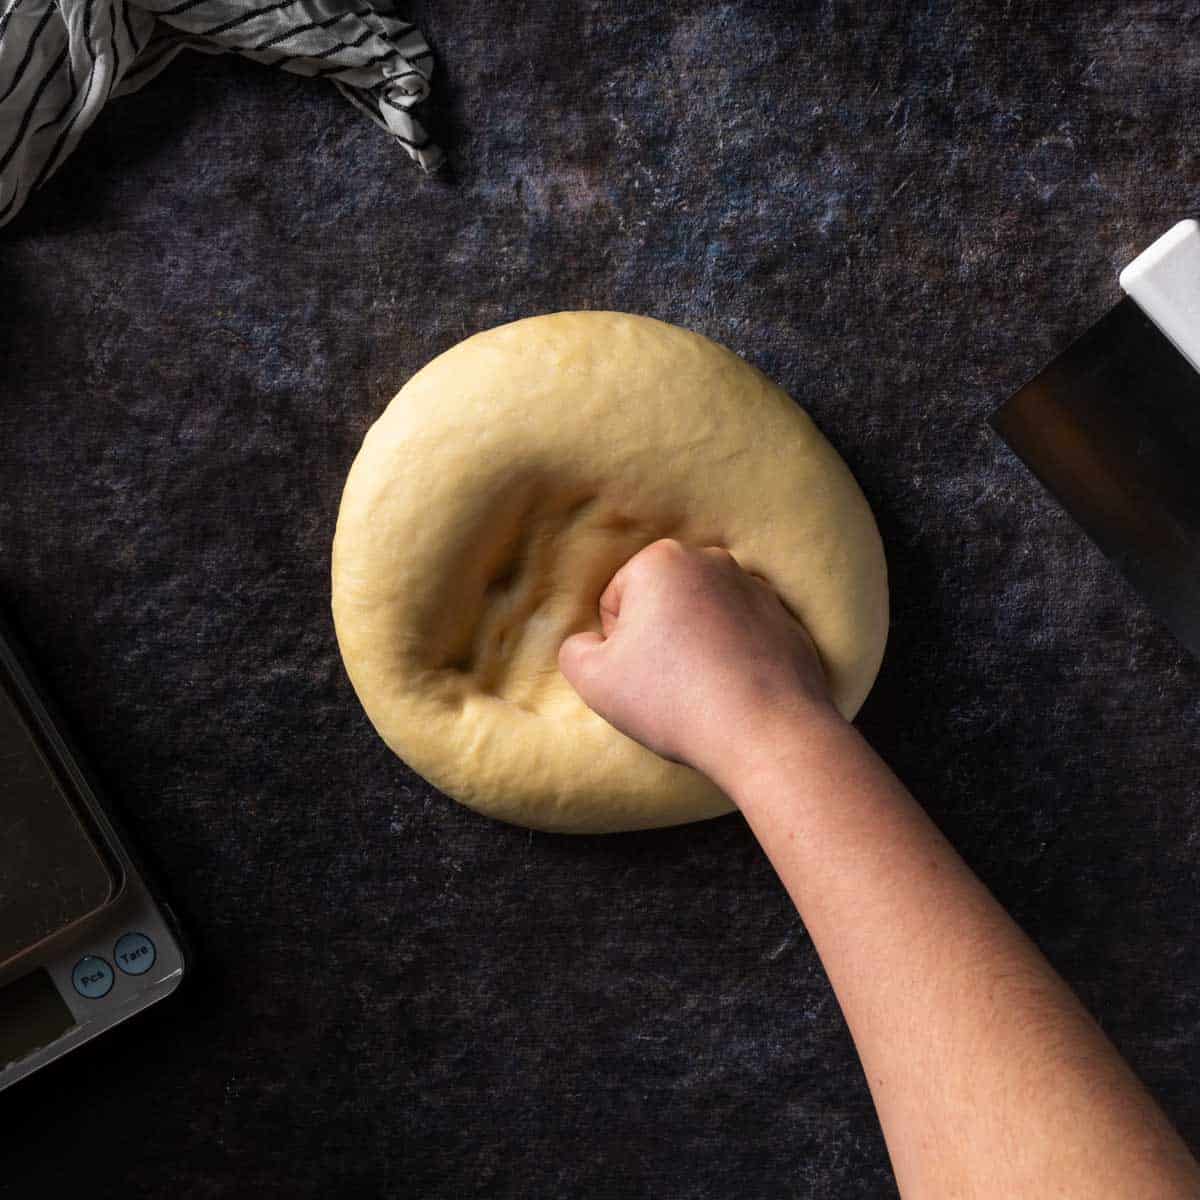
1. The first step is to transfer your challah dough (after the first rise) to a clean work surface. Do not flour the work surface! Your dough should be slightly tacky and the tackiness will help create tension needed during this shaping process.
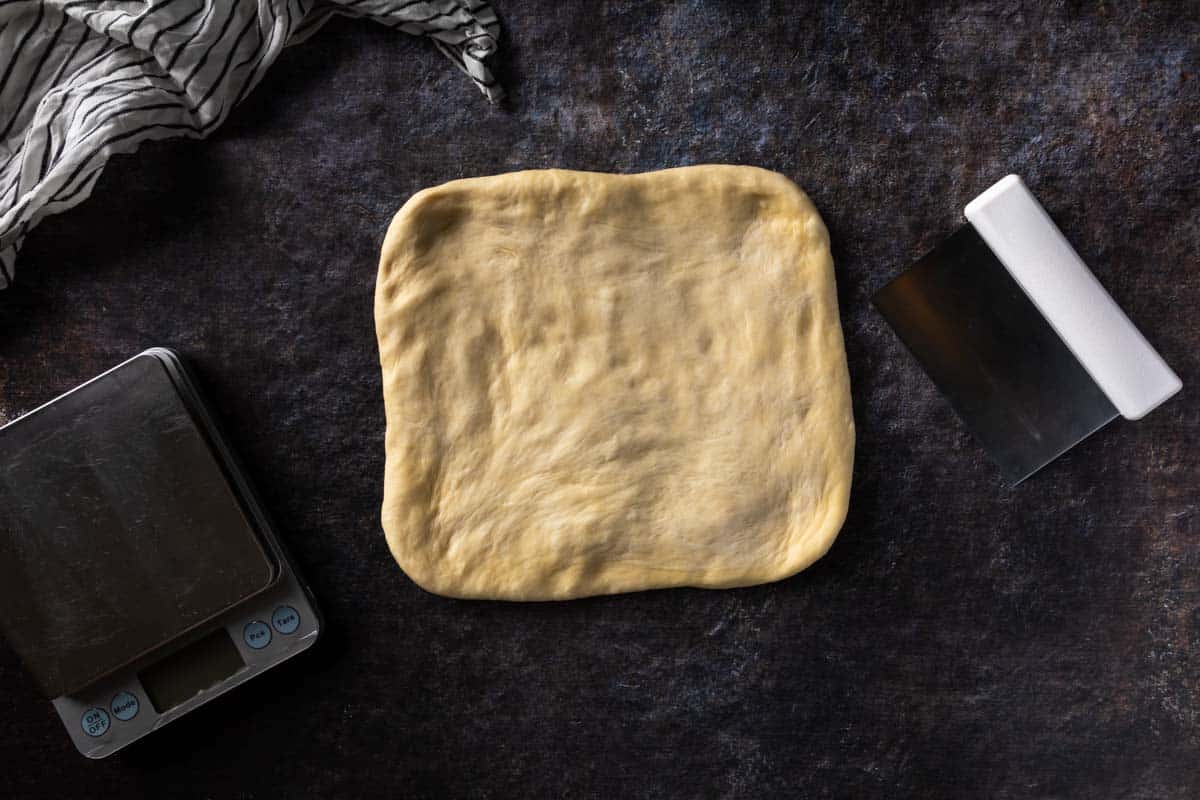
2. Punch down the dough to deflate. Press dough into a rectangle shape.
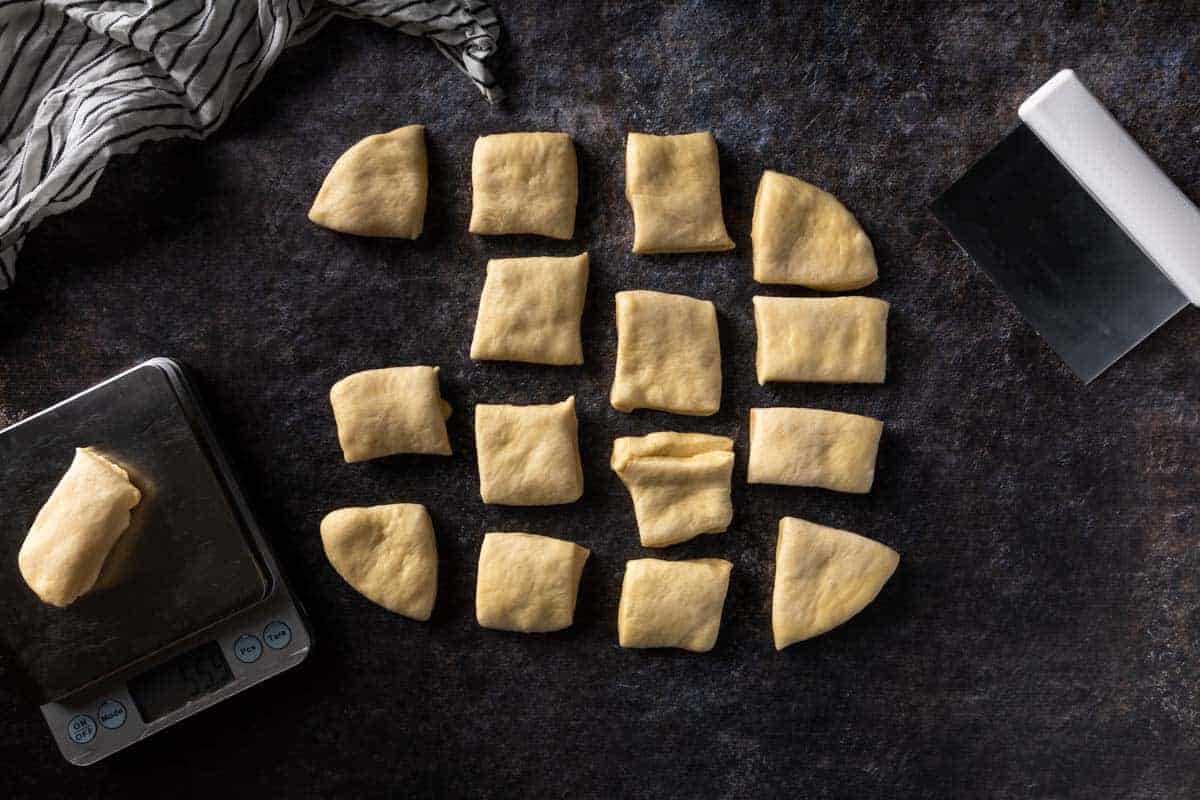
3. Divide dough into 16 equal pieces. For consistency, I recommend weighing each pieces of dough on a kitchen scale to equal 2 ounces (56 grams). Keep pieces covered with plastic or a damp kitchen towel to avoid drying out.
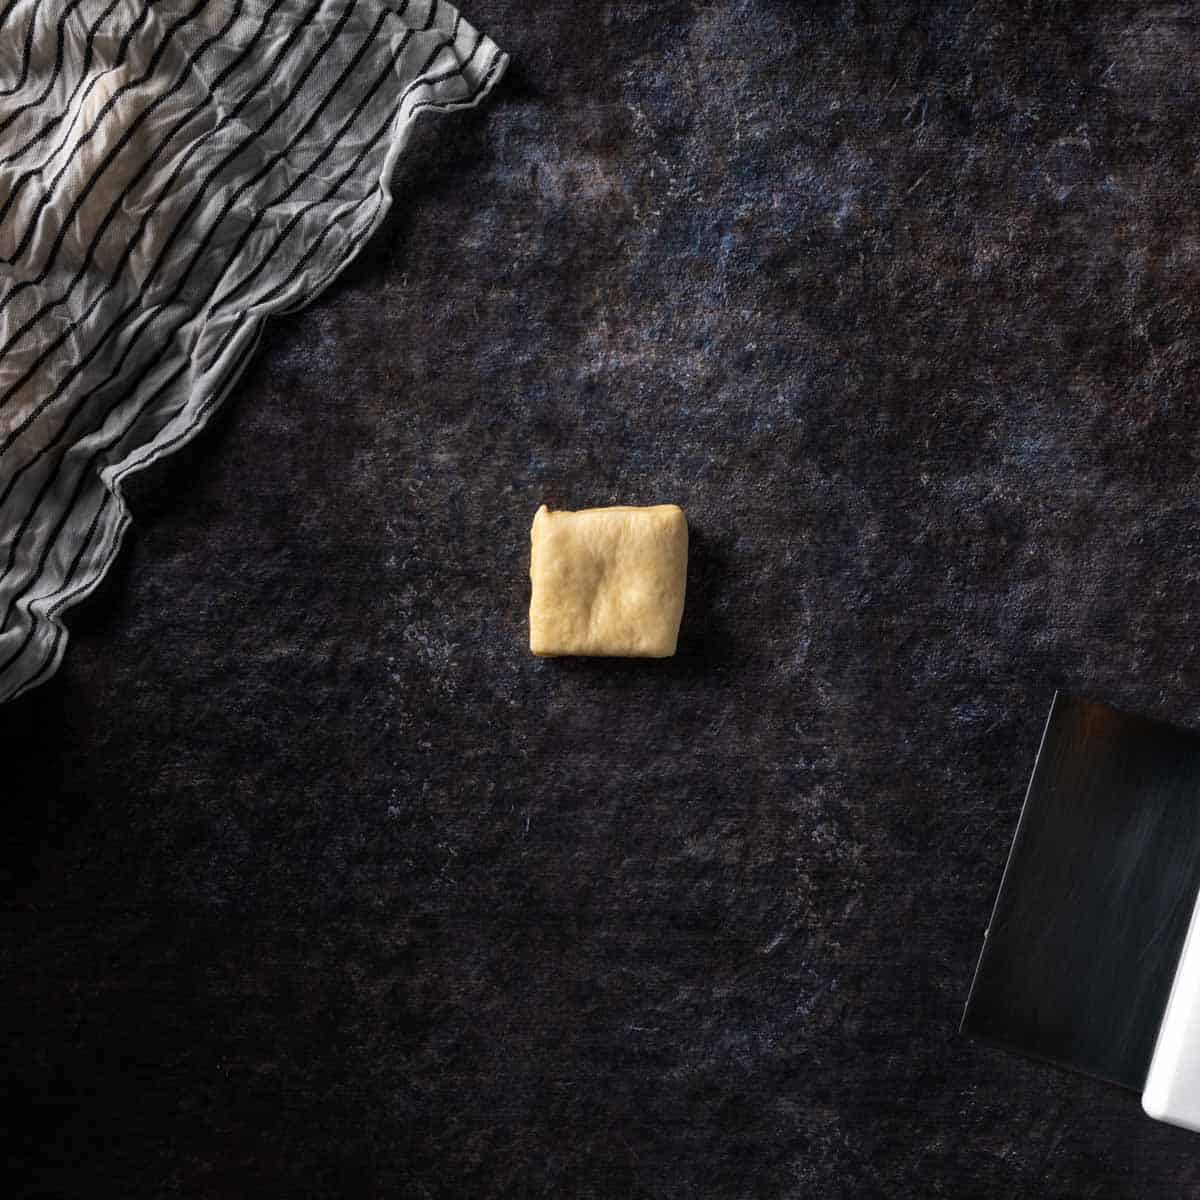
4. Working with one piece of dough at a time, use a bench scraper to divide the roll into 4 equal parts.
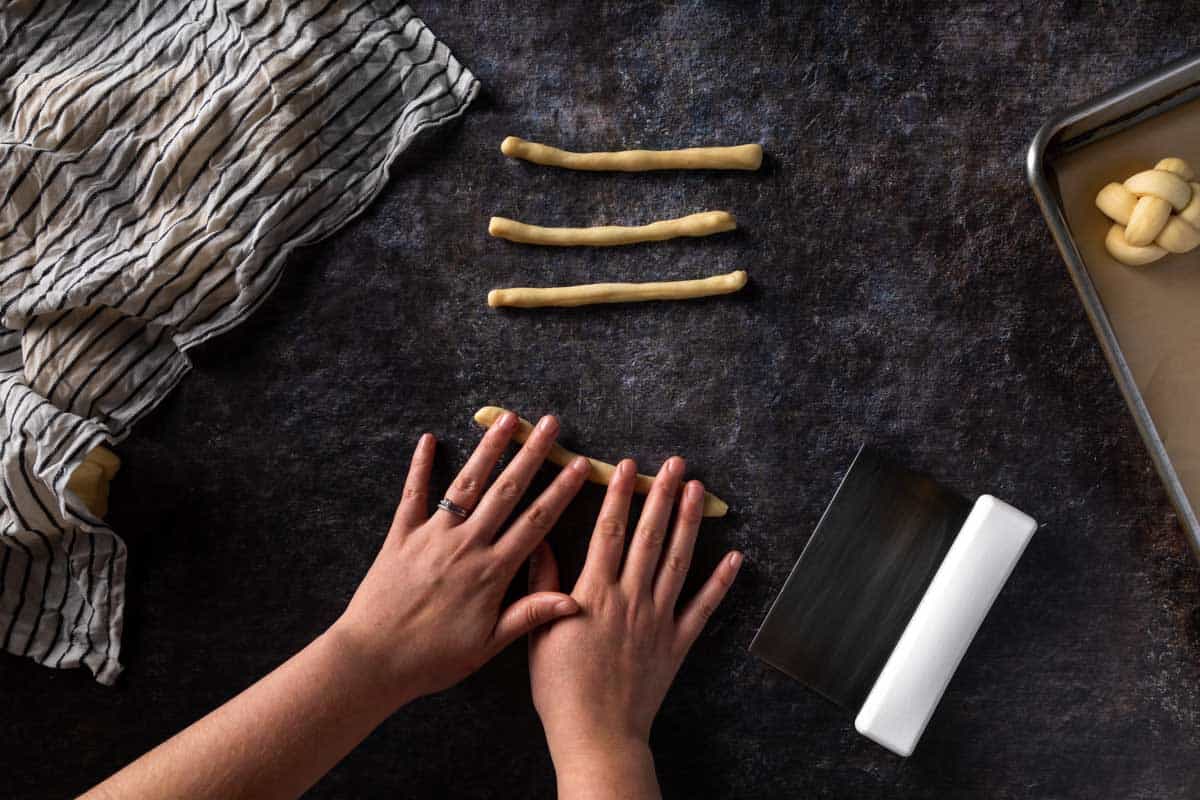
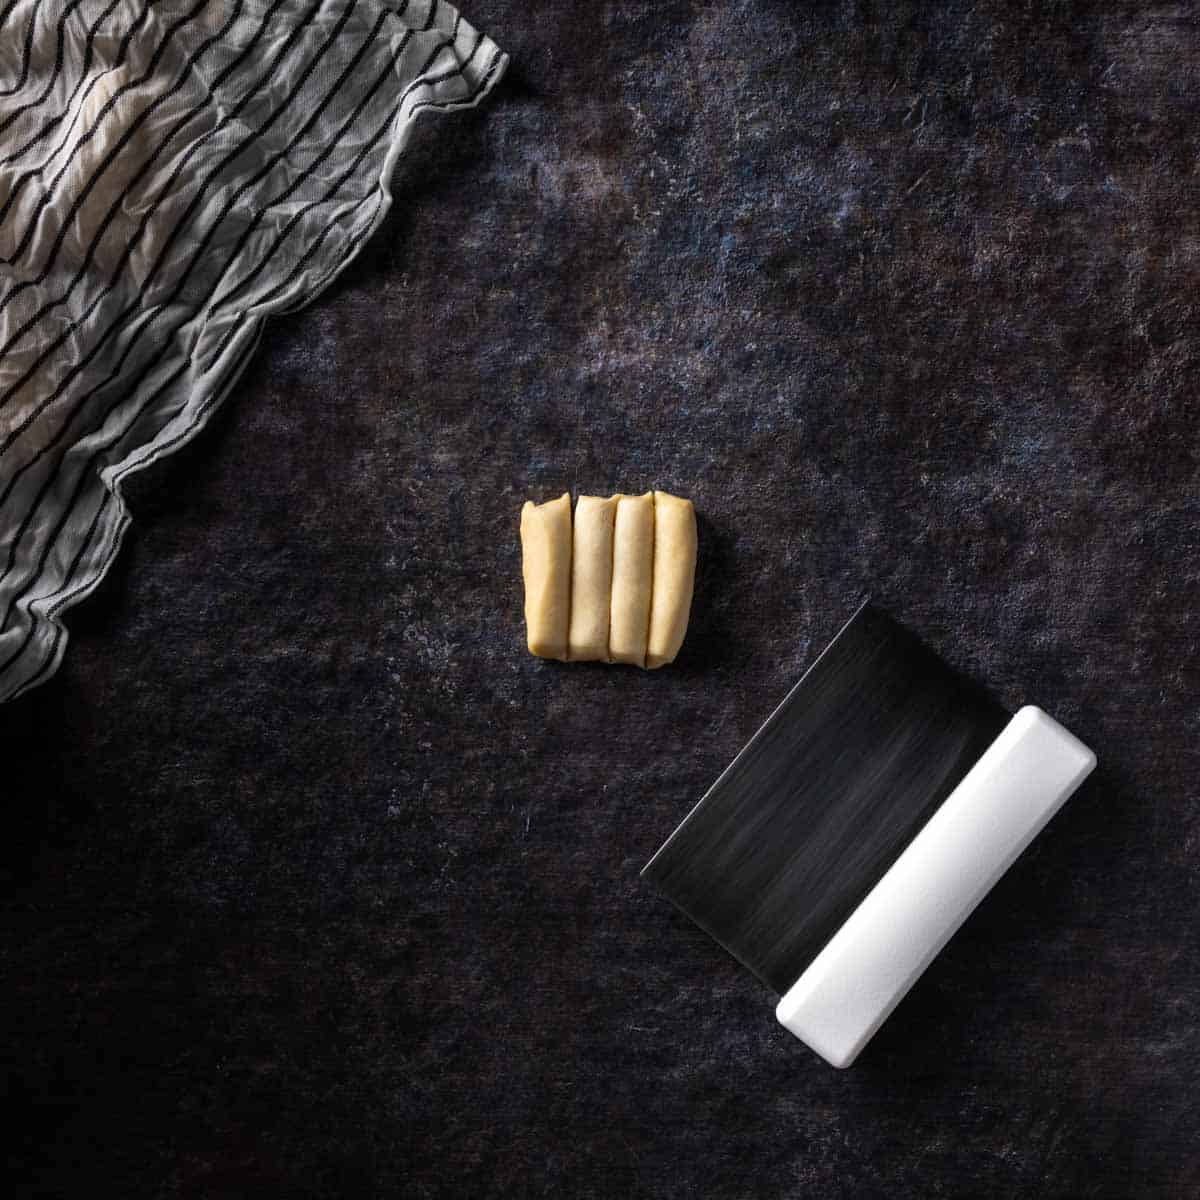
5. Use your hands to roll each of the 4 pieces into a rope about 6 - 7 inches (15 - 17 centimeters) long.

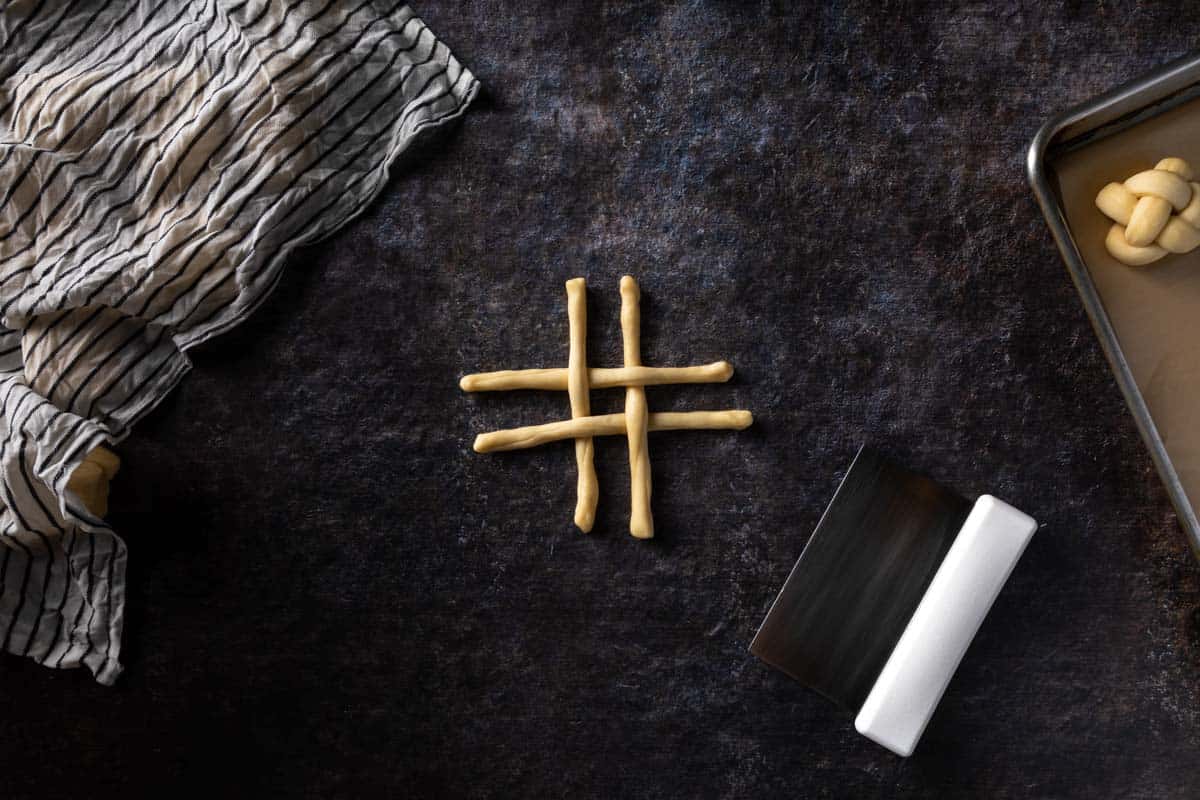
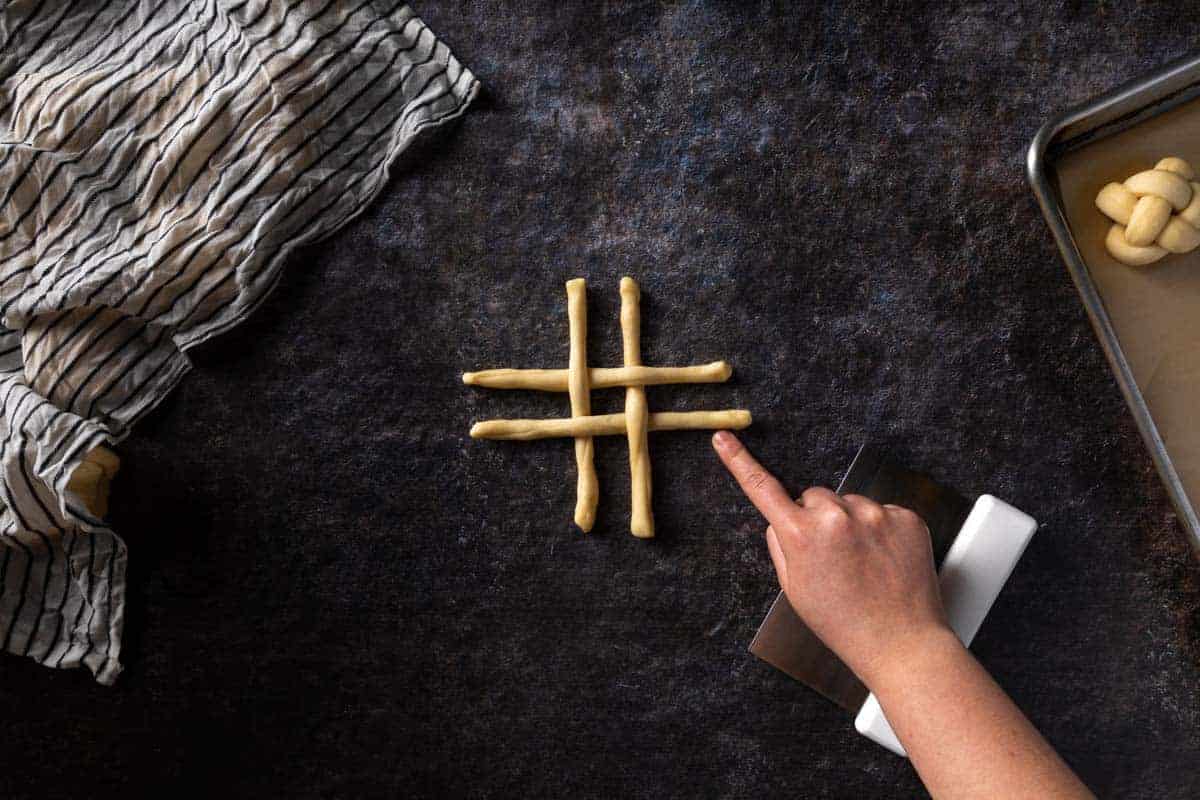
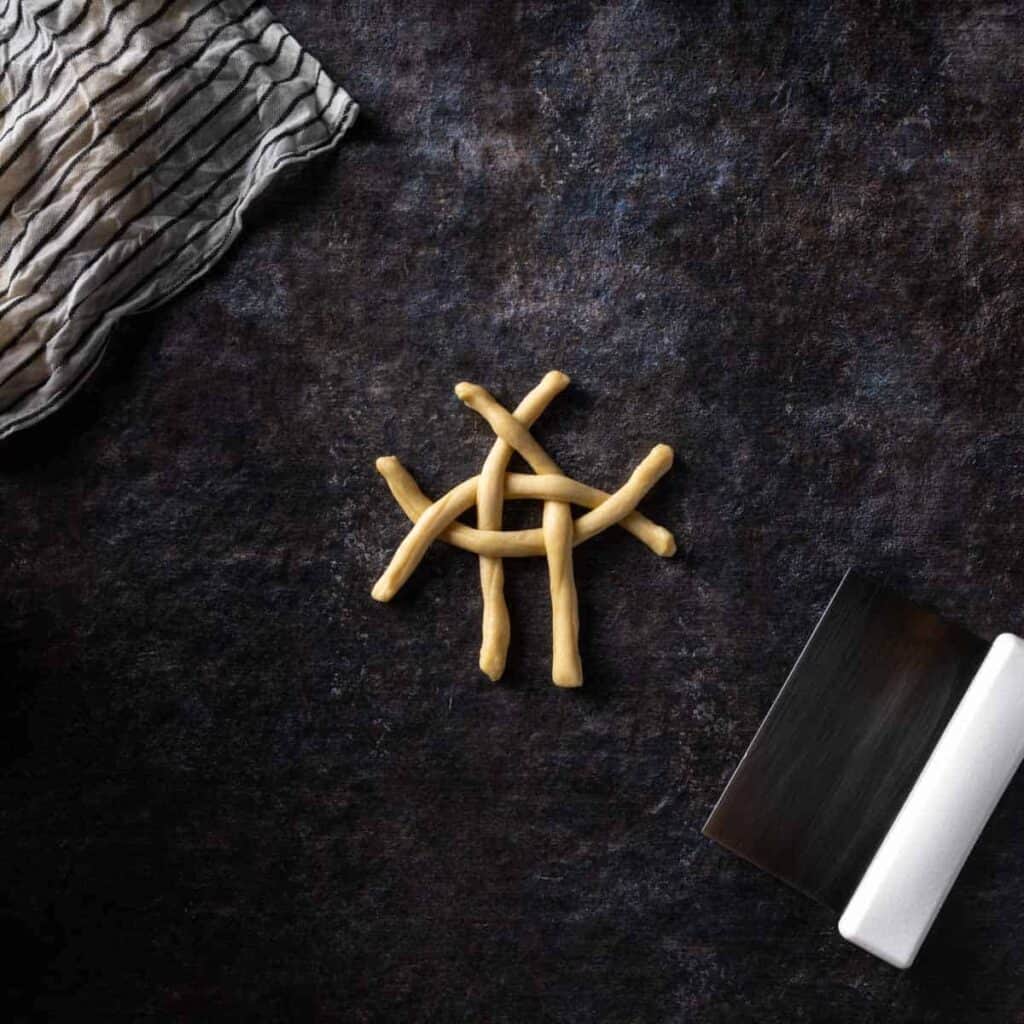
6. Arrange the strands in a hashtag or grid pattern so that two parallel strands are horizontal and two parallel strands are laid on top, vertically. The strands should cross perpendicularly in their center.
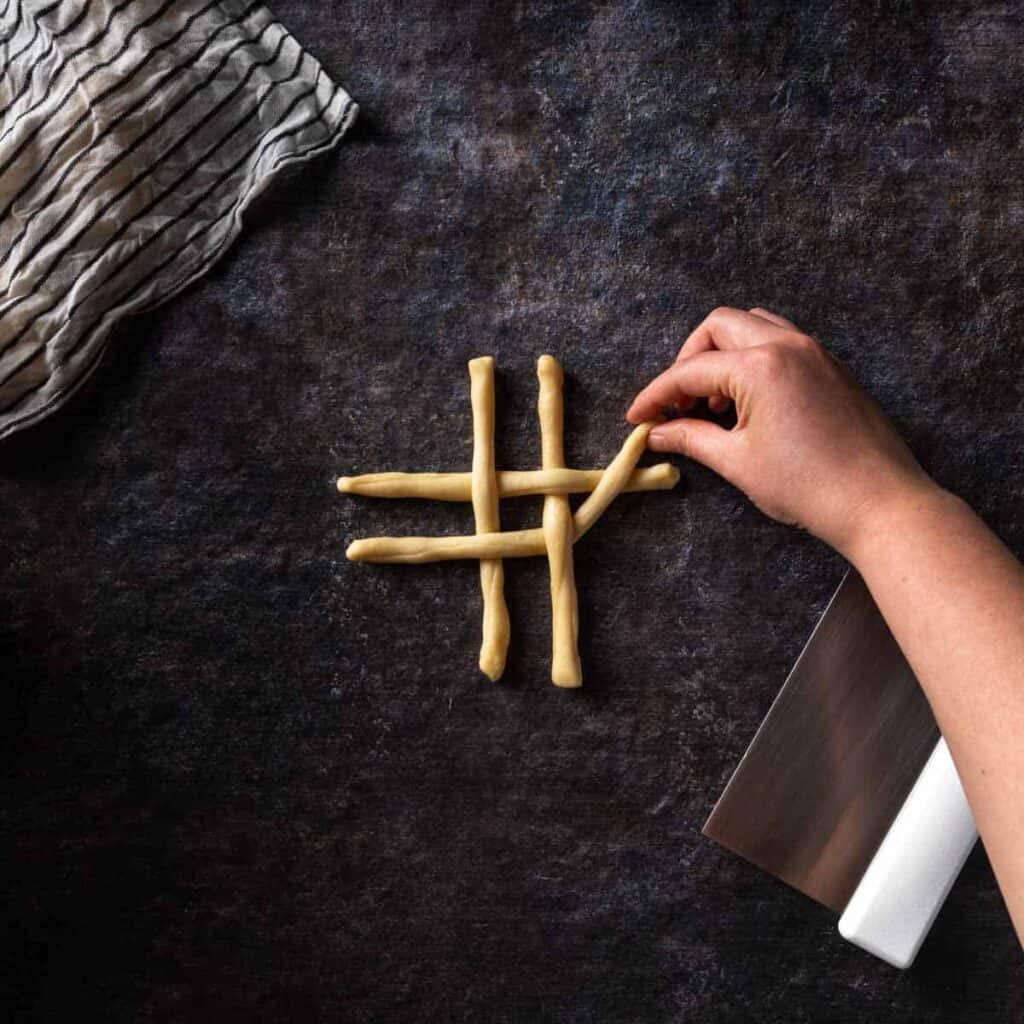
7. Now, arrange the strands so they create a lattice pattern. To do this, cross the vertical strand on the left underneath the LOWER horizontal piece. Then, cross the vertical piece on the right underneath the UPPER horizontal piece. Keep an inch, or so, of space between each strand of dough.
8. At this stage, I will refer to the pattern as if it were a compass where North refers to the two strands at the top of the image, East refers to the strands of dough at the right of the image, South refers to the strands at the bottom of the image and West refers to the strands at the left of the image.
At each point of the compass (North, South, East and West) there will be one strand of dough that is going OVER its perpendicular piece and another strand that is going UNDER its perpendicular strand.
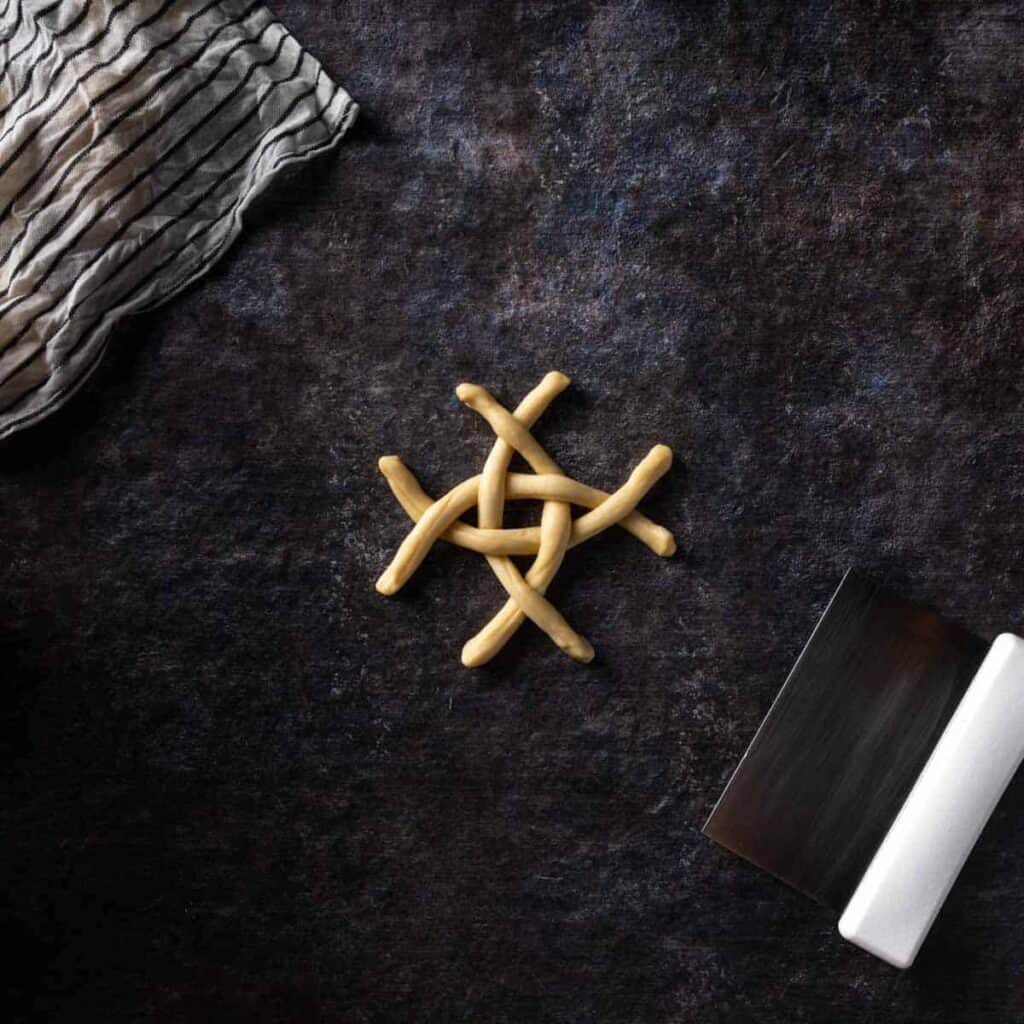
9. Cross the strand going under, OVER its parallel strand on each point of the compass. (Here I am doing East, North & West and finally, South).
10. Your bun should now look like this with X's of dough at each of the North, East, South and West points.
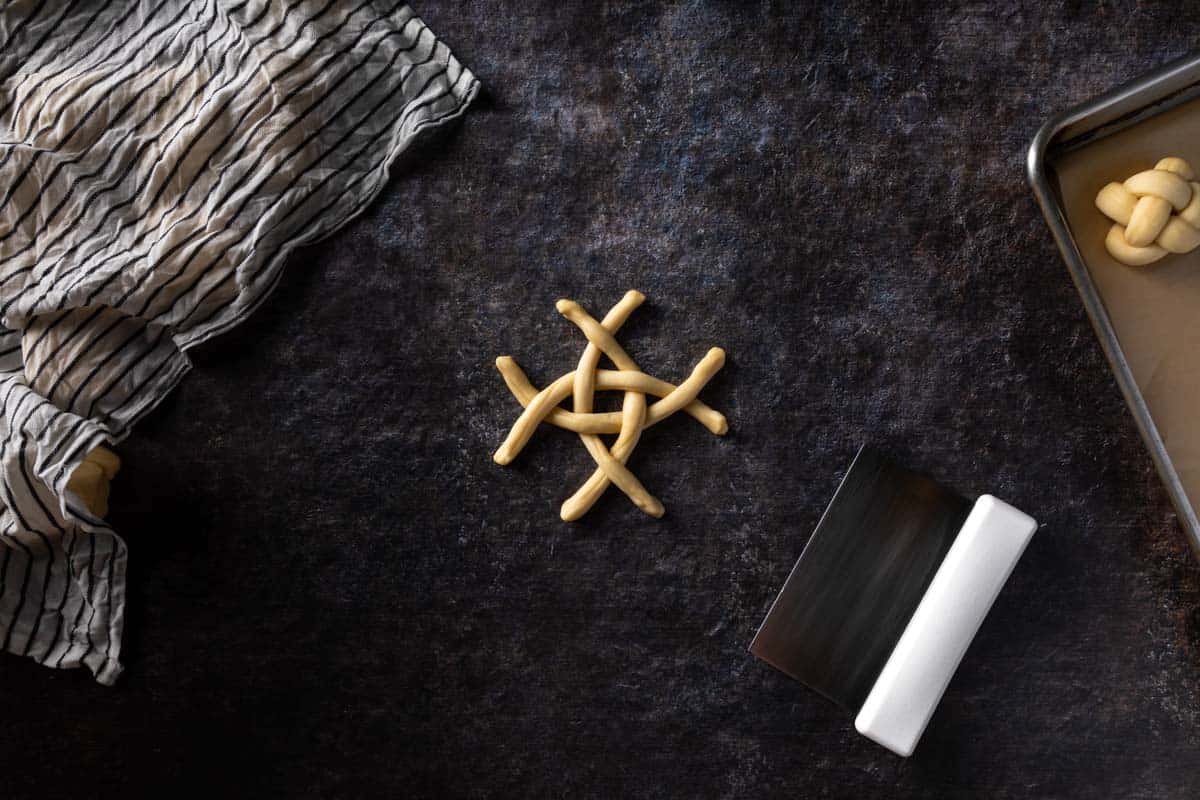
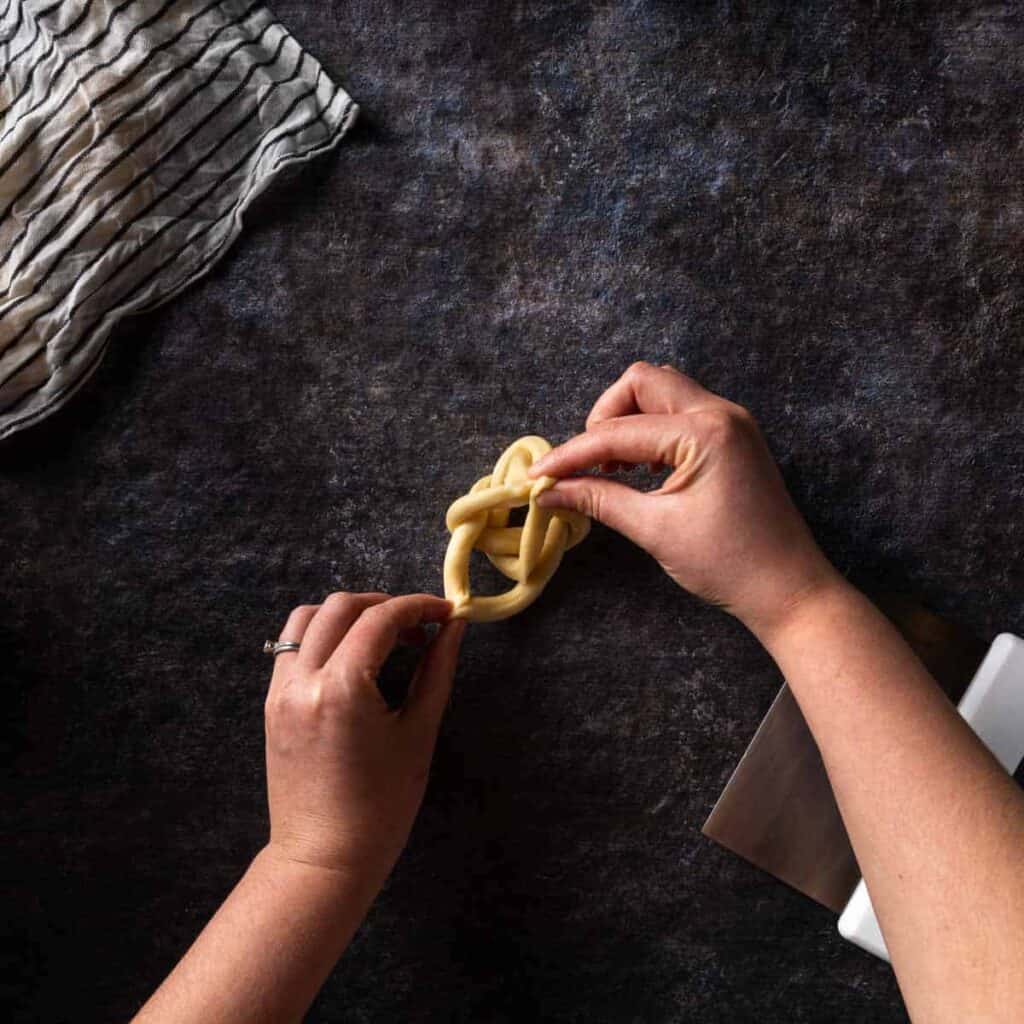
11. Next you will join strands of dough together to connect the bun. Start by pinching the closest strands of the North and East sides together.
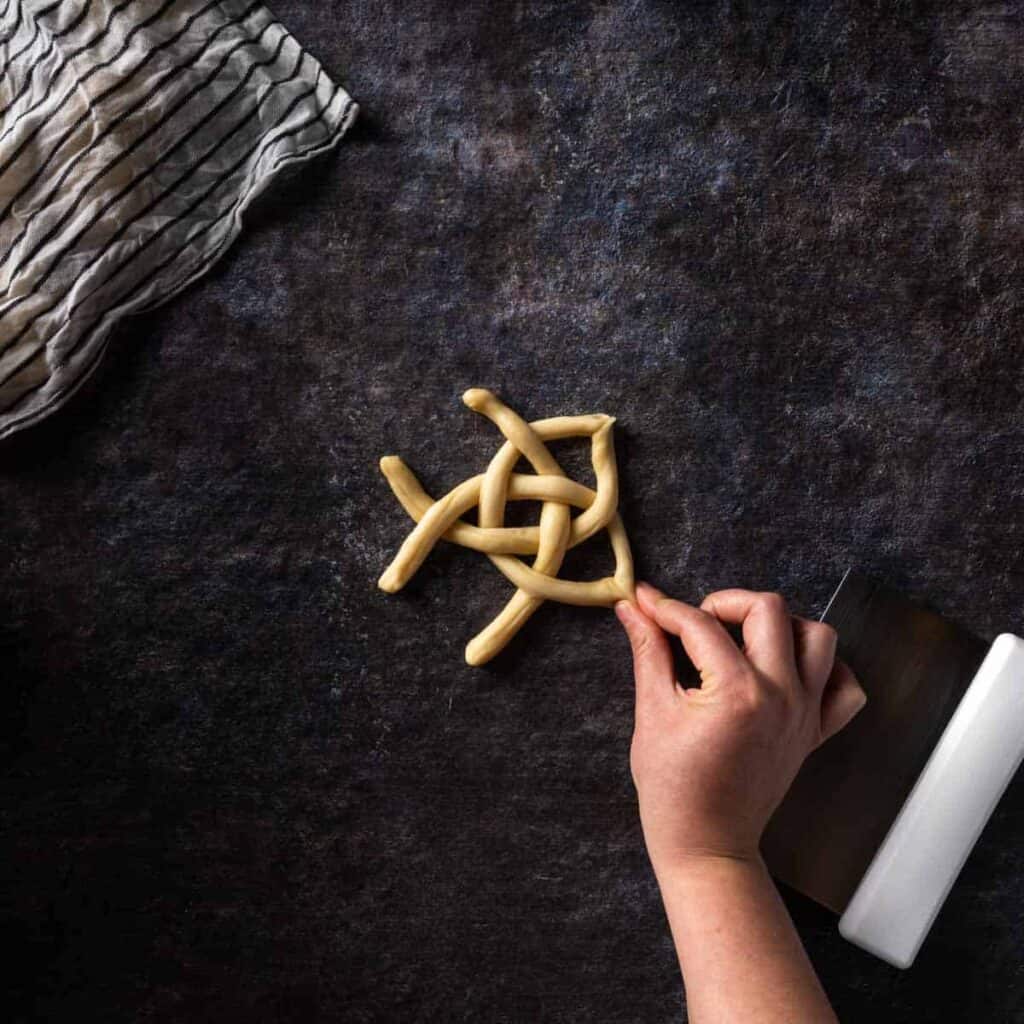
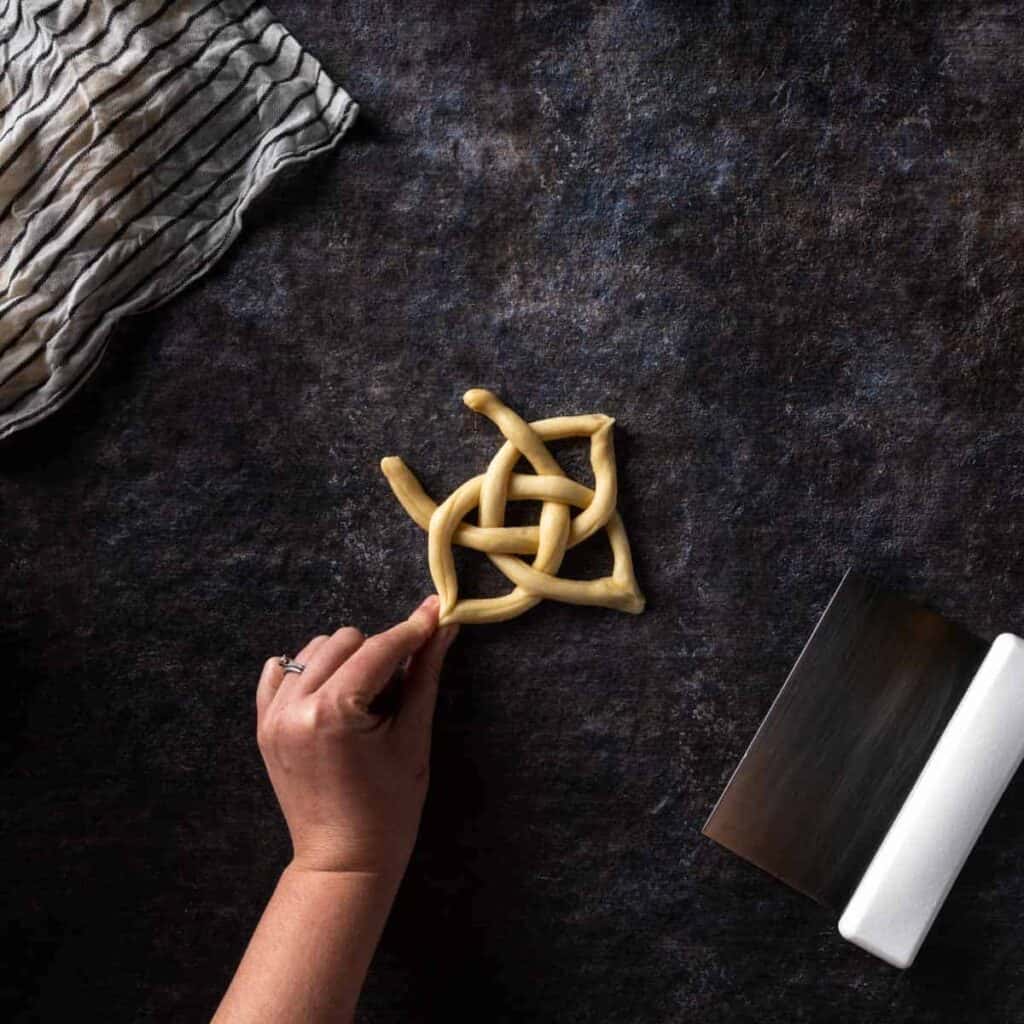
Then continue around the bun by joining the closest strands of the East and South sides together. Then the South and West sides and finally the West and North sides. All of the strands should be pinched together at one end.
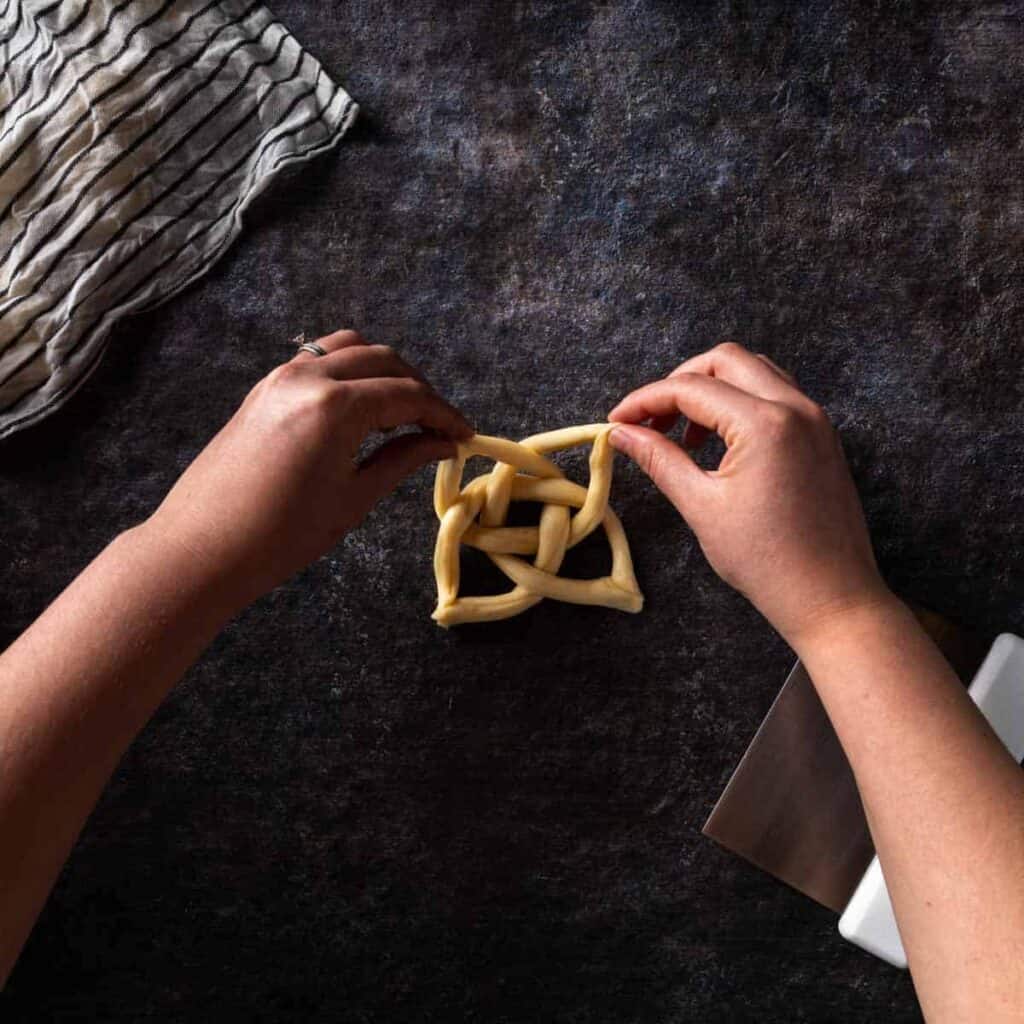
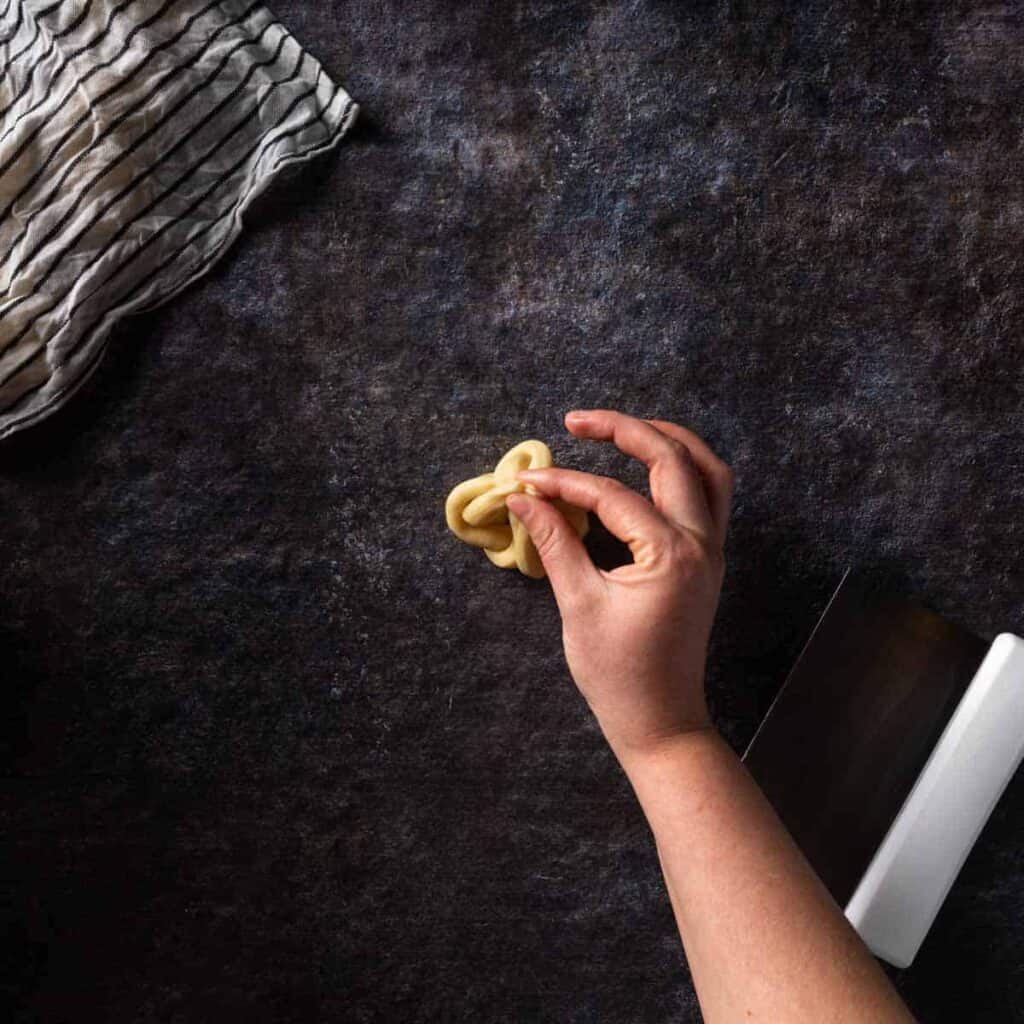
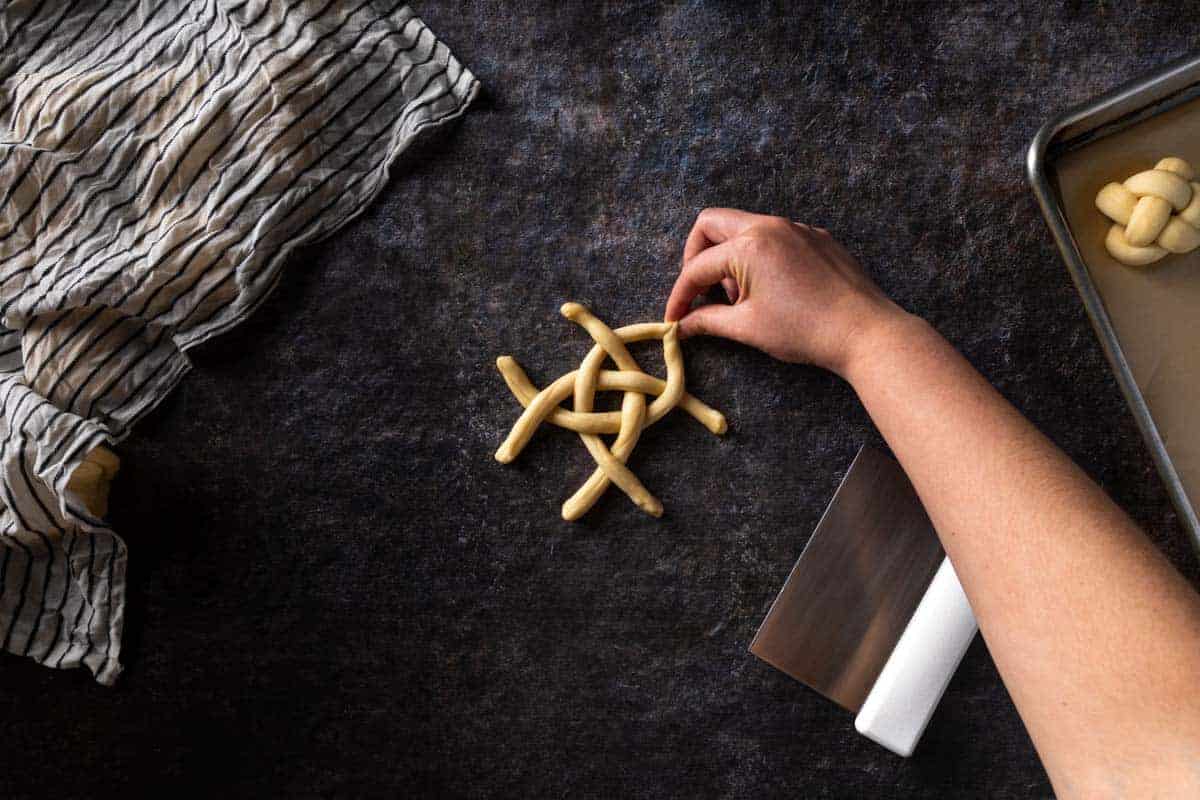
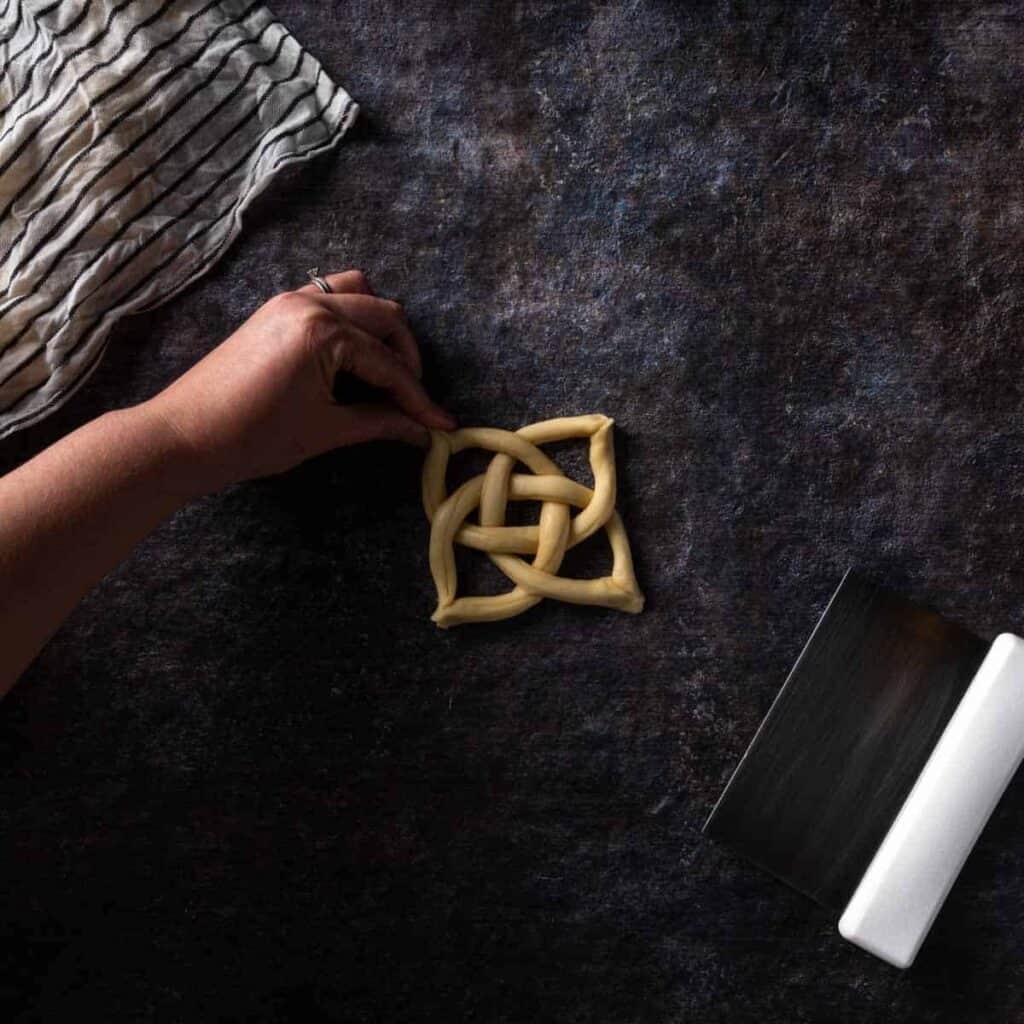
12. Next, gather all of the pinched ends of dough together. Pinch the ends to connect the roll.
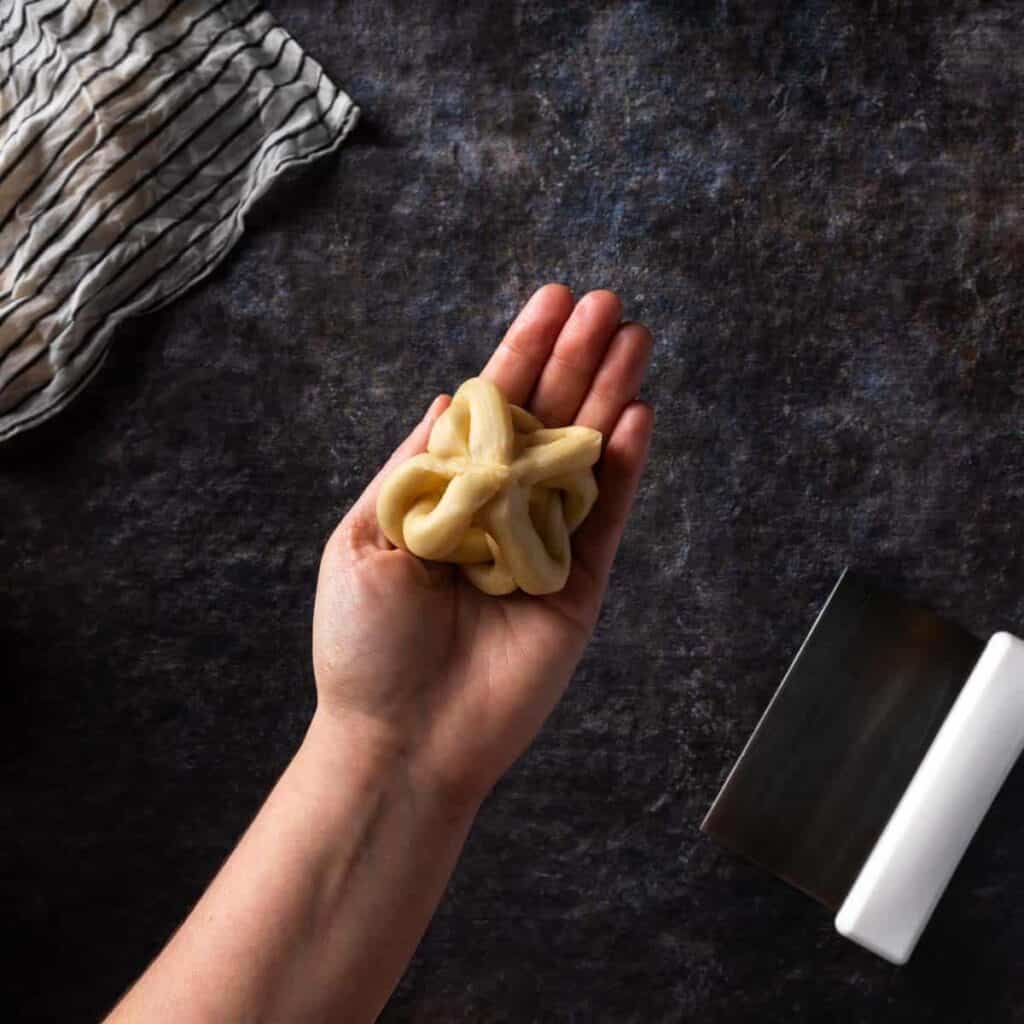
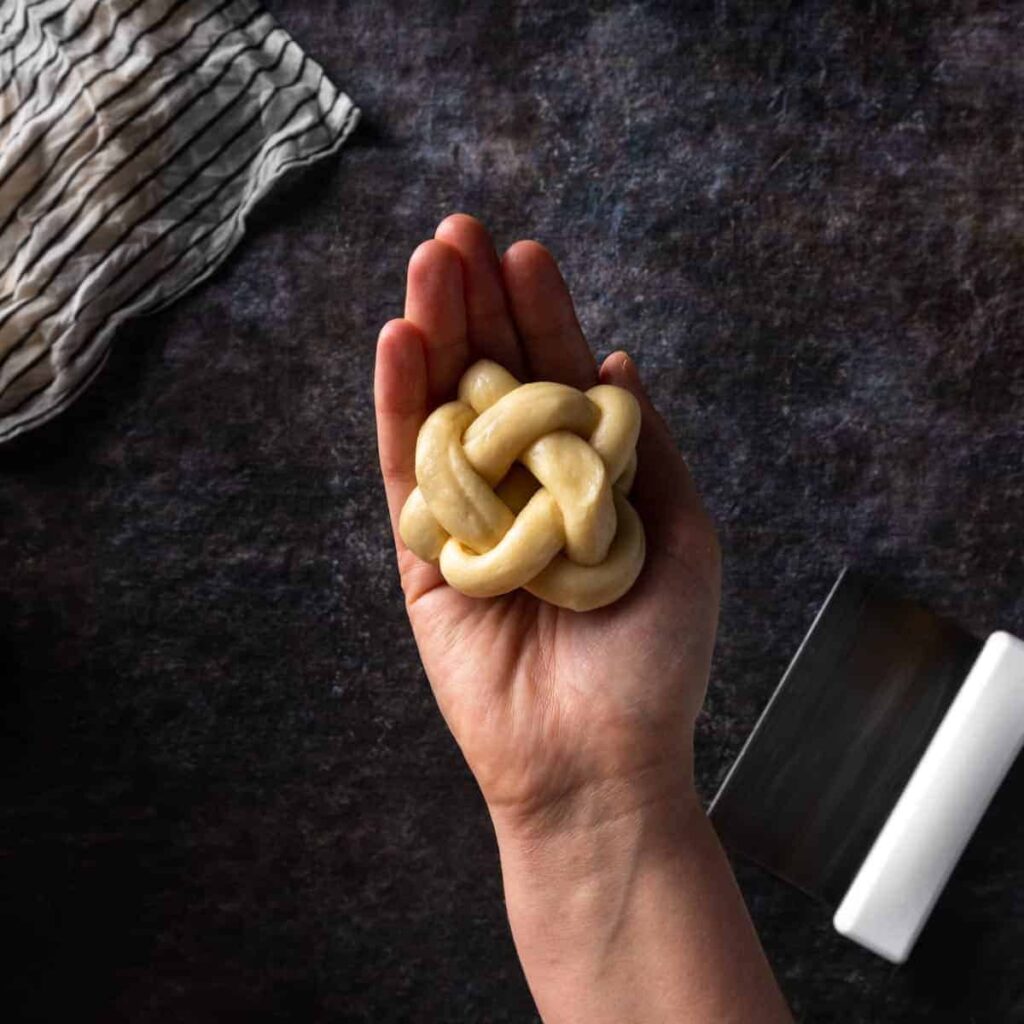
13. Finally, flip the Braided Challah Bun over so that the pinched ends are at the bottom of the roll. Place the shaped bun onto a prepared baking sheet lined with parchment paper.
The buns should be loose and still have space between each strand of dough. This space will be filled as the dough rises and create a plump roll. Proceed with the remaining pieces of dough.
Tips & Tricks For Holler Worthy Challah
- Mix dough with room temperature eggs. Don't let cold eggs bring down the temperature of your dough and further extend the long proofing time! If needed, place whole eggs in a bowl of warm water for 5 minutes before cracking and mixing dough.
- Don't rush the proof! This bread recipe takes time to develop that rich flavor and tender crumb. For the best results, don't rush it!
- Egg wash the braided challah buns twice! For shiny-all-over challah buns egg wash the buns twice! Once, before baking and a second time about 10 - 12 minutes into the bake. Once the buns have their initial puff in the oven, some unwashed creases will appear in the buns cracks. Quickly remove them from the oven and lacquer with a little additional egg wash. This is also the perfect time to add a sprinkle of sesame or poppy seeds!
- Bake buns on two stacked baking sheets. To avoid overly burnt and crispy bottoms, I like to bake these buns on two stacked baking sheets. The extra baking tray adds insulation that keeps the bottoms of these buns pillowy soft.
- Bake the challah rolls to an internal temperature of 190 degrees Fahrenheit. No doughy centers or dried out bread rolls! We use this instant read thermometer.
- Serve warm with lots of butter! (Unless you are kosher!) Like all good dinner rolls, these Braided Challah Buns are best warm from the oven with a schmear of butter and a sprinkle of salt! They're also delicious at breakfast time with a little jam!
Frequently Asked Questions
Challah bread is an enriched dough made with eggs and oil. Similar to brioche, challah is a rich flavorful bread that is soft, shiny and slightly sweet.
Challah bread is ceremonial food with symbolic significance in the Jewish religion and culture. Some loaves are baked to symbolize biblical references while others see the braided strands as representations of hugging arms, love and community. Round loaves of challah with no beggining or end (like these buns) represent continuity and are often enjoyed on Rosh Hashanah, the Jewish New Year.
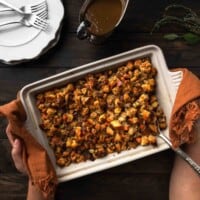
These braided challah buns are the perfect addition to any home-cooked meal. These buns are great with turkey dinners, beef brisket, lamb roasts and more. Serve buns with lots of soft butter, as a slider roll, or as a breakfast bun with honey or jam.
While brioche and challah breads are similar in taste and texture, brioche bread is made with butter while challah bread is made with oil.
Yes! By itself, challah bread is kosher.
Make sure to use egg wash made with only eggs and water (no dairy) to keep it kosher. Also, skip the butter!
No, of course not! Challah bread is traditionally braided but your buns don't have to be. These rolls are just as delicious when shaped into rounds or simply knotted.
Yes! Challah buns freeze very well! Simply keep them in a freezer safe bag for up to 3 months. When ready to enjoy, thaw buns for 30 - 45 seconds in the microwave or for several minutes in a warm oven.
Recipe
Braided Challah Bun Recipe
ADJUST SERVINGS
Special Equipment
- Stand Mixer with the Dough Hook Attachment (Optional)
- Bench Scraper
- Kitchen Scale (Optional but recommended)
- Pastry Brush
Ingredients
- ¾ Cup warm water (about 105° Fahrenheit/ 40° celsius), plus more, as needed
- 2 Tablespoons honey
- 2¼ teaspoons active dry yeast (1 packet)
- ¼ Cup vegetable or grapeseed oil plus more for oiling bowl
- 2 whole large eggs room-temperature
- 2 large egg yolks room-temperature
- 4 Cups bread flour
- 1½ Tablespoons fine kosher salt*
- Egg Wash (1 egg whisked with a splash water)
- 2 Tablespoons sesame or poppy seeds optional
Instructions
- Gather, measure and prepare the Braided Challah Buns ingredients as listed. For the most consistent results, we recommend using metric weight measurements whenever possible. To view metric measurements, toggle the US Customary/Metric switch at the top of this recipe card.
- In a small mixing bowl or measuring cup, combine warm water, honey and yeast. Stir to dissolve and set aside to bloom (hydrate).
- In another small vessel, combine oil, whole eggs and egg yolks. Whisk to combine. Set aside.
- In the bowl of a stand mixer fitted with the dough hook (or large mixing bowl) combine bread flour and salt. Whisk to combine. On the lowest speed (or with a wooden spoon) stir in yeast mixture and egg mixture. Mix until a shaggy dough forms. (If very dry, an additional Tablespoon of warm water can be added.)
- Increase speed to medium (or knead on a floured work surface) for 2 - 3 minutes or until a smooth elastic dough forms. Knead dough into a round ball. Transfer dough into an oiled bowl and cover with a damp kitchen towel (or plastic wrap). Allow dough to proof in a warm area for about 90 minutes or until dough has nearly doubled in size.
- Transfer dough to a clean work surface. Do not flour the surface. Punch down dough to deflate. Use a kitchen scale and a bench scraper to divide dough into 16 equal 2 ounce (56 gram) pieces. Shape one piece of dough at a time, keeping the remaining pieces covered with a damp kitchen towel (or plastic wrap).
- To shape each bun, divide each piece of dough into 4 equal pieces. See the step-by-step photos in the post text for a visual demonstration. Roll each fourth of dough into a thin rope that is 6 - 7 inches ( 15 - 18 centimeters) long. Arrange each strand of dough in a grid pattern with two vertical pieces and two horizontal pieces. Follow the photo instructions complete a round 4 strand braid. Set braided buns, seam side down, on a parchment lined baking sheet. Repeat braiding process with remaining pieces of dough.
- Cover the braided buns with a damp kitchen towel (or plastic wrap) and place in a warm space for 2 - 2½ hours or until the buns are fully proofed and the dough does not spring back when gently poked. During this proofing time, arrange a rack in the center third of the oven and preheat to 375° Fahrenheit (190° celsius).
- When ready to bake, use a pastry brush to gently apply egg wash all over the buns exposed surface. I recommend stacking your baking sheet on a second baking sheet to help prevent over cooking the bottom of the buns. Bake buns for 10 - 12 minutes. Then, working quickly, remove buns from oven and glaze with a second layer of egg wash. Be sure to brush egg wash onto the breads braided seams that have puffed up in the oven. Sprinkle each bun with sesame or poppy seeds, if using, while egg wash is still wet.Rotate pan and return to oven to finish baking for an additional 10 - 12 minutes or until buns are glossy, golden brown and reach an internal temperature or 190° Fahrenheit (88° celsius).
- Serve rolls warm with lots of soft butter and other comfort foods! Enjoy!
Notes
* A Note About Salt
Unless otherwise noted, all recipes on The Sage Apron are developed using Diamond Crystal Kosher salt. It is a great all-purpose salt for cooking and baking. If using table salt, reduce quantities by about half.


Jeff says
Excellent challah recipe!. I only divided the dough into 8 portions (and was too lazy to braid, so I just formed the dough into rolls), which gave me 8 very large (and tall) challah rolls, which I used for veggie burgers. The rolls were soooooo good, with a perfect soft, chewy texture and great taste.
This will be my go-to recipe for challah, thanks!
foodworthfeed says
Ooo challah rolls for veggie burgers sounds fabulous! Thank you for leaving a comment and sharing your variations. We're so glad you liked this recipe! 🙂
Nina says
I made these yesterday for the first time ever. Thanks to your very clear instructions, they were surprisingly easy to make. The dough came together really well and was great to work with. Nice crumb, beautiful gloss from the egg wash.
For the buns that don't get eaten immediately, 10-15 seconds in the microwave softens them right up.
foodworthfeed says
Nina, we are so happy you liked the buns! They are a staple for us around the holiday season. Thank you so much for leaving us a kind and insightful comment - you made our day! 🙂 Happy baking.
Lily says
Nice instructions.
Taylor says
Wonderful recipe! They come out beautifully every time! Only downside is they don’t last long in a hungry house and you’re always back to make more! Thank you for sharing!
Anand V. Patel says
Was fun to make! Great instructions! I wish I had read the salt comment though. I used sea salt and it came out a bit too salty. Will cut in half next time. This was my second bread bake as I am new to baking and I loved it. Thanks again!
The Sage Apron says
This is an ambitious second bake! I’m glad you had fun and enjoyed the recipe! Thank you for the nice comment, it makes my day!
🙂 - Taylor
mik says
I've made challah before using other recipes, and I've had tons of success. I couldn't find my regular recipe, so I decided to try this one.
What an epic fail. I followed all the directions perfectly. These turned out like flat white bread rolls.
Terrible. Waste of ingredients. Never again.
The Sage Apron says
Hi Mik, I’m sorry that this recipe was a fail for you. This recipe has been tested dozens of times and has been highly rated by my other readers. (4.9 stars before it hit your kitchen!) I think if you compare this recipe to other challah recipes, you’ll find that it is pretty consistent with the traditional preparation. Baking with yeast can be a bit temperamental, especially with an enriched dough, and I admit this recipe is not for beginners. I know how disappointing it is when your results are less desirable and I hope you can feel better now that you have left a bad review on my page. Please know that I am a real girl who spent many, many hours testing, baking, writing, photographing this recipe simply because it is something I love and wanted to share with the world. If I may suggest angrily crumbling these rolls over your trash can - perhaps it would be a bit therapeutic for you.
Best of luck in your pursuit of challah.
- Taylor
Debbie says
these buns look wonderful!! I am going to make them for Easter, can I make them a day ahead up to the second raise, and then put them in the refrigerator over night. then take them out and raise the second time and bake them on Easter?
The Sage Apron says
I’m sorry I didn’t see this yesterday! Yes, that should work fine - just give enough time for the second proof, it is a rich dough that will take a good bit longer to proof from cold.
- Taylor
Mattie says
The recipe was super easy to follow and came out really good. I do think it was on the verge of almost being too salty (I used kosher salt too), but my husband said they are perfect.
The Sage Apron says
Thanks Mattie! You could totally cut down the salt a little bit, next time, if preferred. (But don't omit it!!) I'm glad you enjoyed the recipe - thank you for commenting!